
Overview
Trella CRM can be customized by adding new fields to records, editing existing fields and, in some cases, re-labelling fields to best fit your organization. Account administrators are also able to restrict specific fields from being edited by users.
![]() This article is primarily for account administrators and will describe how to create, edit, or delete objects in Trella CRM.
This article is primarily for account administrators and will describe how to create, edit, or delete objects in Trella CRM.
 Managing Fields - or what happened to "Custom Objects?"
In this article, we will talk about creating, editing, and deleting "fields," not "objects."
![]() You can just press on, or read why in Object or Field?
You can just press on, or read why in Object or Field?
 In this article
- Fields summary
- Creating a new field
- Field Types
- Editing an existing field
- Field Edit Control
- Removing an Field
- Object or Field?
Fields Summary
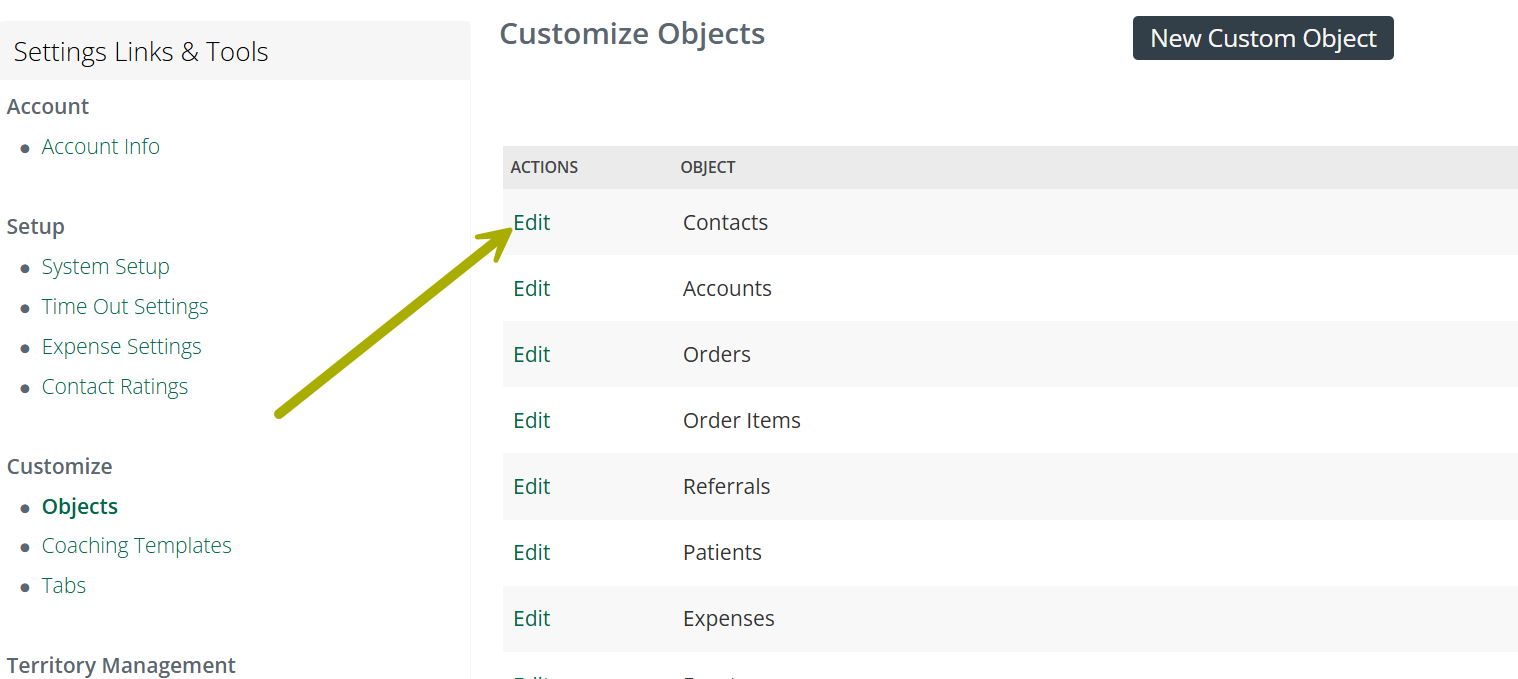
Navigate to the Object management interface
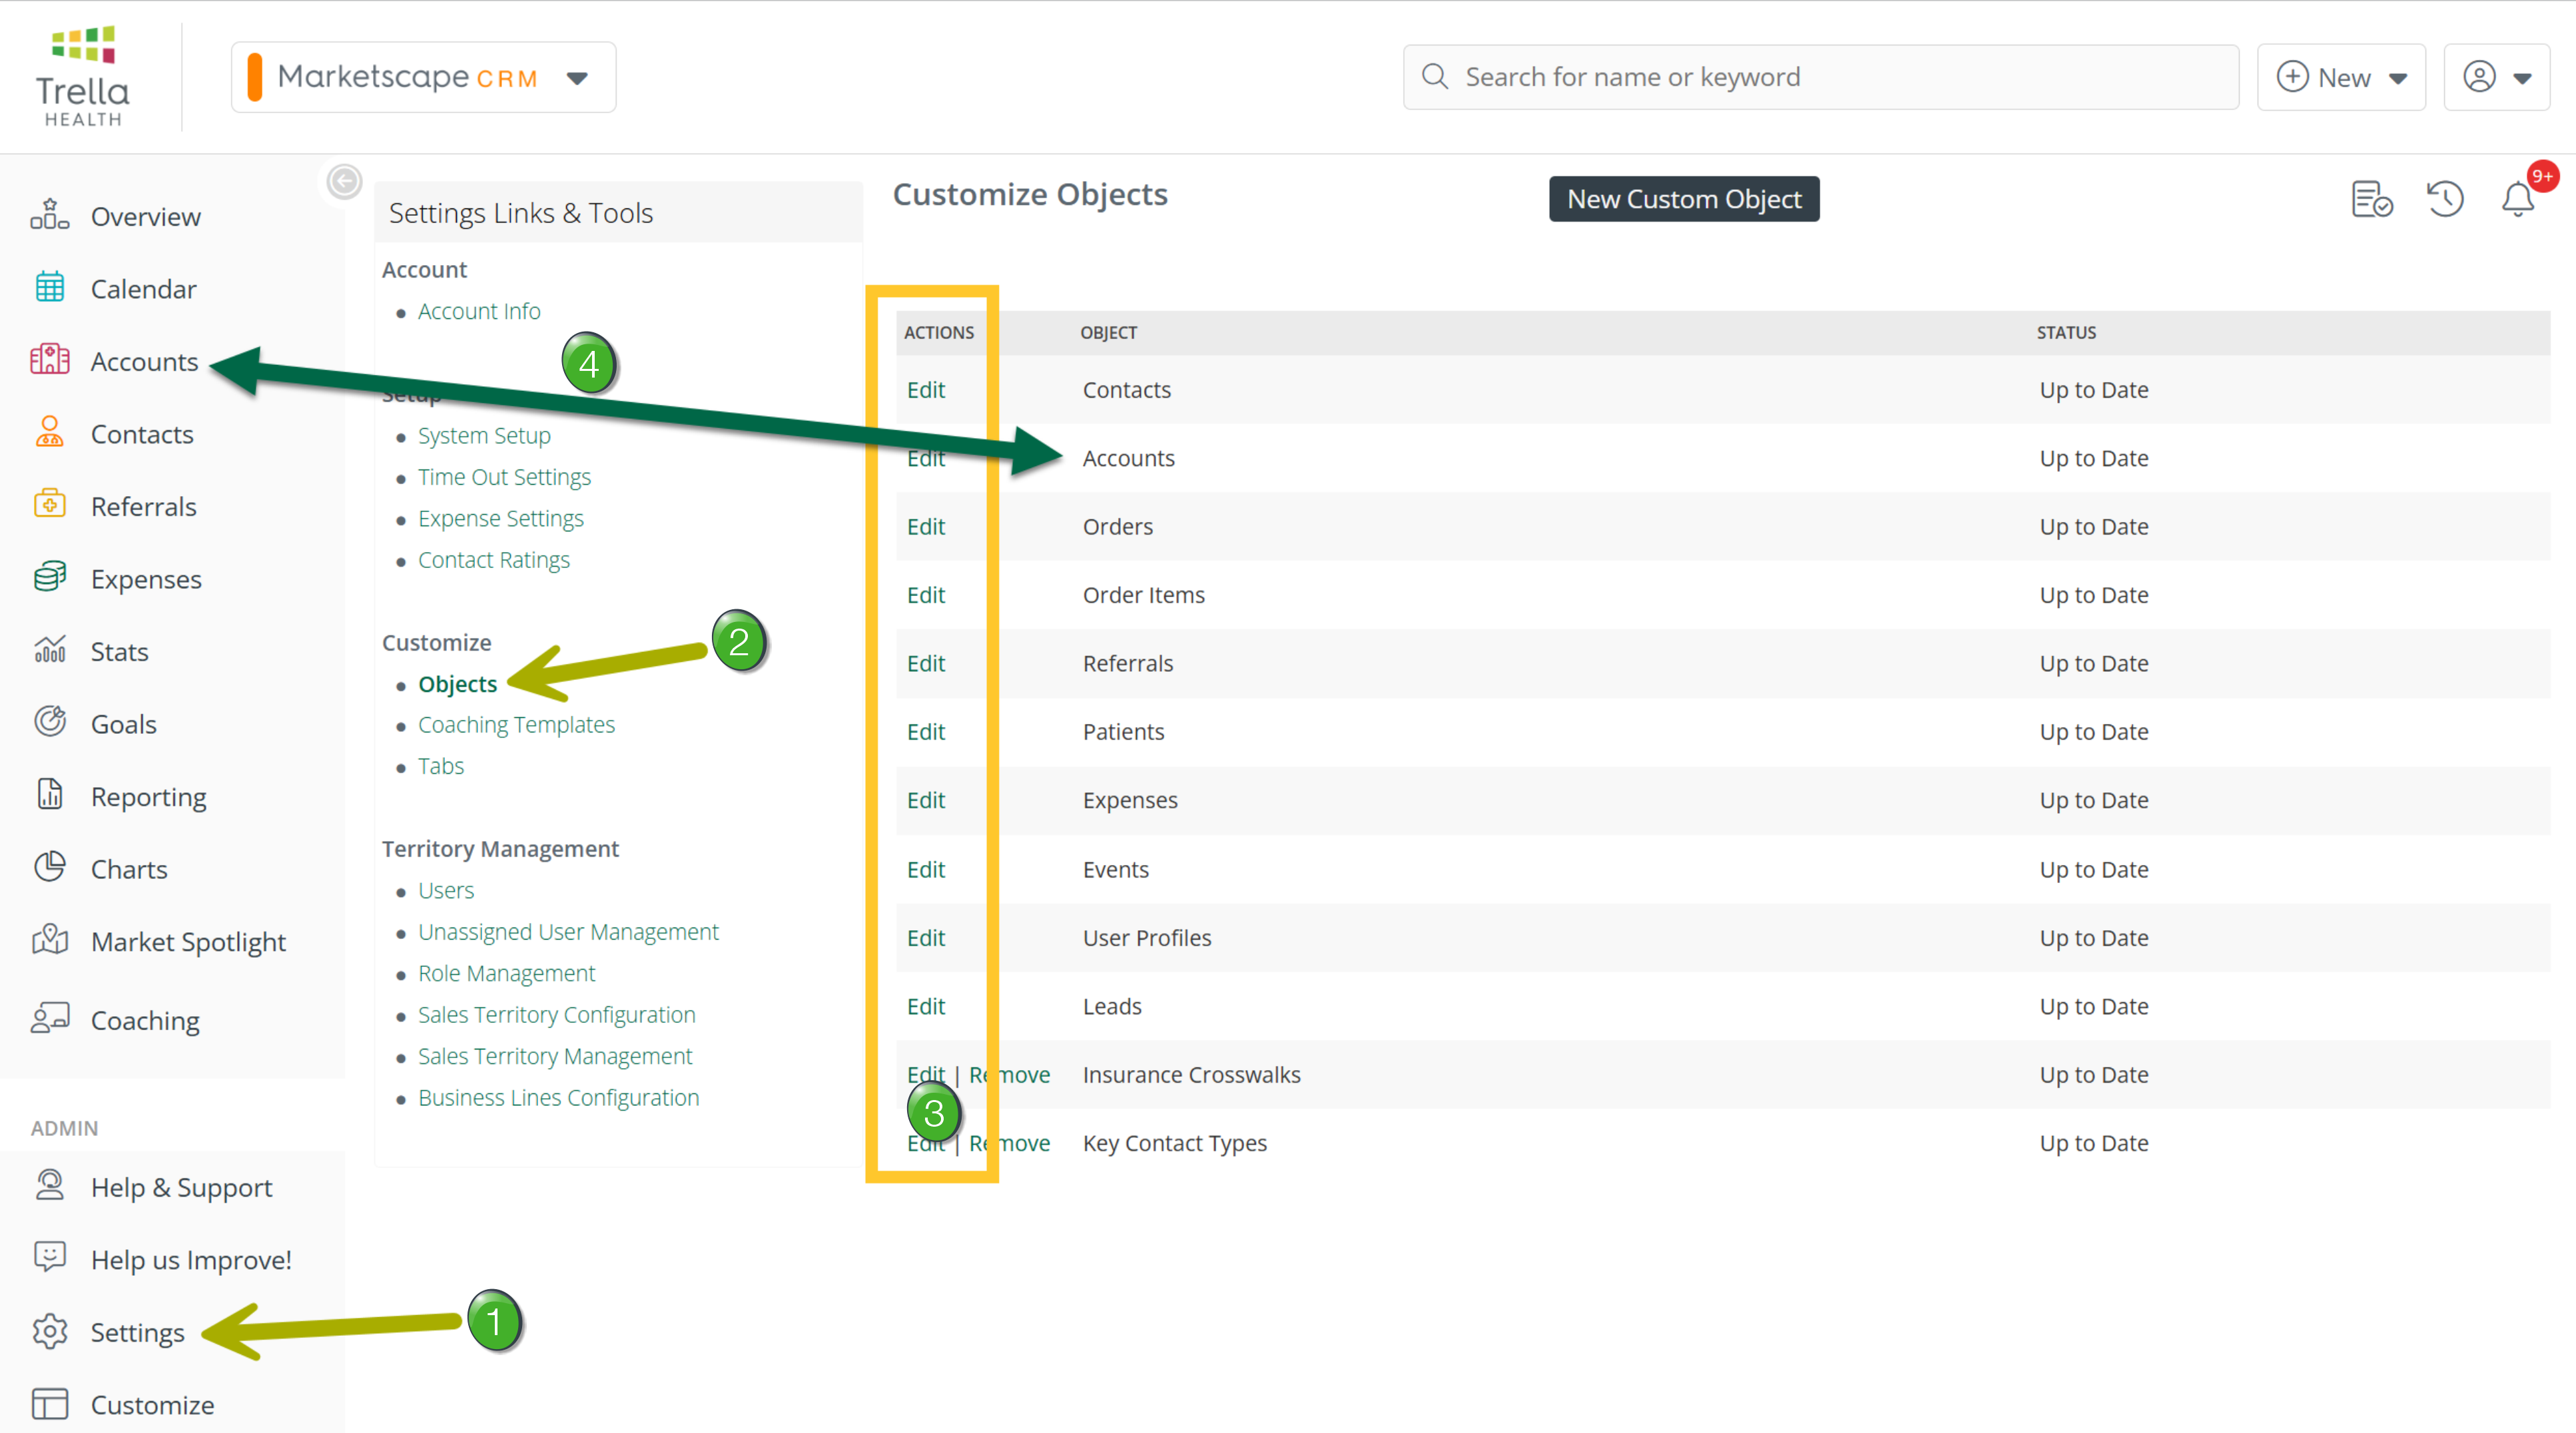
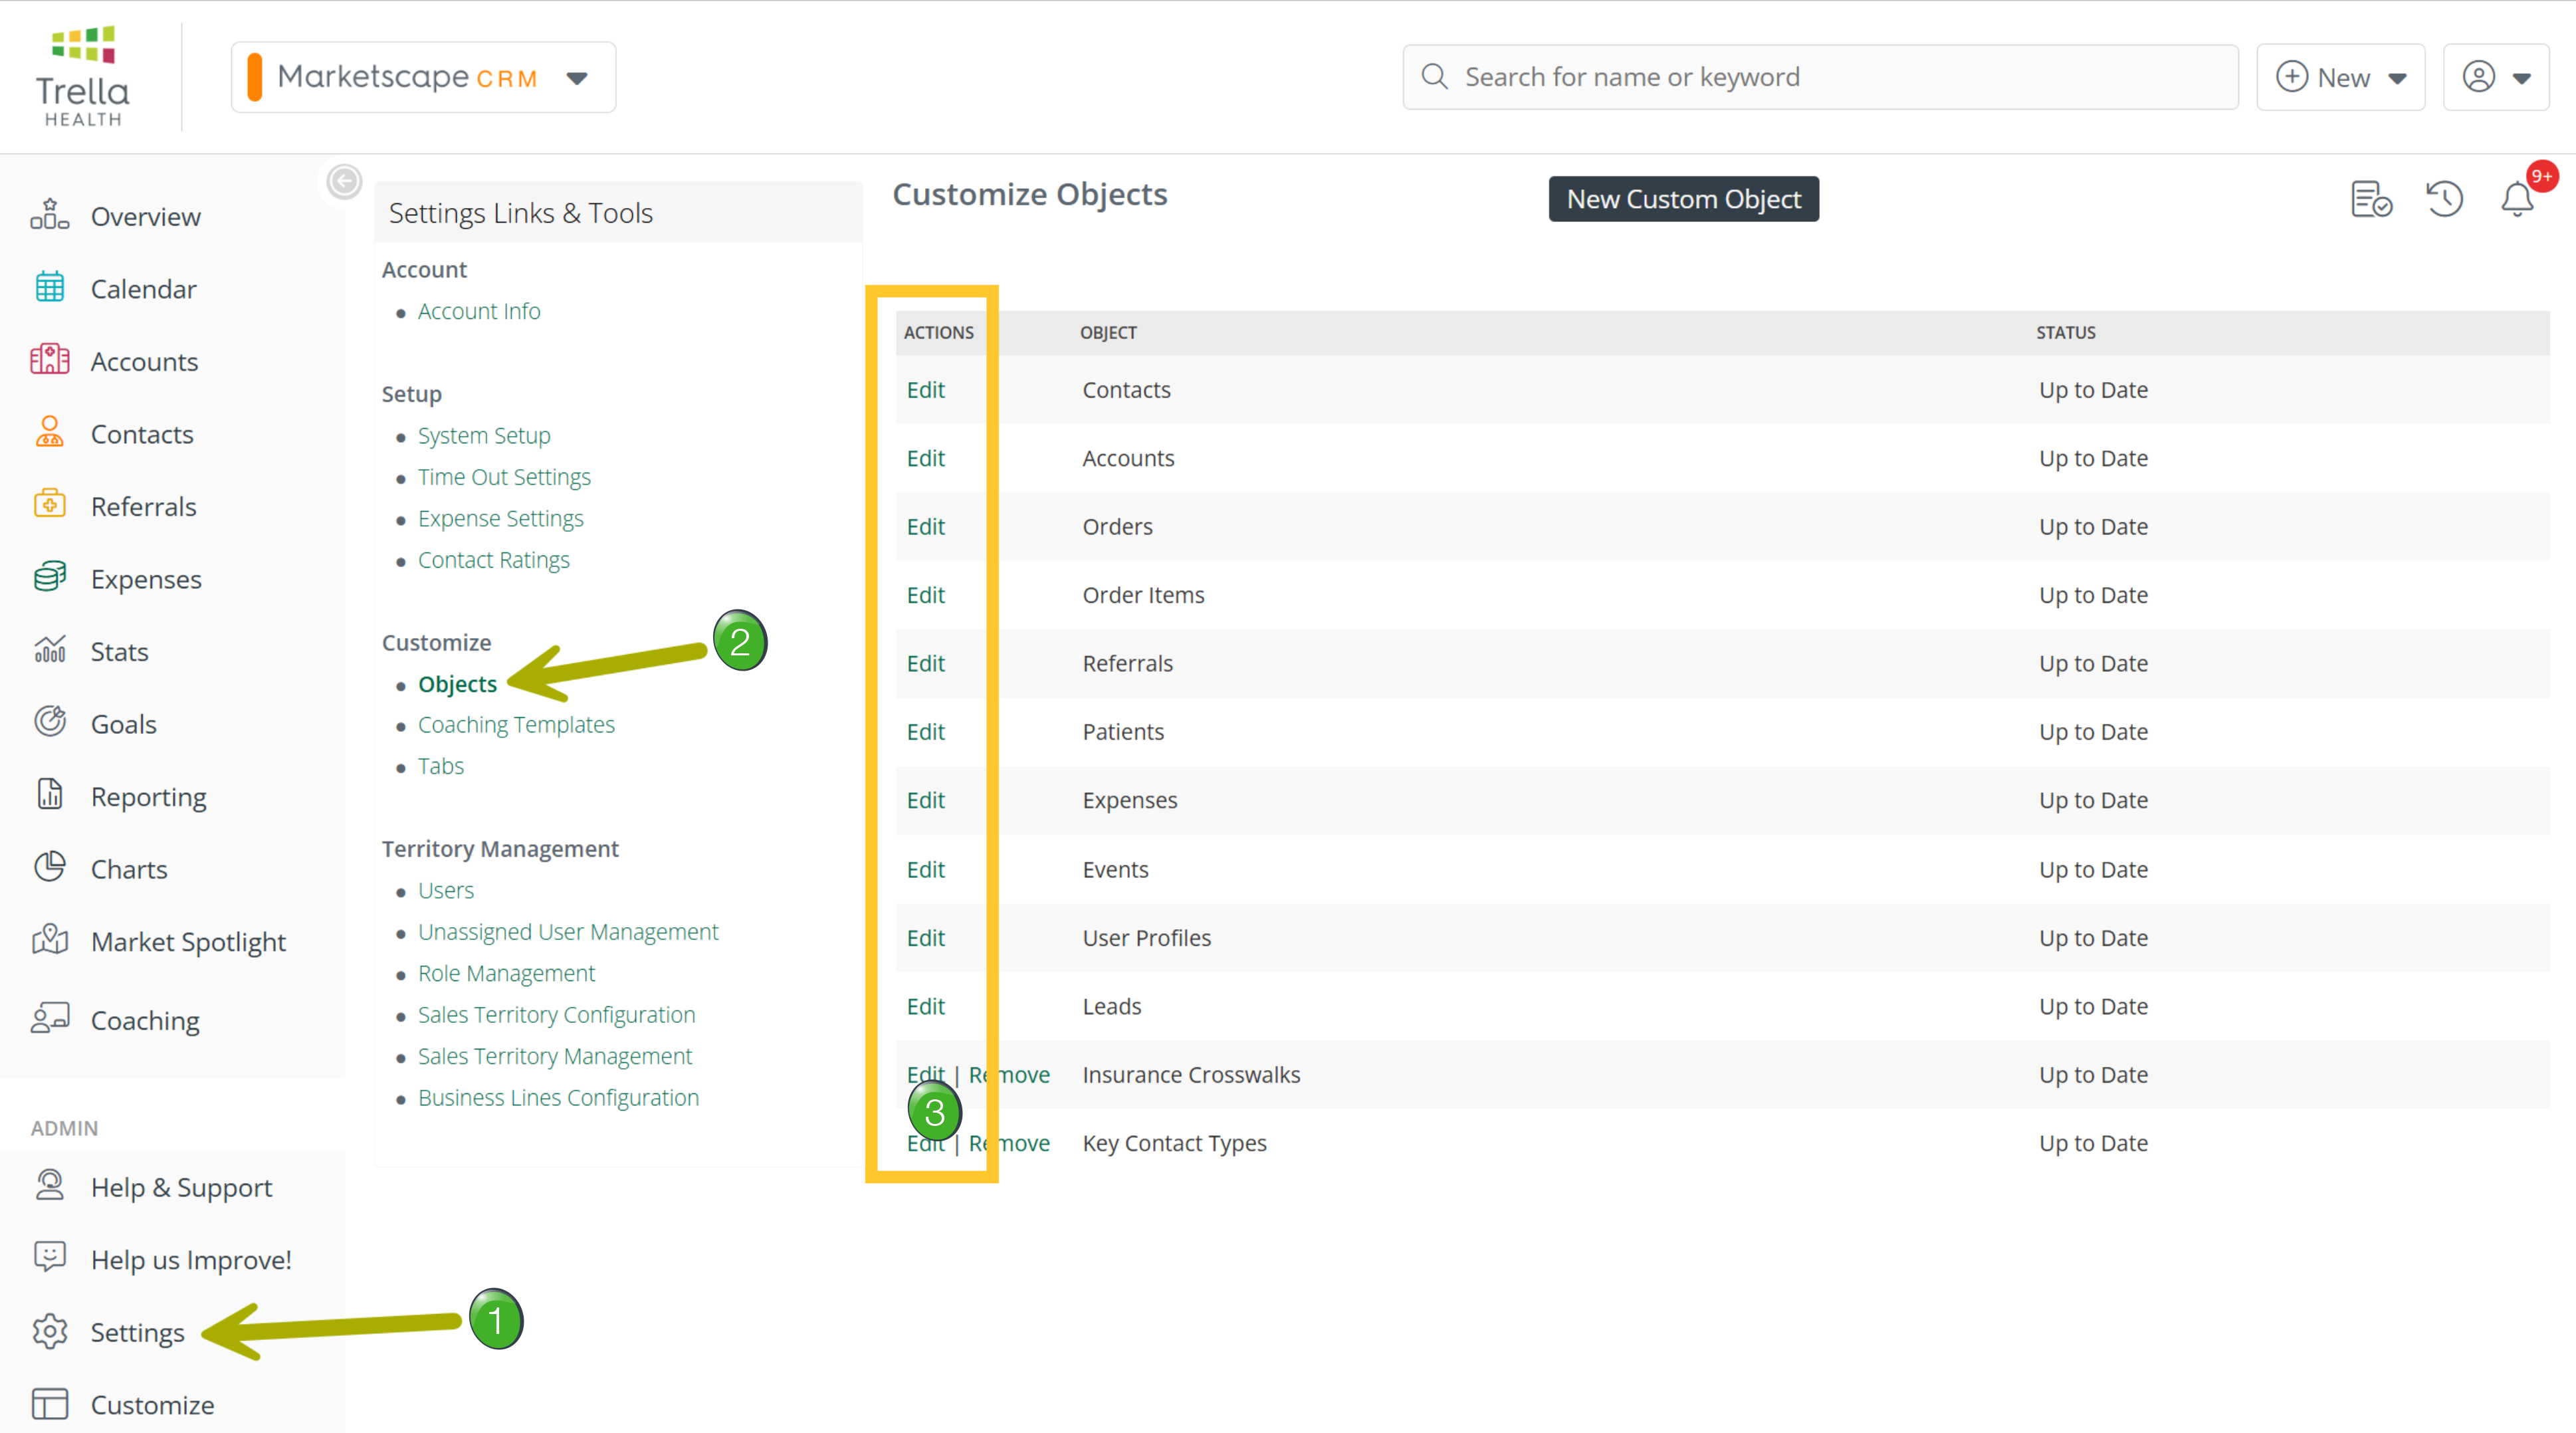
Use the following image to learn how to navigate to the object management interface.
|
|
 |
![]() Click on the "Objects" link under "Customize" under Settings Links & Tools
Click on the "Objects" link under "Customize" under Settings Links & Tools
The Customize Objects page will open revealing the pages for which new objects can be created or existing objects can be added.
![]() Edit - Click the "Edit" link to the left of a listed page to create or edit objects in the listed page.
Edit - Click the "Edit" link to the left of a listed page to create or edit objects in the listed page.
You will click the "Edit" link to create new objects or to edit existing objects.
![]() For details, see Customize Objects/Fields page
For details, see Customize Objects/Fields page
![]() Connections - Notice that the "Objects" that can be edited correspond to the different pages found in the left navigation. Even though the pages listed are under the heading "Objects," it might help to think of this process as managing objects/fields on different pages. If we follow the arrows in the above image as a guide, making changes to the Accounts "Object" is actually making changes to the fields available when we view an account. The examples below will show this.
Connections - Notice that the "Objects" that can be edited correspond to the different pages found in the left navigation. Even though the pages listed are under the heading "Objects," it might help to think of this process as managing objects/fields on different pages. If we follow the arrows in the above image as a guide, making changes to the Accounts "Object" is actually making changes to the fields available when we view an account. The examples below will show this.
Customize Objects/Fields page
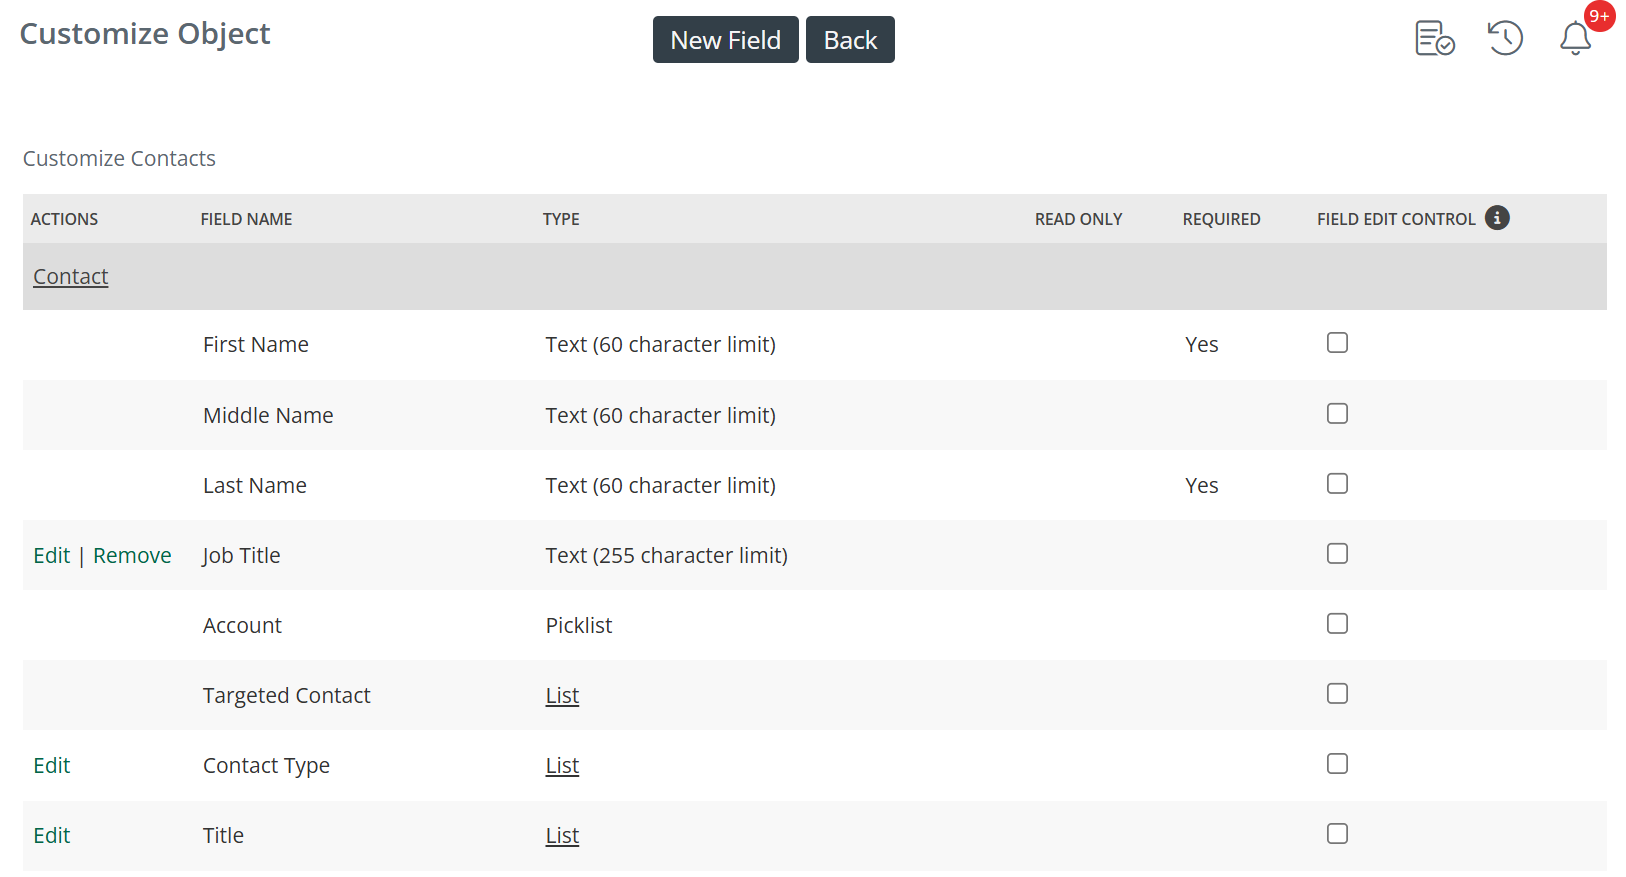
When you click the "Edit" button for any page, a new page opens that allows you to make some changes to the fields on the selected page.
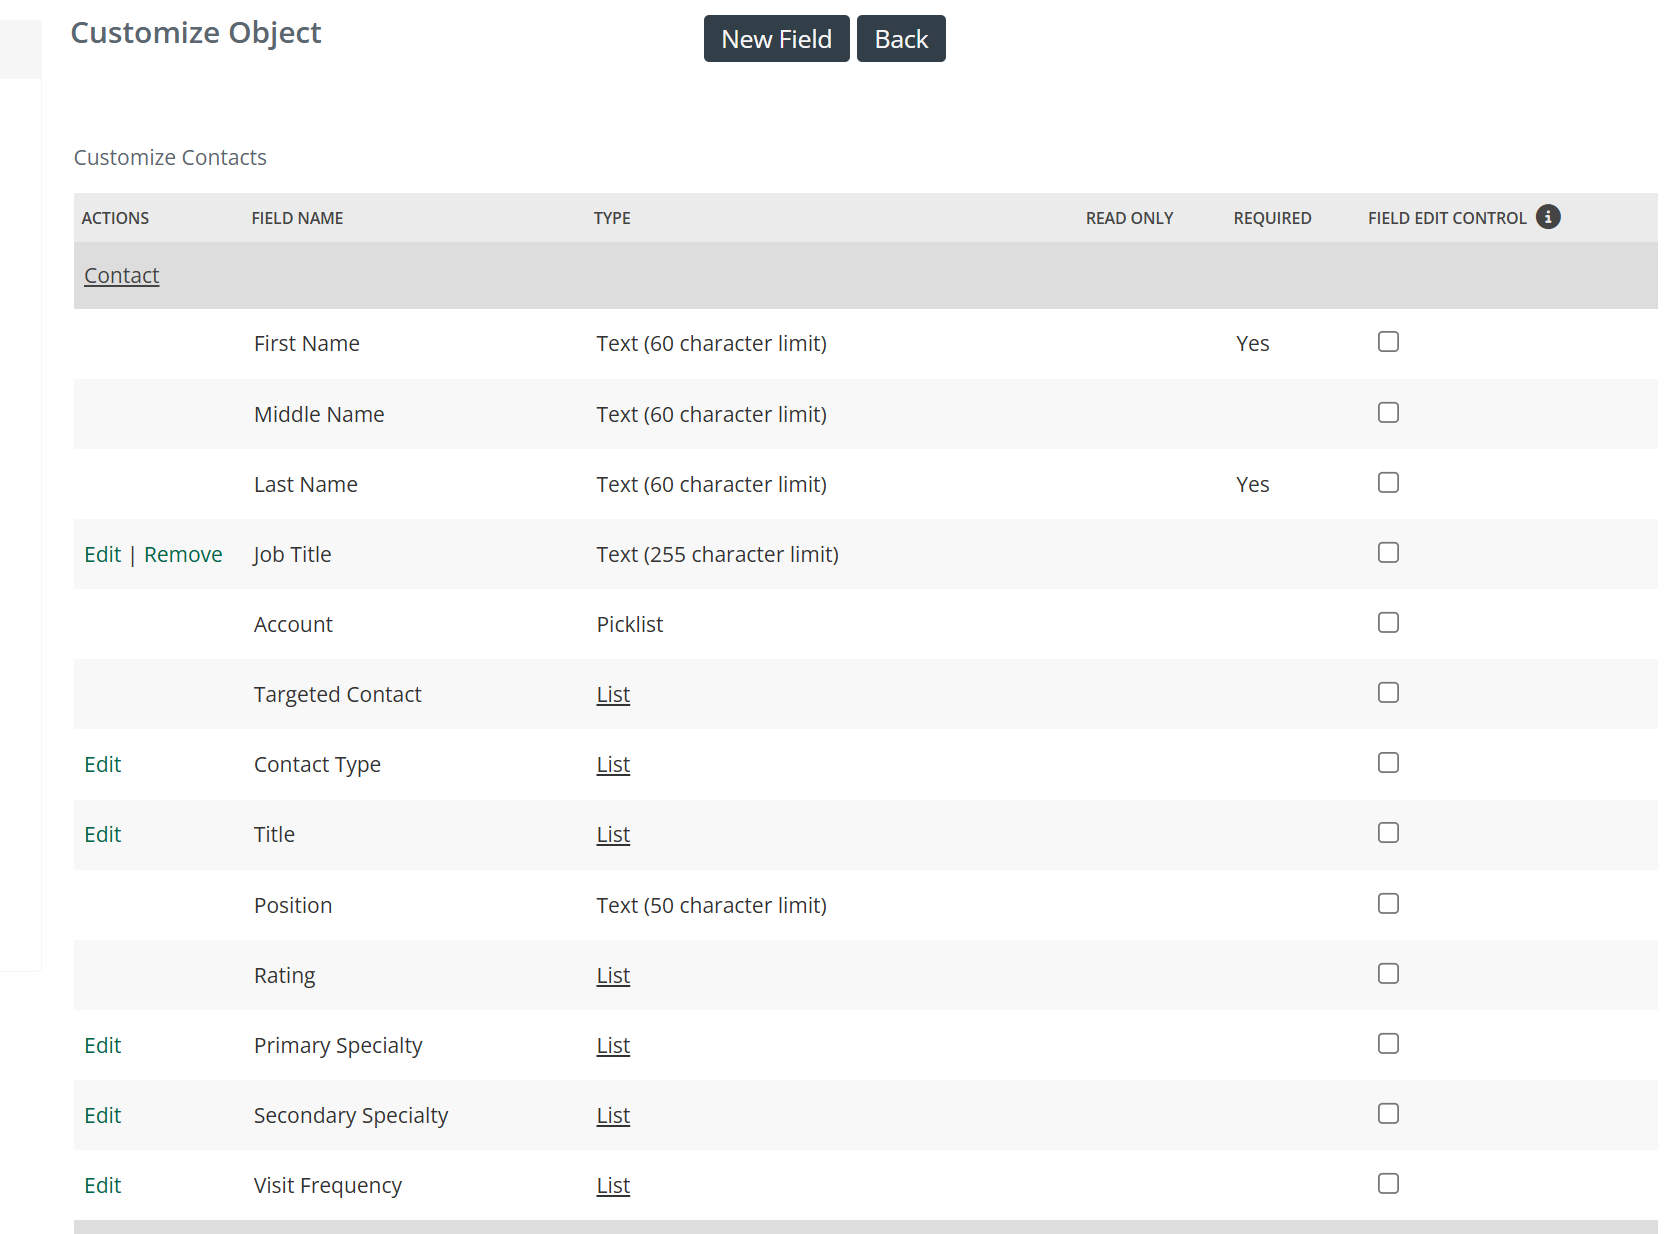
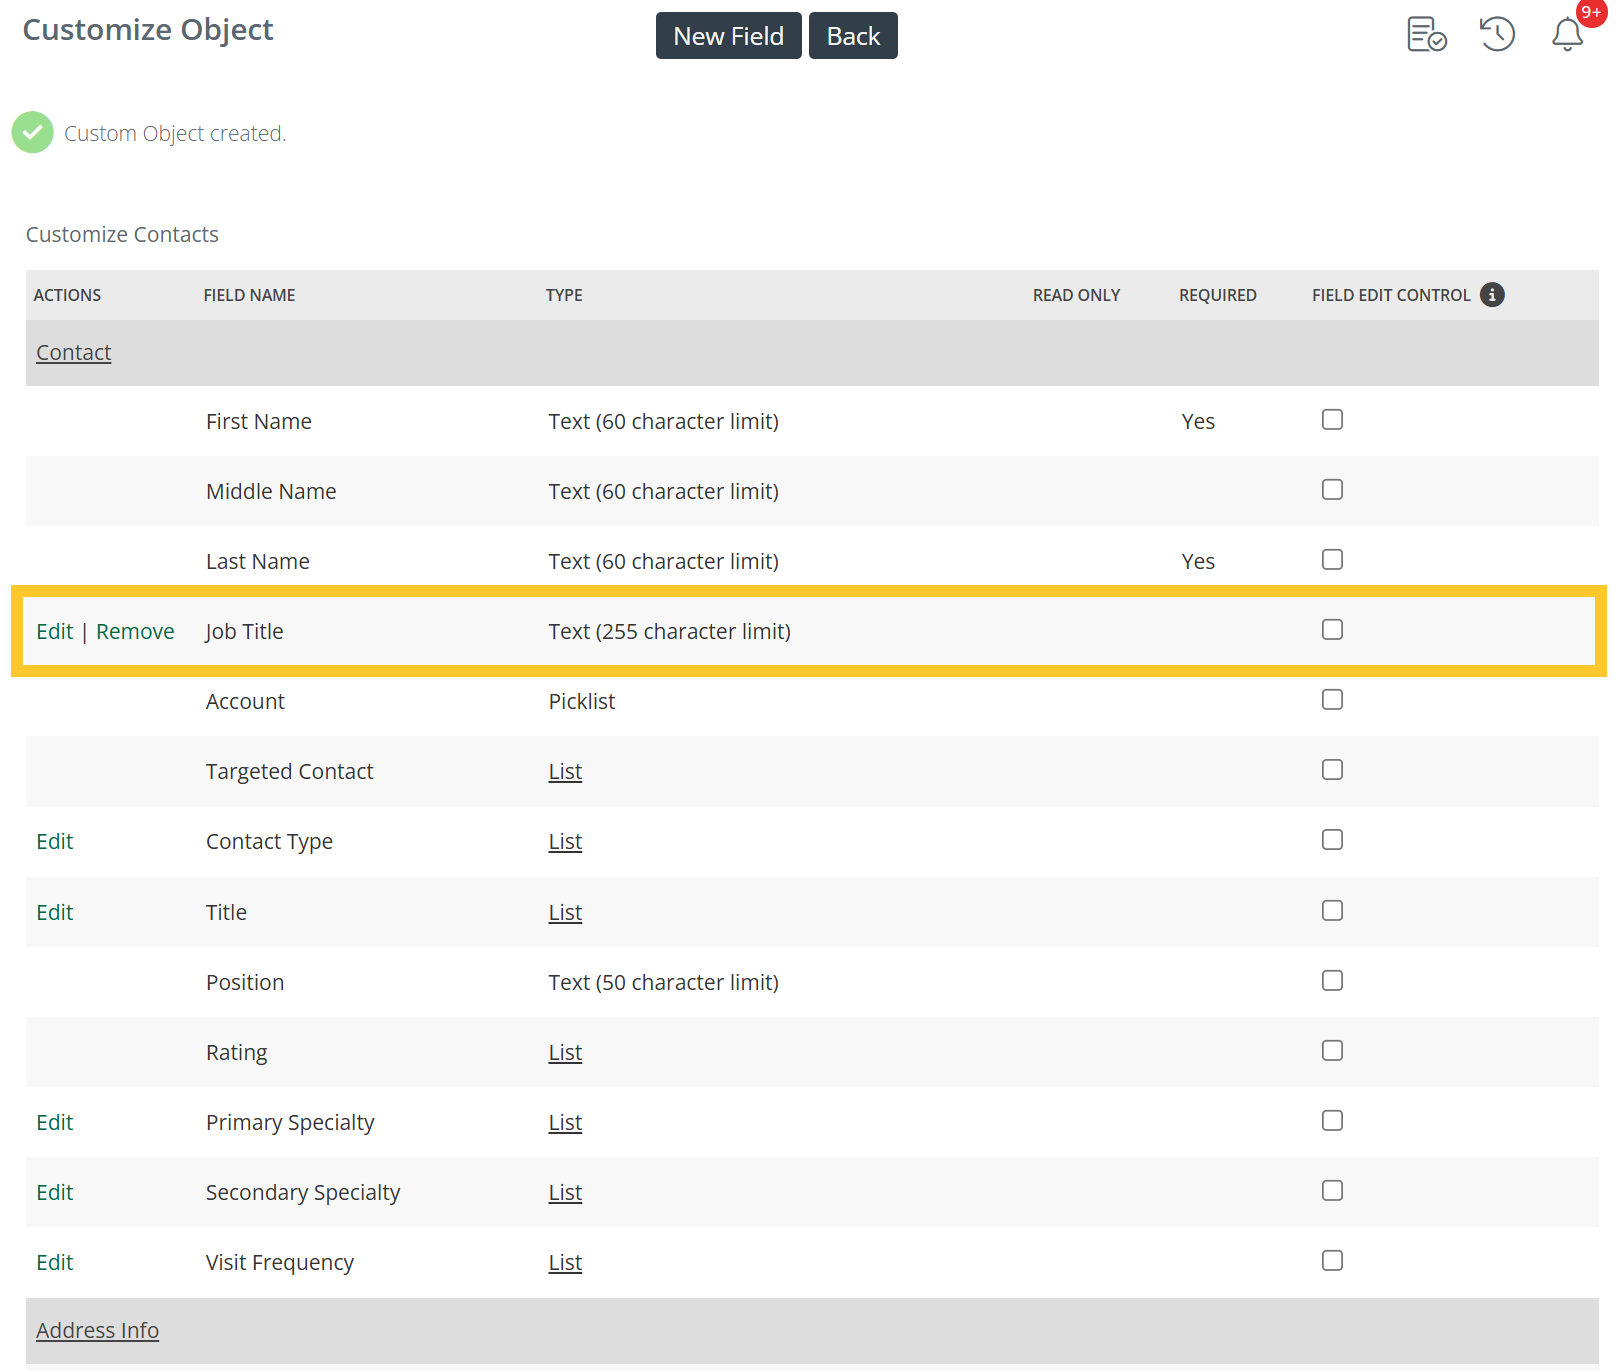
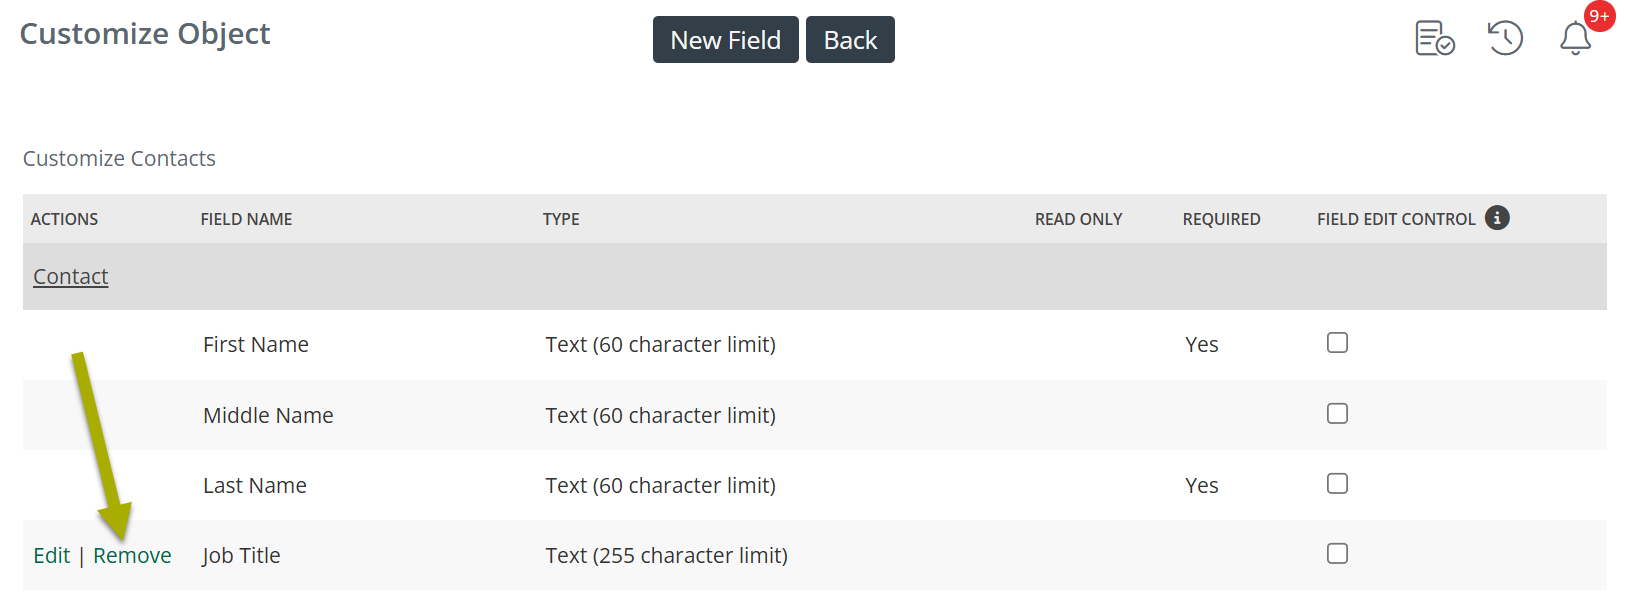
- Actions - This column identifies which fields for the records on the selected page can be edited or removed. As you can see, some fields can be customized, others may not be changed. The Job Title field is one created as an example for this article and is the only type of field that can be removed. See Removing an Field
- Field Name - The field name identifies the field in this interface and on the selected page when a record is viewed or edited
- Type - The field type. See Field Types
- Read Only - If the field is identified as Read Only, the field may not be edited on the selected page in the edit view
- Required - identifies if the field is required when adding a new record on the selected page
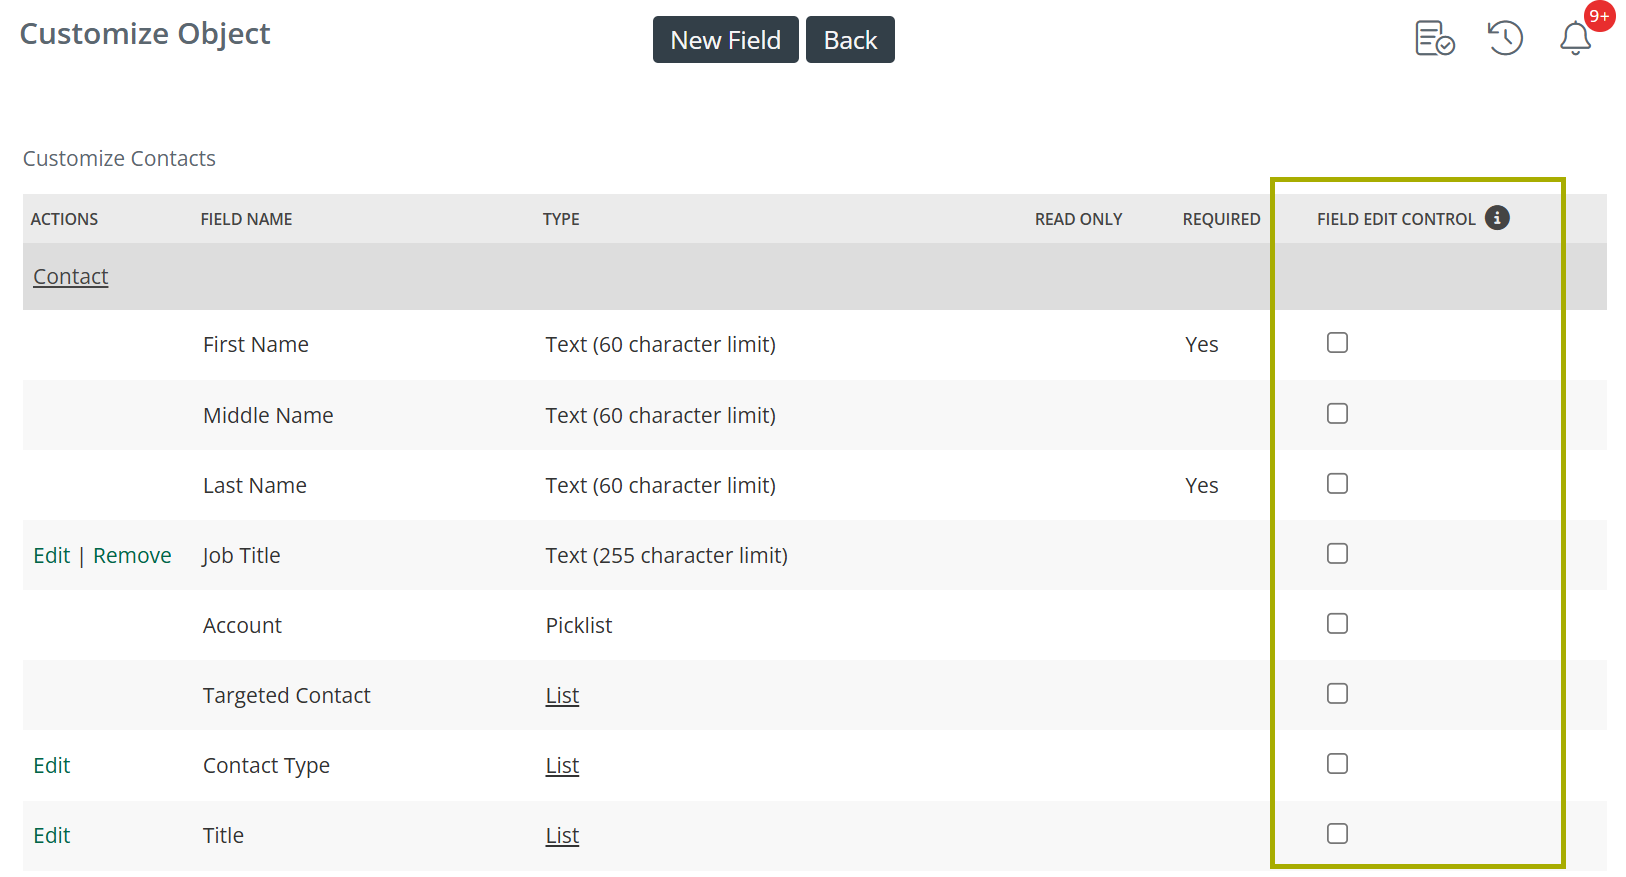
- Field Edit Control - If this check box is checked, users will not be able to edit the field on the selected page when they are editing a record. See Field Edit Control
 Be Prepared
Creating new fields or editing existing fields is a critical process that can result in major changes to your database in Trella CRM. It is helpful to know what you want to do before jumping into the interface. At the very least, make sure that you understand Field Types.
Creating a New Field
![]() Although you are able to create and edit fields on different pages, in this article we will show examples for fields on the Contacts page. Managing fields for any other page will work the same way.
Although you are able to create and edit fields on different pages, in this article we will show examples for fields on the Contacts page. Managing fields for any other page will work the same way.
Before we create a new field, let's look at what we would see before changes
On the Contacts page |
In the field management interface |
| When we view/edit a specific contact, the "Contact" section includes the items shown in the image below. | When we navigate to the field management |
|
|
 |
Start on the "Customize Objects" page.
- Click on the "Edit" link to the left of the page for which you want to add an object.
This will open the "Customize Contacts" page that shows the current fields for the selected page.
- Click on the "New Field" button to create a new field

This will open a simple (two step) wizard that will guide you through creating a new field.
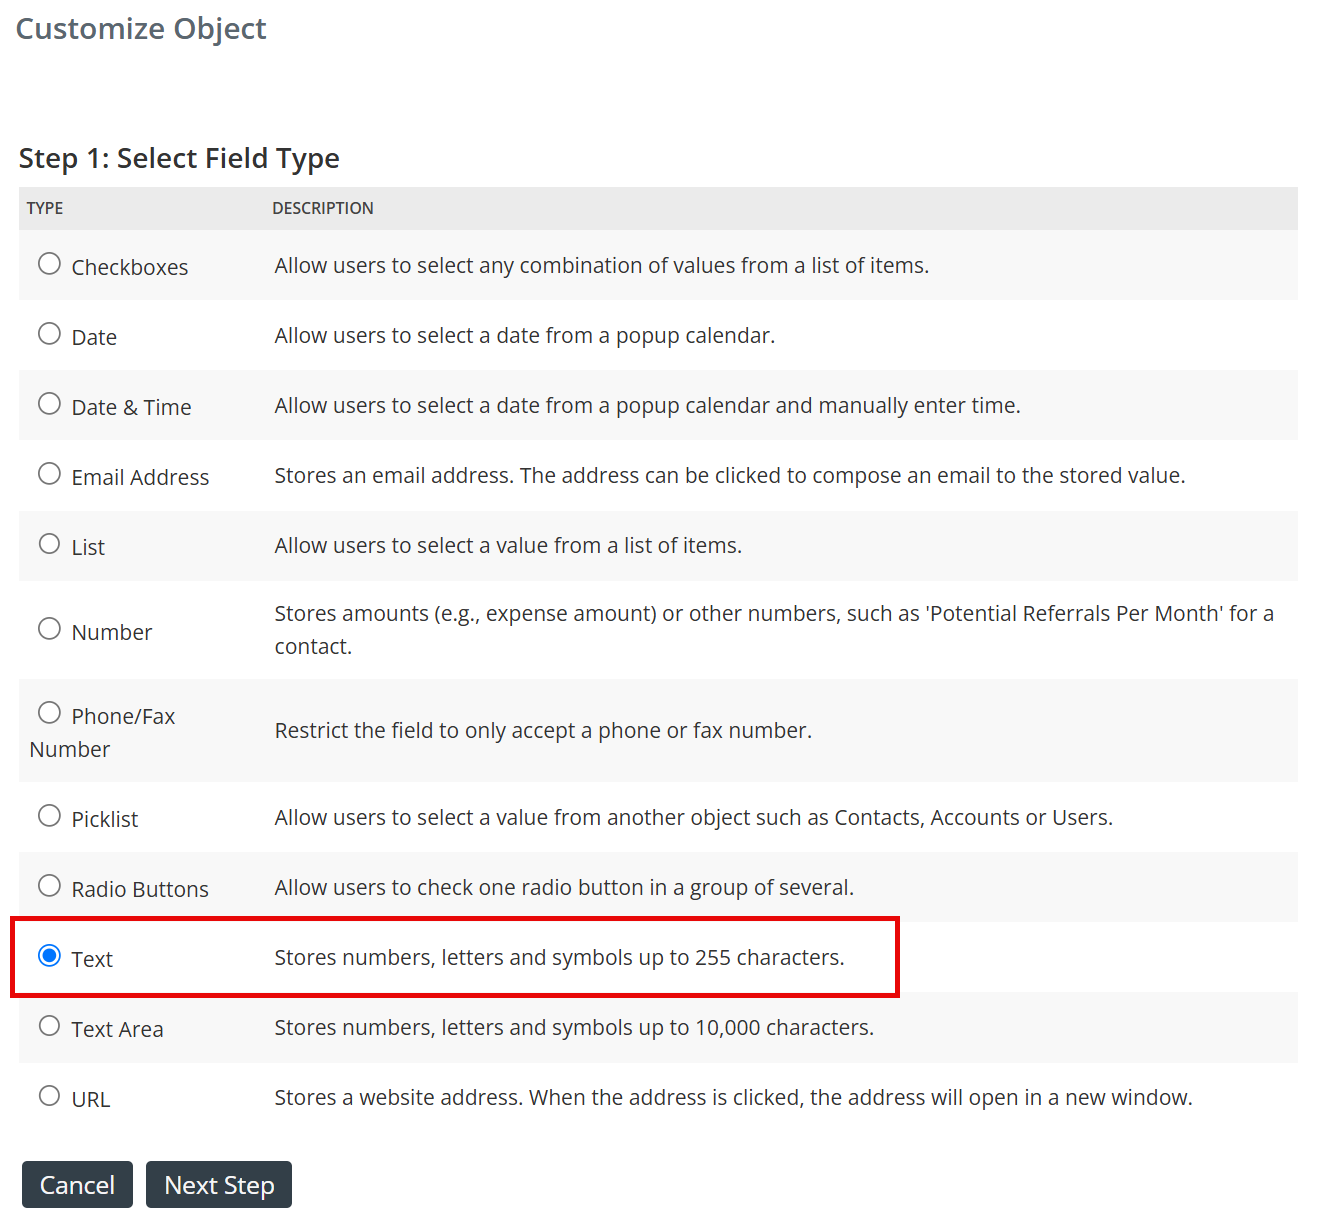
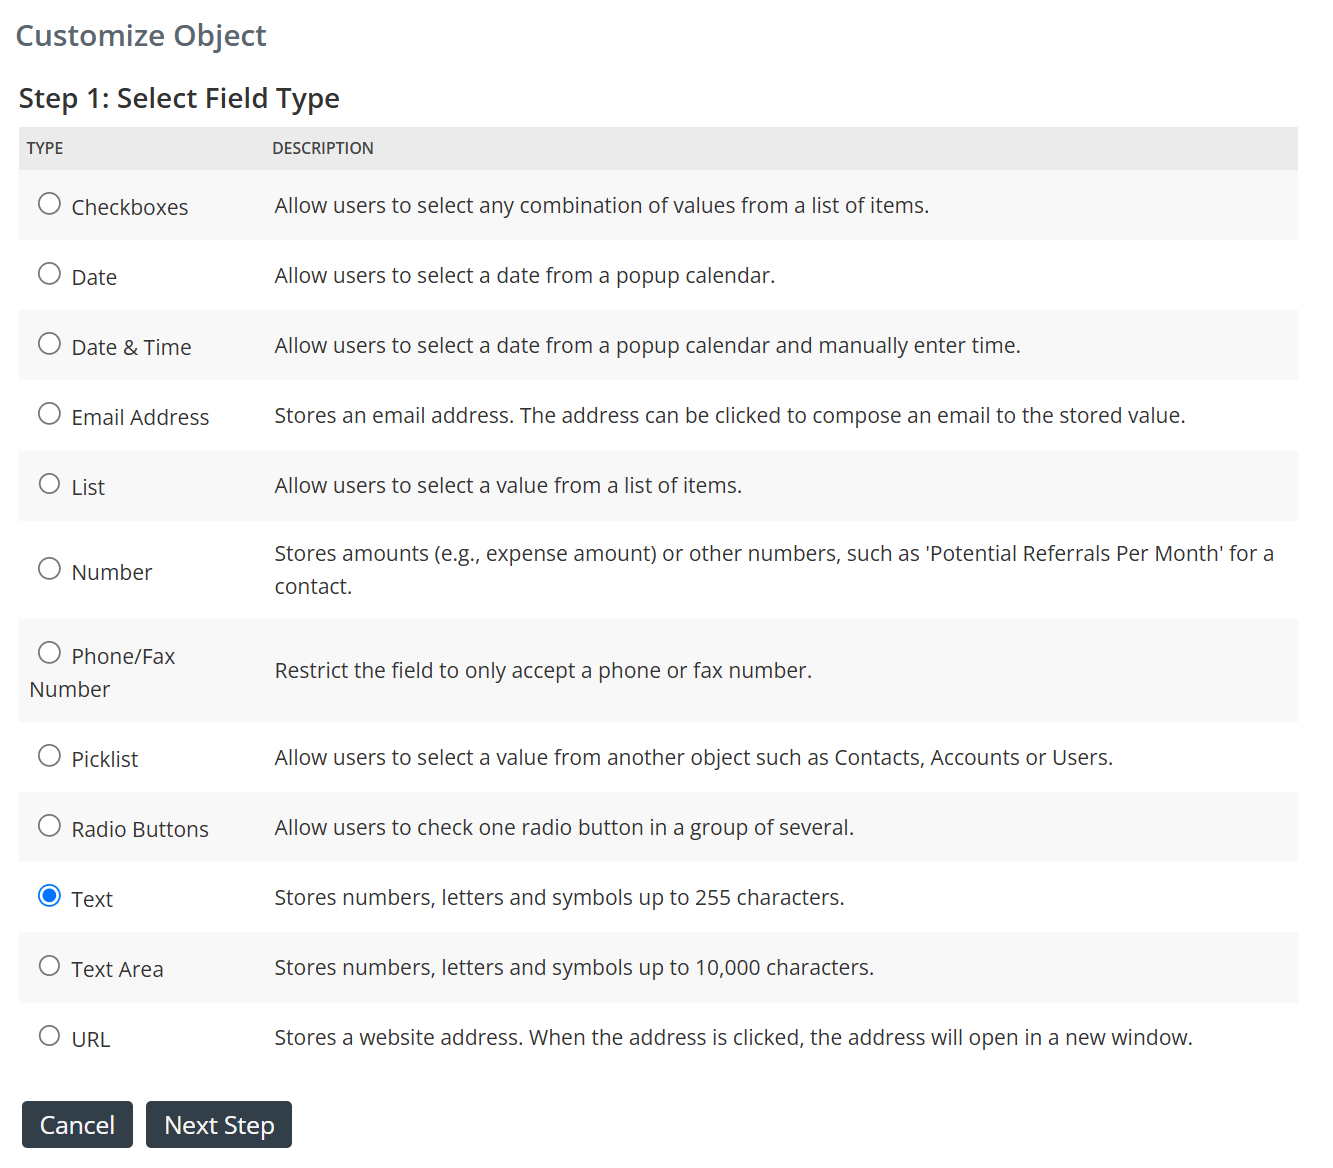
- Step 1 - Select the type of field - you can choose one option from the list shown
- Once you have chosen a field type, click the "Next Step" button
For our example, we chose the "Text" field type (box in image below).
![]() For a summary of all field types, see Field Types
For a summary of all field types, see Field Types
The second step is to set up some basic options for the new field
- You must choose a Field Label that will identify the field on selected page. For our example, we chose "Job Title."
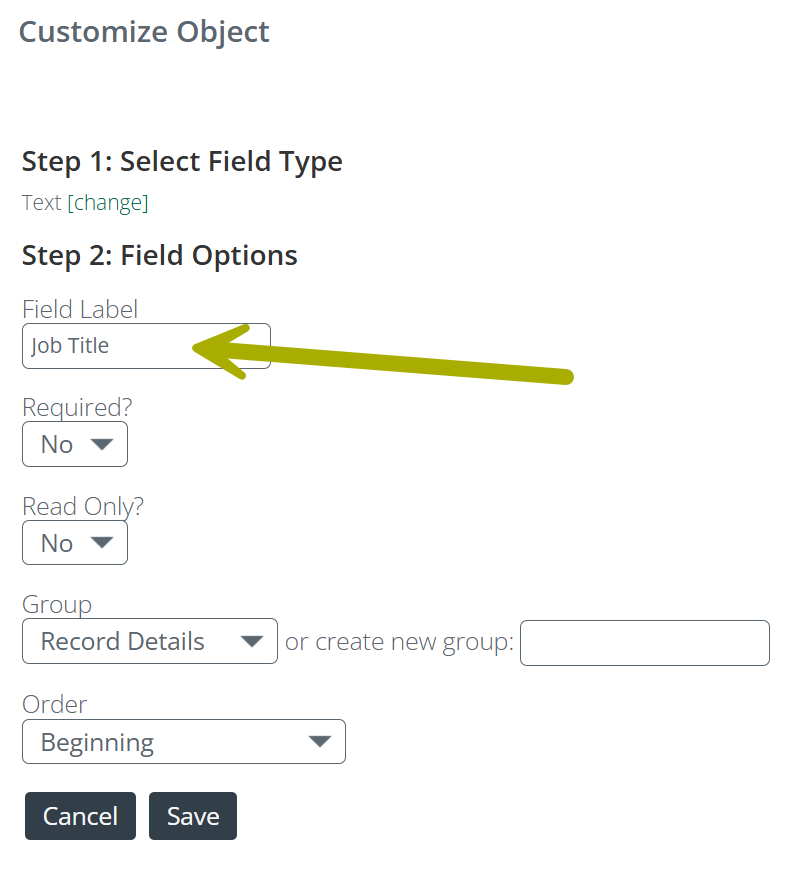
- Required? - the options are yes and no. If you choose yes, then a person filling out the form on the page will need to enter something in the field in order to save the record
- Read Only? - the options are yes and no. If you choose yes, the field can only be viewed, not edited.
- Group - Each page has sections of content, broken up to present metrics in groups. You will need to choose the group into which your new field will included.
For our example, we are adding a field to the "Contact" section of the page, so we click Contact in the dropdown.

The field to the right allows you to create a new group.
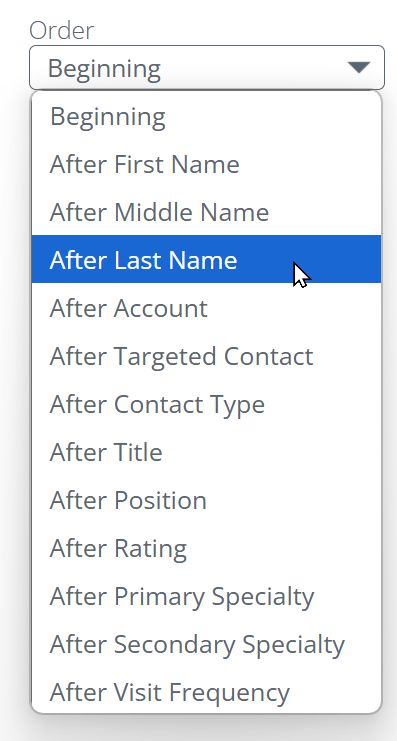
Once you select the Group, the Order dropdown will display all of the current fields in that group/section.
- Choose the location where you want to place your new field.
For our example, we decided to place our new field after the Last Name field.
- Click the "Save" button when you are done
| Once you have hit save, the new field will be visible immediately | |
|
On the Contacts page The new field will appear in either view or edit mode. |
On the Customize Object page The new field will appear in the list of fields for the selected page |
 |
 |
Field Types
When you click the "New Field" button for any page, the following options open. To the right of each type is an explanation of how the field works. Some notes below.
 Helpful details
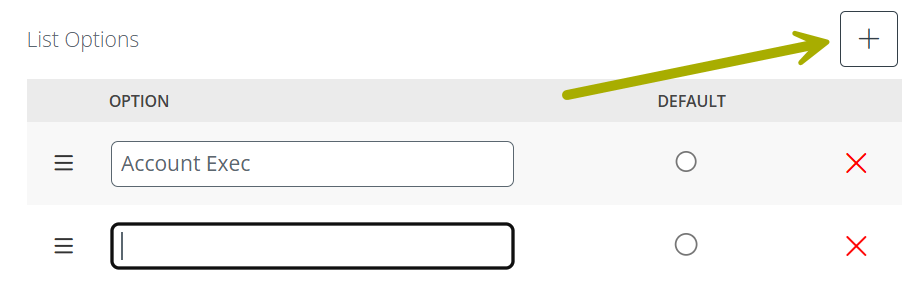
- Checkboxes and List and Radio Buttons - If you choose to add any of these fields, on "Step 2: Field Options," you will need to specify the options you want the field to show. All of these field types work the same way.
The "List Type" dropdown provides the options available. For this example, we will demonstrate how to create a static list
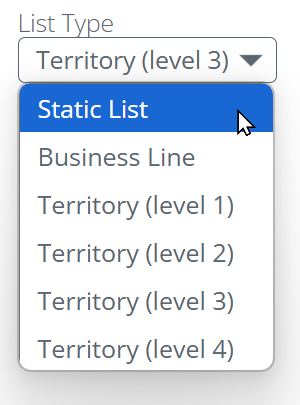
Since our new field contains job titles, we can create a list of the actual titles our company uses. We created "Account Exec," as shown below. Click on the "+" icon to add additional titles. If you make a mistake, click the "X" to the right of an entry to delete it. If a specific entry is the most common, click the default radio button to make it appear automatically in a new record.
- Text Area - In addition to allowing far more characters than the "Text" field type, this field type can be sized on the page to make viewing larger amounts of text on the page.
Editing an existing field
Opening the Field Management Interface
The following image shows the steps to open the field management interface for a selected page.
![]() Editing the fields on any page is the same, so once again, the example will be for the Contacts page.
Editing the fields on any page is the same, so once again, the example will be for the Contacts page.
|
|
|
![]() Click on the "Objects" link under "Customize" under Settings Links & Tools
Click on the "Objects" link under "Customize" under Settings Links & Tools
The Customize Objects page will open revealing the pages for which new objects can be created or existing objects can be added.
![]() Edit - Click the "Edit" link to the left of a listed page to create or edit fields for the listed page.
Edit - Click the "Edit" link to the left of a listed page to create or edit fields for the listed page.
You will click the "Edit" link to create new objects or to edit existing objects.
![]() In the example below, we clicked on the "Edit" link for the Contacts page. The image below only shows a small section of the interface that opens.
In the example below, we clicked on the "Edit" link for the Contacts page. The image below only shows a small section of the interface that opens.
- Click on the "Edit" link to the left of the field you want to edit.
A two step wizard will open.
- Step One - in step one, choose the field type you want for the change
- Step Two - in step two, choose the settings for the field type chosen in step one
This process is displayed in an example above. The Field Types are summarized above.
Since editing a field follows the same process as creating a new field, that process is not duplicated here.
- Click the "Save" button after you have completed your changes.
Field Edit Control
Field Edit control is a feature that allows an account administrator to set any field so that users can't edit the field on the selected page.
 Usage
Usage
- Click on any checkbox to disable editing of the selected field
- Allowing editing means that more of your team will be able to update records for greater data accuracy
- Disabling editing will ensure that fields remain consistent with intake data
- Either way, an administrator is able to manage each field in every record on all pages as needed!
Removing a Field
Once you have the Field Management Interface open for a specific page, any field that has the "Remove" link in the Actions column can be removed from the fields for the selected page.
- Click on the "Remove" link to remove a field
The following warning will appear to confirm your choice.
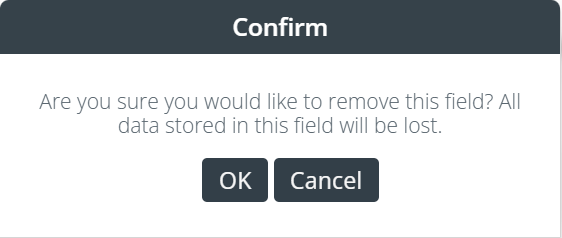
As indicated, removing a field will eliminate all data in that field from all records in the database.
Object or Field?
![]() What is the difference between an object and a field?
What is the difference between an object and a field?
This is the place where programmers and database folks crash into each other. Definitions.
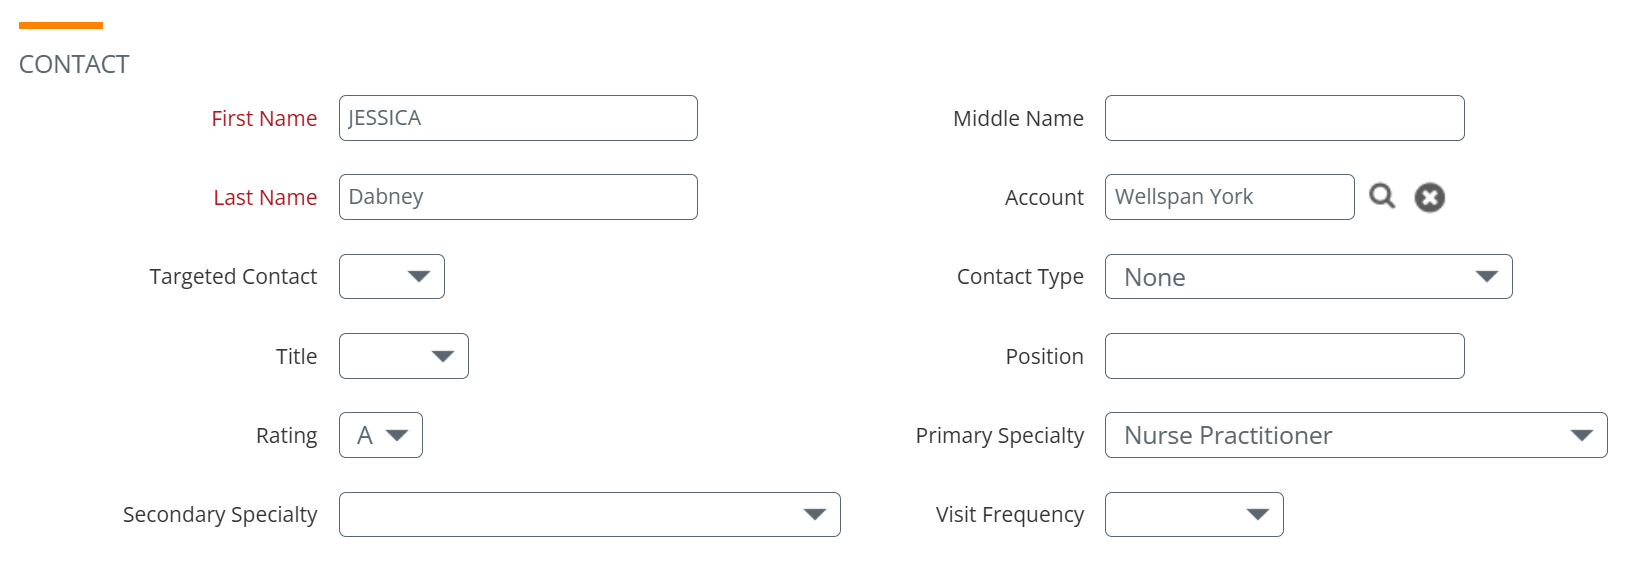
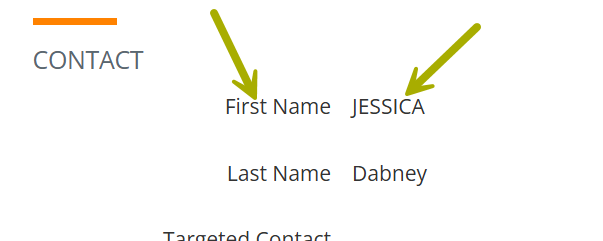
An Object
|
In programming, everything that has attributes and that functions in a specific way is an object. So, if we look at a contact on the Contact page, everything you see is an object. From our example to the right, "First Name" is a title that is an object that has a specific font, color, size, and you can't edit it. "Jessica" is data brought into a different object, a text field, that also has a specific font, color, size, number of characters, but we can edit the name. Other objects are buttons, navigation links, images, yup... everything is an object. |
 |
A Field
|
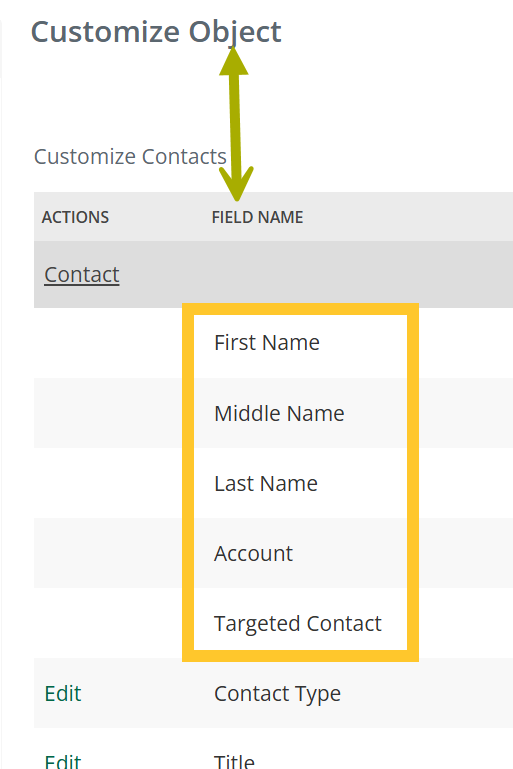
From the perspective of a database, we works with fields, all of which are stored together in a record. So, if you think of our contact, Jessica, we can imagine that the record for her contains a field for the first name, the last name, and lots of other details.
The box in the image to the right shows the list of fields (objects) for the Contacts page.
|
 |
In sum, objects are what the users see when they look at records, an administrator manages fields in the database using the object management interface.