Overview
Trella CRM on your phone can track your attendance at your scheduled events to automatically track and calculate mileage totals. Using GPS ensures that mileage is accurate and tied to actual completed visits.
![]() Mileage Assist is an add-on feature in Trella CRM. Not everyone will have access to this feature.
Mileage Assist is an add-on feature in Trella CRM. Not everyone will have access to this feature.
![]() There are three articles related to Mileage Assist in Trella CRM.
There are three articles related to Mileage Assist in Trella CRM.
- Prepping for Mileage Assist - for account administrators to set up Mileage Assist
- Using Mileage Assist - for reps - set up and usage "how to's"
- Mileage Assist Reporting - for managers - mileage reports
More Links
For more about events, see Calendar overview, and Track Your Activity.
 In this article
- Get your Phone Ready - For iOS and Android
-
Check-ins
-
 Using Check-in - step by step, well, really one-and-a-half steps
-
- What if my Check-in button is gone?
- More Details
Get your Phone Ready
For Mileage Assist to work, location services need to be enabled for the Trella CRM app on your phone. This section will describe the basics for phone set up for iOS and Android.
The steps to set up the needed settings on your phone are included below. The following table shows how to navigate to those settings from within the app.
Steps |
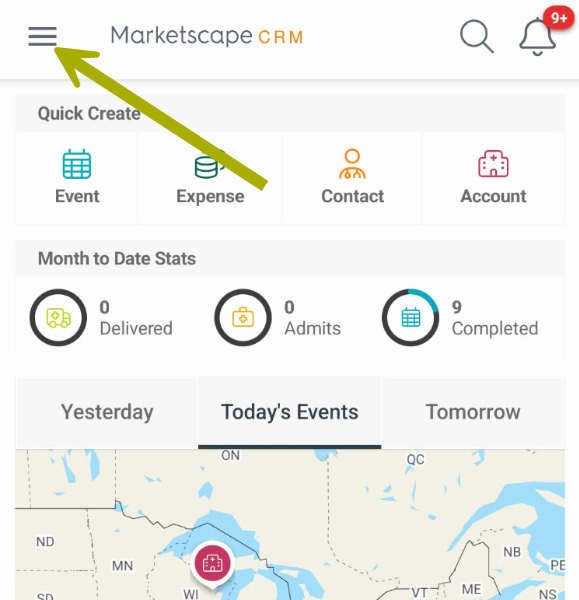
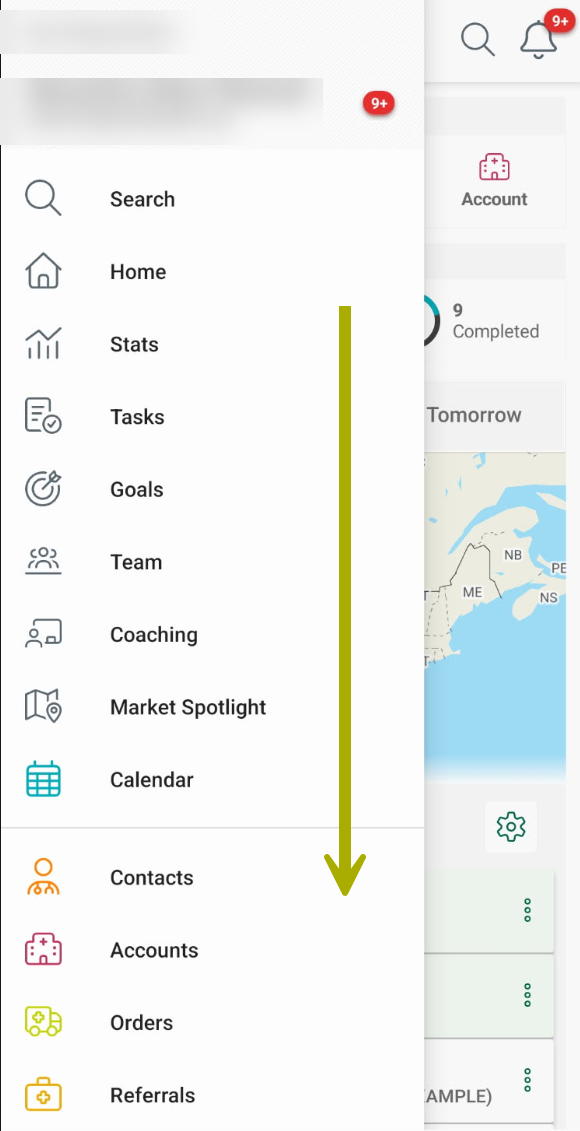
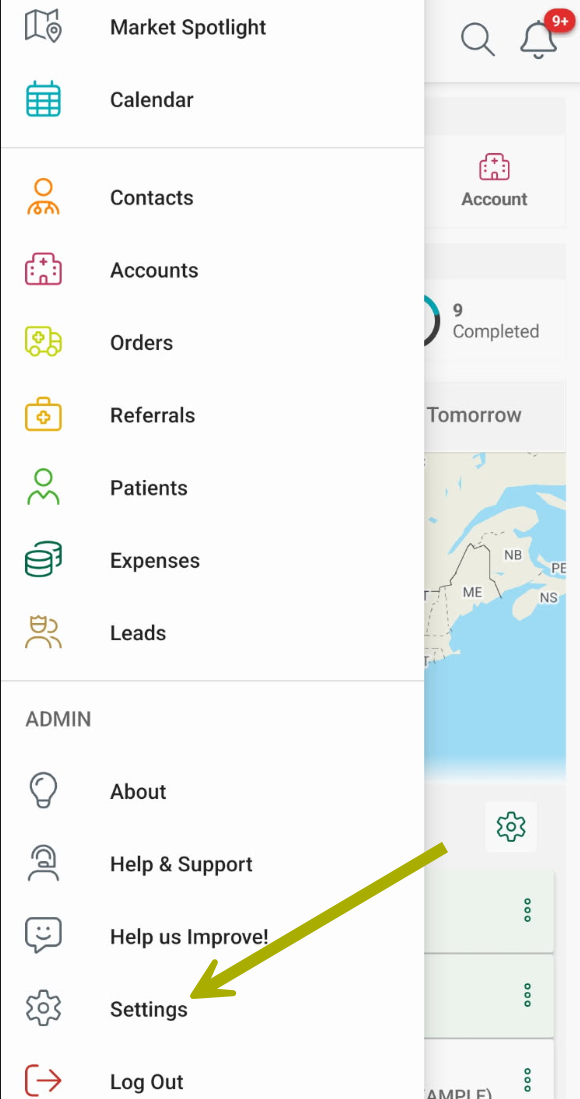
Image |
The navigation menu will open (see next image) |
 |
|
 |
This will open the Settings page |
 |
This will open the application settings for your phone. What you see specifically will depend on your phone. Instructions for iOS and Android are described below. |
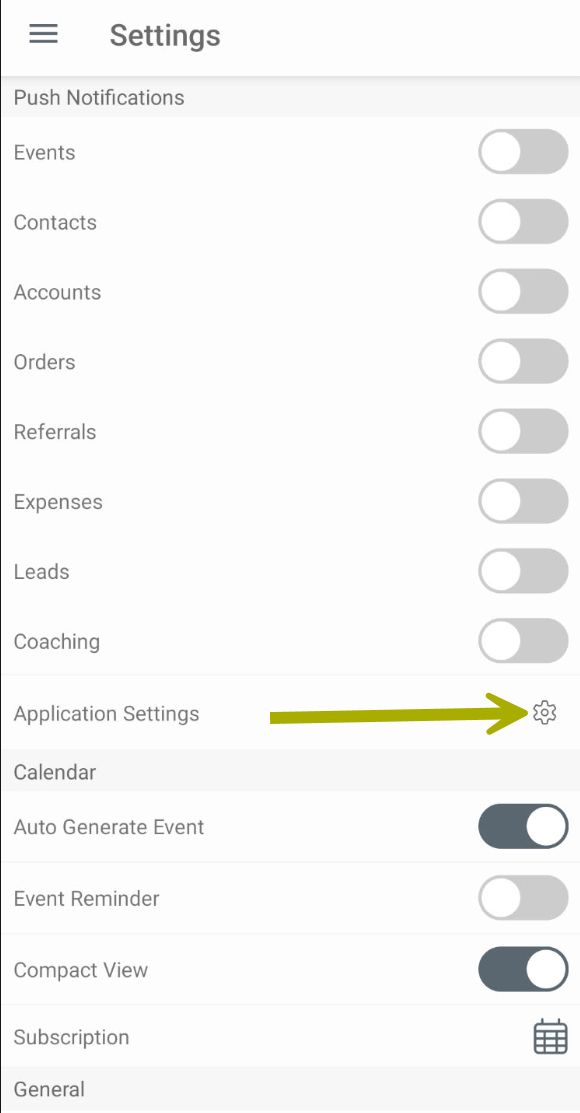 |
iOS
To set up your Apple phone:
- Navigate to the Settings App
- Select Privacy and Security
- Tap on Location Services
- You want to select the option, "While Using the App" - This allows access to Location Services only when the app or one of its features is visible on screen. If an app is set to "While Using the App," you might see your status bar turn blue with a message that an app is actively using your location.
- Turn on Precise Location: Precise location uses GPS, Wi-Fi, Bluetooth, and cellular signals to pinpoint your location within a few meters.
Android
To set up your Android phone:
- Navigate to the Settings menu
- Scroll to find and open Location
- Tap on "App Permissions"
- Scroll to find and open "Trella CRM"
- Select "Allow only while using the app"
- Make sure that the toggle for "Use precise location" is on
![]() Check to make sure that you have the latest required OS and app versions - Current Mobile App Versions Requirements
Check to make sure that you have the latest required OS and app versions - Current Mobile App Versions Requirements
Check-ins
![]() Some Tips for a smooth check-in at the event location:
Some Tips for a smooth check-in at the event location:
- Ensure your device's location services are turned on.
- If indoors, try stepping outside for better GPS accuracy.
- Double-check that you're at the correct location.
The difference between Check-in and Manual Check-in
Check-in
This check-in type confirms a user's location using geolocation. If you are within the check-in radius, you can simply tap the Check-in option or complete the event.
Requirements
- You must be within the check-in radius when you use Check-in
- You can only use Check-in on the same day as the event
Manual check-in
This check-in type allows you to claim mileage when you are not within the selected radius.
Requirements
- You must use manual check-in if you are outside of the Check-in radius of the event
- You must use manual check-in if you are checking in for an event that occurred on an prior day.
If you forget to check in at the event, manual check-in allows you to complete the check-in at a later time so that your mileage calculation is complete.
![]() Check-In Type is notated on reports giving managers the ability to review frequent manual check-ins.
Check-In Type is notated on reports giving managers the ability to review frequent manual check-ins.
Using Check-ins
There are two ways to check in. The workflows are below.
How Easy can you get?
| Here is what you need to do to check in | |
|
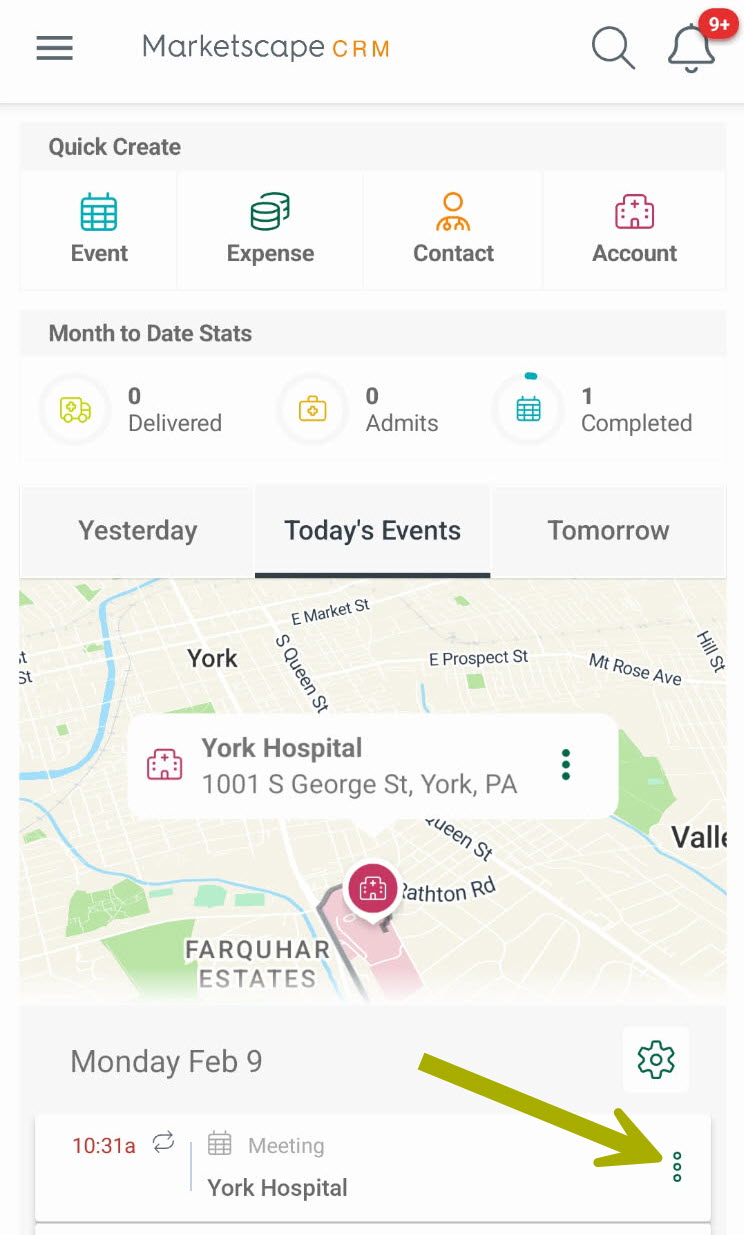
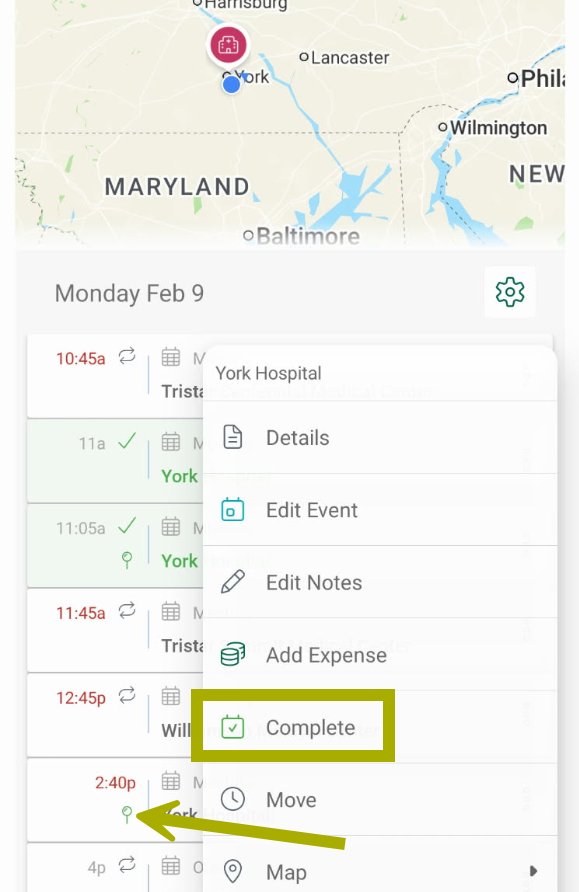
On the home page of the Trella CRM app, you will see your current events under the column, "Today's Events." The map will indicate the location of your scheduled events, and the events are listed beneath the map. Ideally, you would check in to your event when you arrive at the event location, or after the event is completed.
|
 |
|
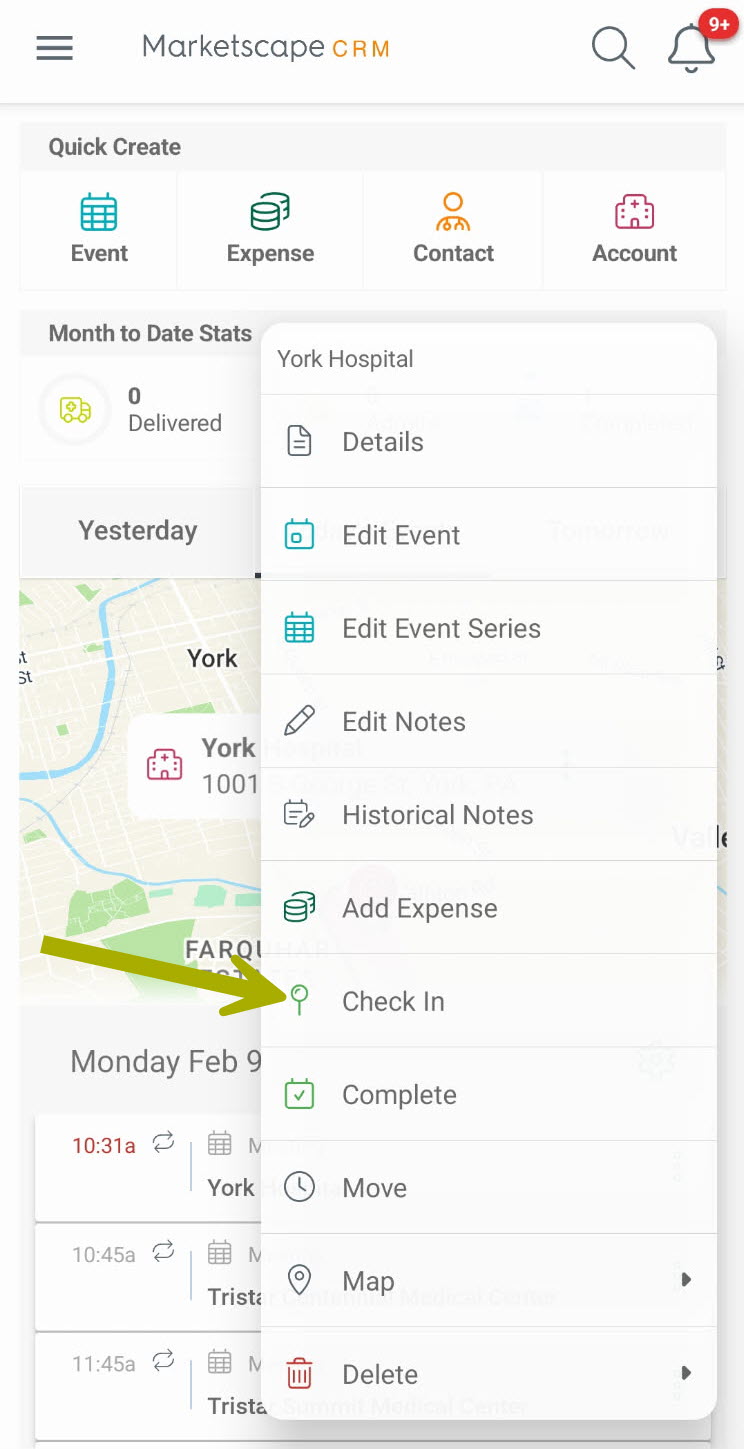
The options menu for the selected event opens.
A notification will pop up to confirm that you have checked in to the selected event. You're done. Enjoy your visit. |
 |
|
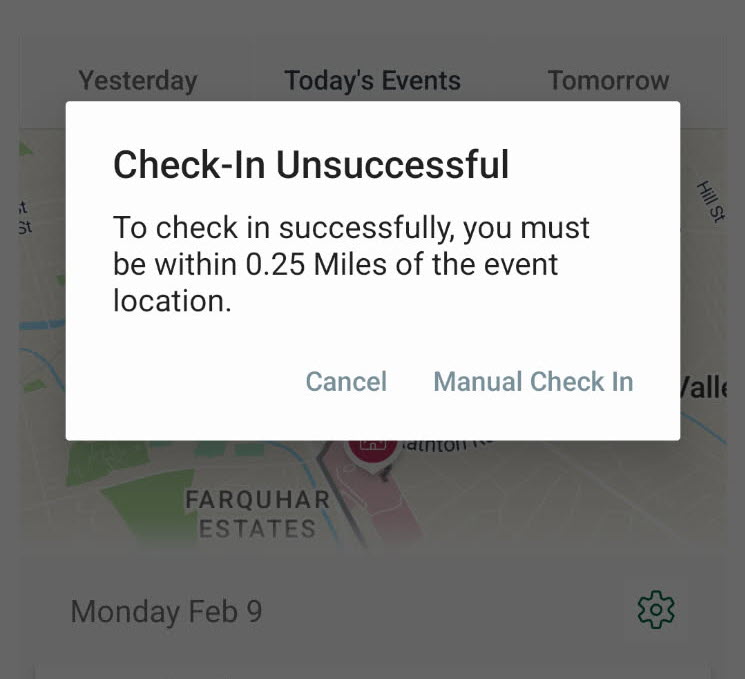
If parking is a problem and you can't park close enough to the scheduled event, you might see the following alert when you try to check in.
You have a couple options at this point.
A notification will pop up to confirm that you have checked in to the selected event. It is possible that the address for the account you are visiting needs to be updated. If it is incorrect, the GPS tracking might determine that you are out of range. If this is the case, you can edit the account address later |
 |
|
If you have checked in, using either method, and you tap the three dots again to open the event menu, the Check in option will no longer be available Notice, however, that you can still complete the event. Also notice that there is a little magnifying glass icon under the event time. That indicates that the event has been checked in. And finally, if you look at the events from 11:00 and 11:05, they are highlighted, indicating that they are complete. |
 |
What if my Check-in button is gone?
If you don't see your Check-In button, here are the possible reasons:
- You have already completed the task. The Check-in button is not visible for an event if that event is completed
- To fix: open the event and turn off the Complete toggle. This will not erase your notes.
- Check in to the event
- Complete the event
- Mileage has not been turned on.
- Make contact with your company administrator
- The event is scheduled for a different day. You can only check-in to events on the same day.
- If the Check-in button is not available, you will need to use Manual Check-in.
- The event type is not allowed for Mileage Assist. Mileage Assist is limited to specific events. The active events are set by your account administrator.
- Example: A face to face event is likely to be activated for Mileage Assist. An email event does not make sense for Mileage Assist and will not be activated for Mileage Assist, even though it is an event that can be scheduled and complete
- The event status is complete. Once an event is marked as complete, Check-in will no longer be available.
- You will need to use Manual Check-in
More Details
Limitation on Check-In Time:
To limit fraudulent check-ins for past events, we’ve limited the number of events that can have a successful check-in.
- We are automatically limiting events to not allow check-in for events older than 90 days from today.
Last Minute Cancellation Handling
For best results, if a user drives to a location and can't attend the event, we recommend completing the event and creating a follow-up.
Intentional Duplicate Event Handling
For best results, we recommend checking-in to all events even if there are duplicates.
Example: Three events at the same location with three different contacts, check-in three times.