Overview
What is Coaching?
Coaching is a feature in Trella CRM that gives managers easy access to custom forms that enable them to provide targeted and documented coaching to their sales reps during ride-alongs. Sales reps can view their manager's comments and keep track of their performance. Sales leaders can maintain a detailed understanding of their entire team's coaching interactions.
![]() The coaching feature is customizable - create new forms or edit existing forms. This article includes detailed instructions on how to edit an existing form and how to create a new coaching form.
The coaching feature is customizable - create new forms or edit existing forms. This article includes detailed instructions on how to edit an existing form and how to create a new coaching form.
Some Use Cases
The following examples describe potential situations where the coaching feature would be used.
- Sales manager - Coaching provides the ability to document performance and notes for their sales reps during ride-alongs to provide real-time observations. It is easy to track trending progress over time.
- Sales rep - Coaching facilitates quick understanding of your performance through the notes written by your manager during/after a ride-along. A rep can view a history of coaching sessions on either mobile or web.
- Senior sales leader - Coaching reveals how your sales managers are performing. It tracks that your managers are doing ride-alongs and effectively coaching their teams. You can quickly uncover weaknesses and strengths in your sales reps' skill as identified by your sales managers.
 In this article
The content in this article is organized to walk a new user through the various tools in a sequence that begins with basic concepts before trying to use the more advanced tools in Trella CRM.
-
- Some Coaching Basics - A few ideas to keep in mind
-
Coaching on Mobile - For Sales Managers - includes a detailed, step-by-step walkthrough filling out a coaching form
- Quick Summary - a summary of Coaching in Trella CRM mobile
- Complete Walkthrough - Every step and click for filling out a sample form
-
Coaching on Web - Viewing coaching sessions on Trella CRM for web
- Duplicate a Coaching Session
- Reporting - Not available yet
- Coaching Notifications
-
Editing and Creating Coaching Templates
- Coaching Templates page Overview - Overview of the page on Trella CRM for web
- Form Basics - learning the pieces of a form
- Planning - some simple steps to follow before creating a new form
-
Overview of the Awesome Form Builder
- Creating a New Coaching Template
- Editing Existing Coaching Templates
- Advanced Usage - some more advanced components
- Questions and Answers
Some Basics - Convenient, Customizable Coaching
To provide some perspective on the coaching feature, take note of the following.
-
 Coaching Templates - The feature has a pre-made template that you can use as is, or you can make your own!
 -
 Customization - Any existing template can be edited or deleted. Track and evaluate what you want.
- Integrations - Since the coaching tool is integrated with Trella CRM, coaching content is automatically integrated into the normal CRM workflow and connected to meaningful metrics that support the coaching session.
-
 Flexibility - From field ride-along’s, office meetings, or virtual check-ins – always deliver meaningful feedback to foster continuous improvement.
 -
 Progress Tracking - Share completed forms with reps so they can stay informed about their performance and track their development over time.
 -
Web vs. Mobile - There are some usage distinctions to keep in mind.
- Mobile - used for real time field coaching during ride-alongs. Reps can view their performance on their phone. Coaching documentation will be done on a mobile device
- Web - will be used for side by side performance reviews and reporting
![]() Go through the following workflow and you will see how powerful, convenient and useful this feature of Trella CRM can be!
Go through the following workflow and you will see how powerful, convenient and useful this feature of Trella CRM can be!
![]() In the product we use the words form and template interchangeably. In this article, a form is what a coach will fill out using their mobile device. A template is what you create or edit in the Form Builder that sets up what is included in a form.
In the product we use the words form and template interchangeably. In this article, a form is what a coach will fill out using their mobile device. A template is what you create or edit in the Form Builder that sets up what is included in a form.
Coaching on Mobile
You will need to be logged in to the Trella CRM on your mobile device.
![]() For more information, see Trella CRM User Login.
For more information, see Trella CRM User Login.
Quick Summary
Before viewing the detailed walkthrough of the coaching steps, review these two summaries for a sales rep or for a coach.
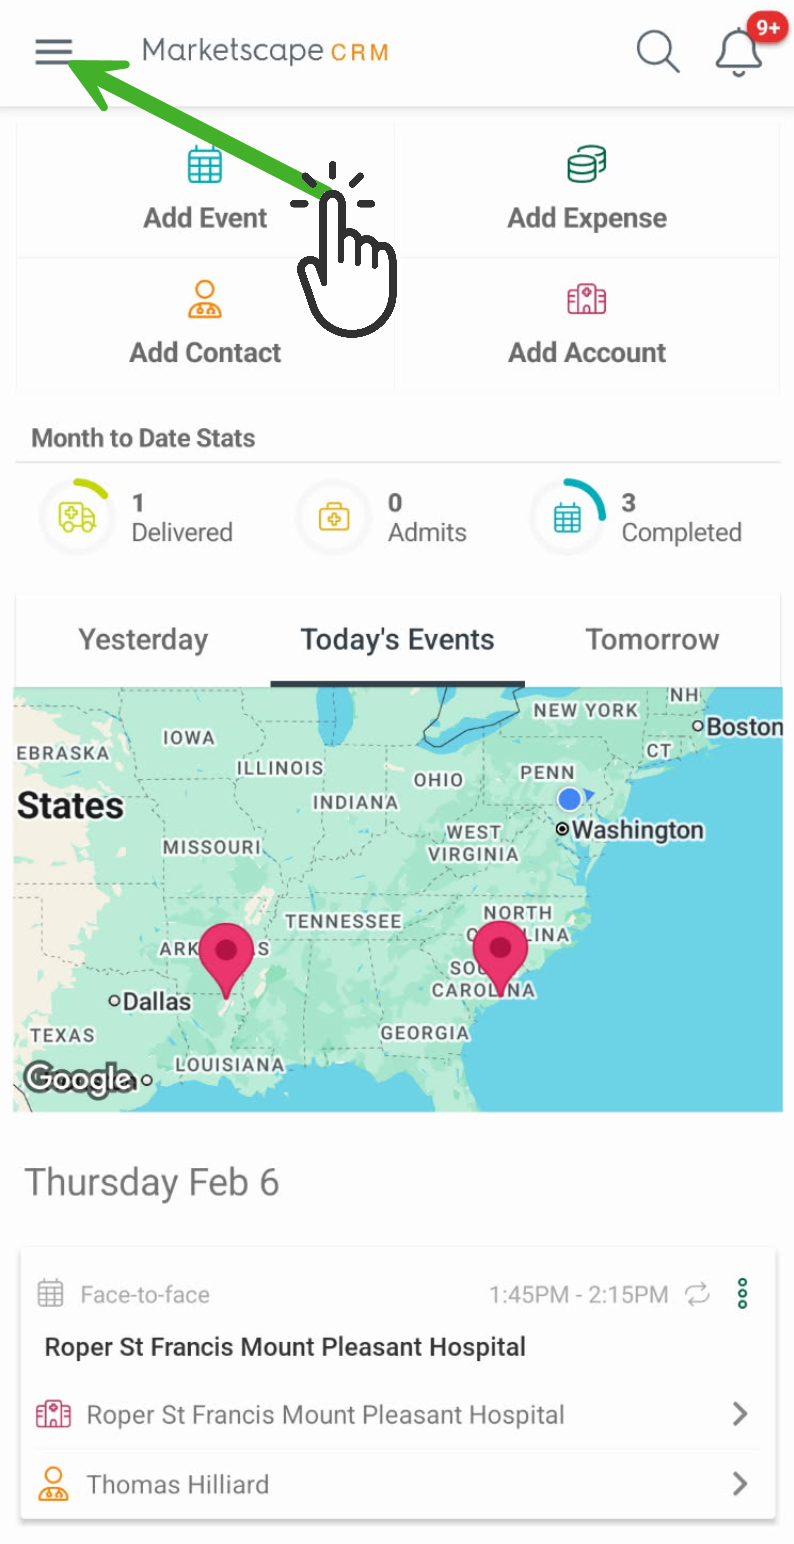
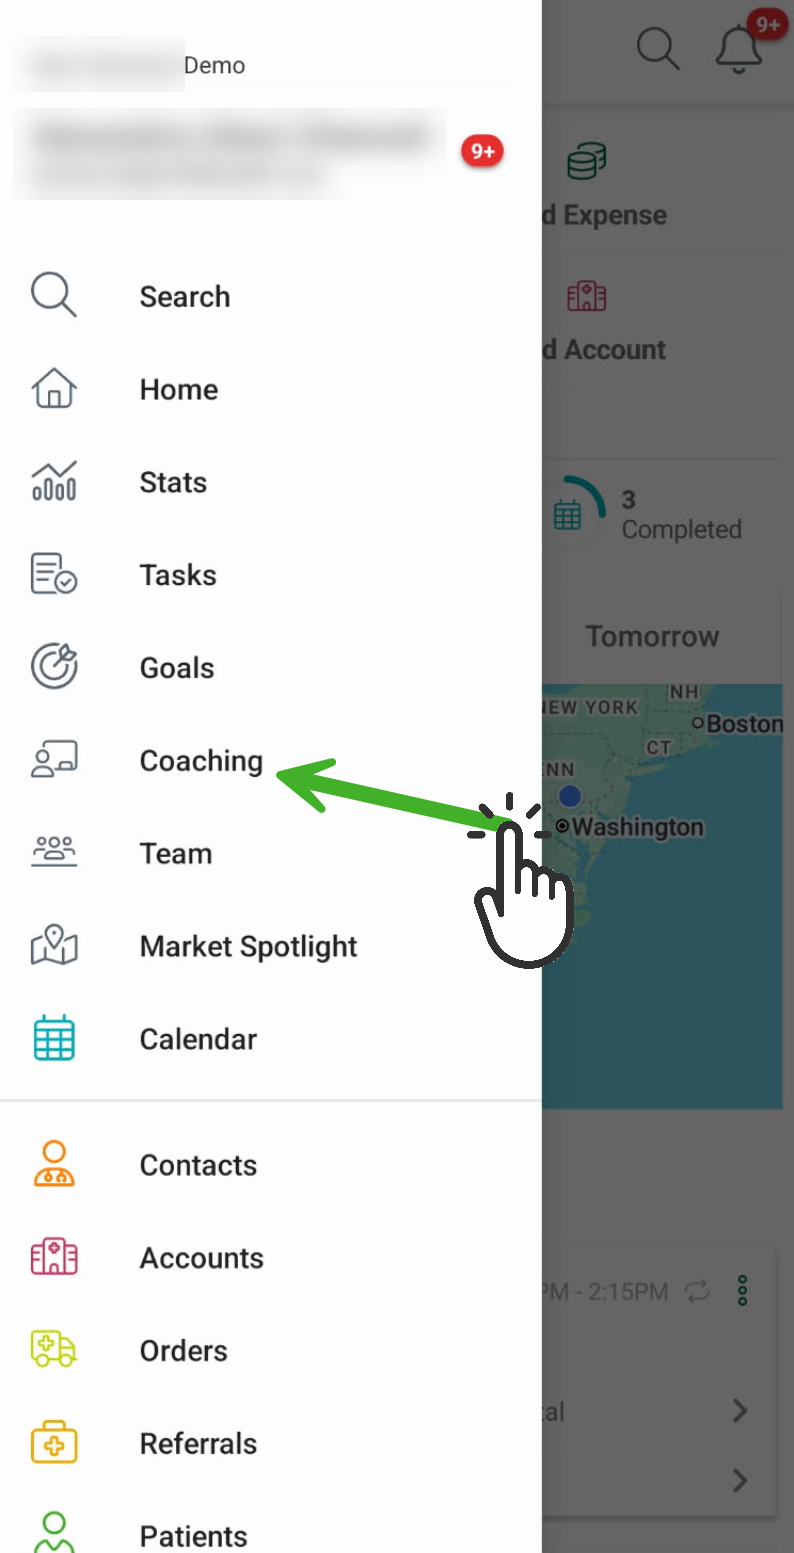
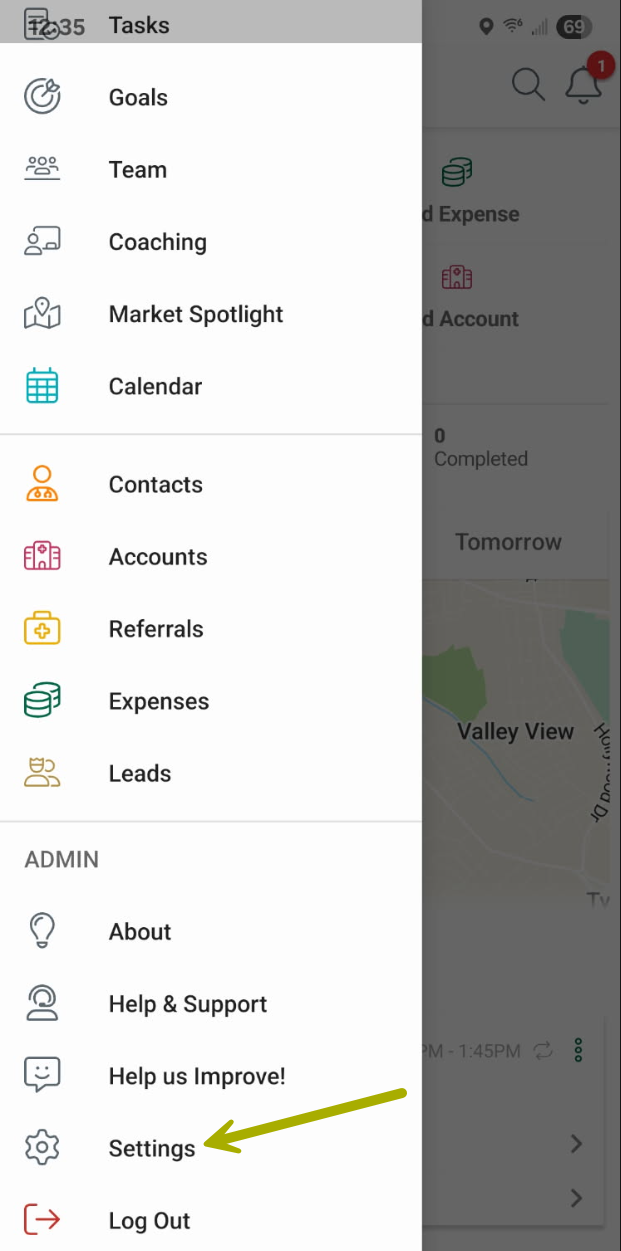
- Open the Navigation panel by tapping the icon at the top left of the page.

Sales Reps
- Tap on the Coaching button to see your coaching sessions.
- All of your coaching sessions are available to be viewed
Sales Managers (the coach)
- Tap on the Team button to see all the members of your team.
- Choose the rep you want to evaluate and tap their name
- Tap the Coaching link
- The reps existing coaching sessions will be visible - tap one to open it
- To start a new coaching session, tap the "Add" button
- Choose the coaching template you want to use
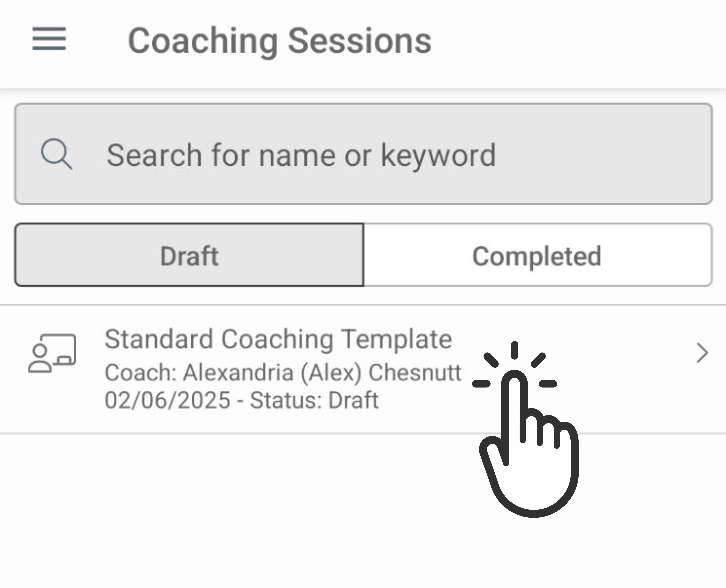
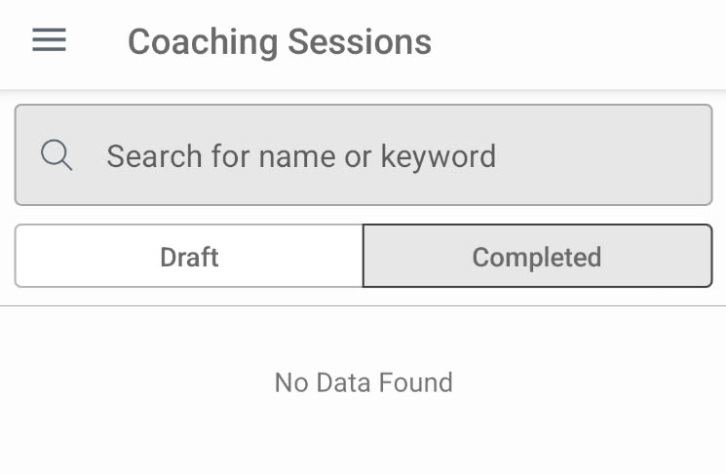
Draft vs Completed
- For either a rep or coach, you can choose to view drafts of coaching sessions or completed coaching sessions
| Click the image to the left to follow the storylane for a coaching session on Trella CRM mobile |  |
Complete Walkthrough
![]() Phone images are tall and skinny, so, in order to keep the cells in the table below from being too tall, the images on the right are a little small. Click on any image to enlarge it.
Phone images are tall and skinny, so, in order to keep the cells in the table below from being too tall, the images on the right are a little small. Click on any image to enlarge it.
|
The icon shown above is visible on most pages of Trella CRM mobile. Tapping the icon will open the menu panel. (next, below) |
 |
|
There are two buttons in the Navigation panel relevant to coaching. Viewing completed coaching sessions 1) Sales Reps - tap on the "Coaching" button and you will open the page shown below.
This page is where you will see coaching sessions where you are the person being evaluated. It will be blank until you are evaluated. You will be able to open coaching sessions from this page once they are completed. A page with entries is shown below. |
 |
|
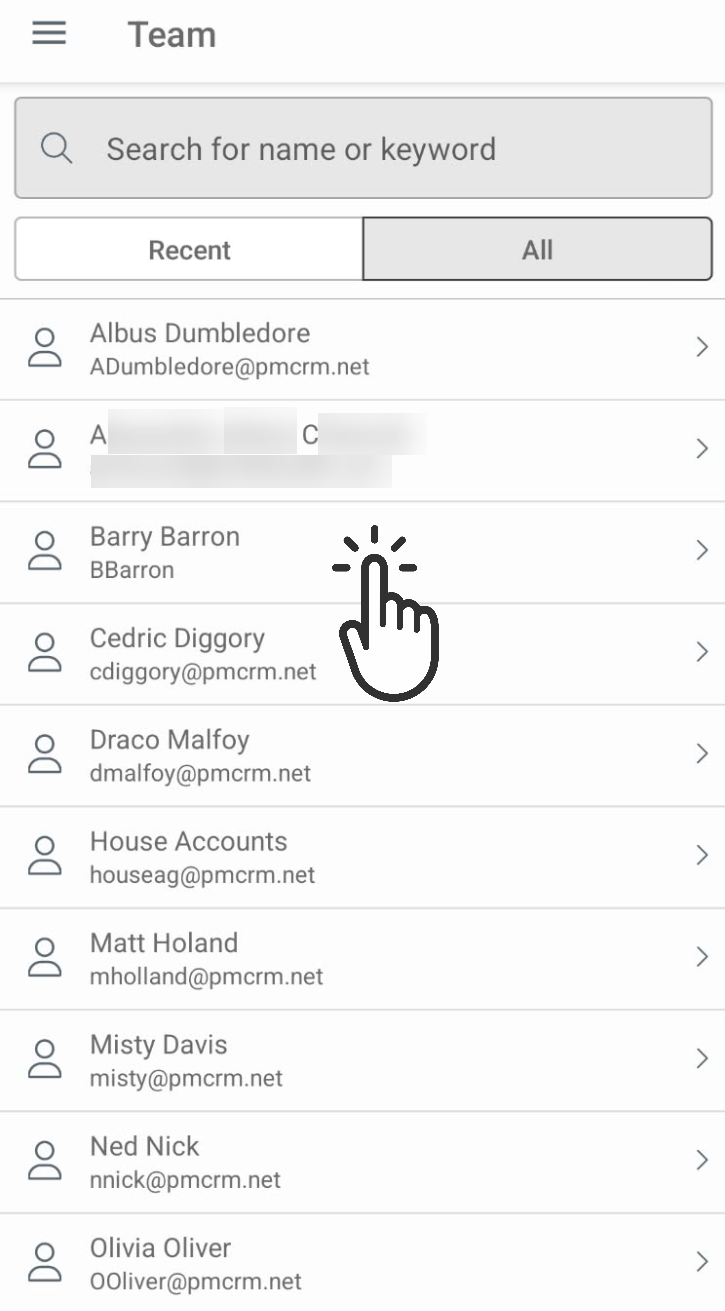
2) Sales Managers - if you want to start a new coaching session, tap on the "Team" button.
|
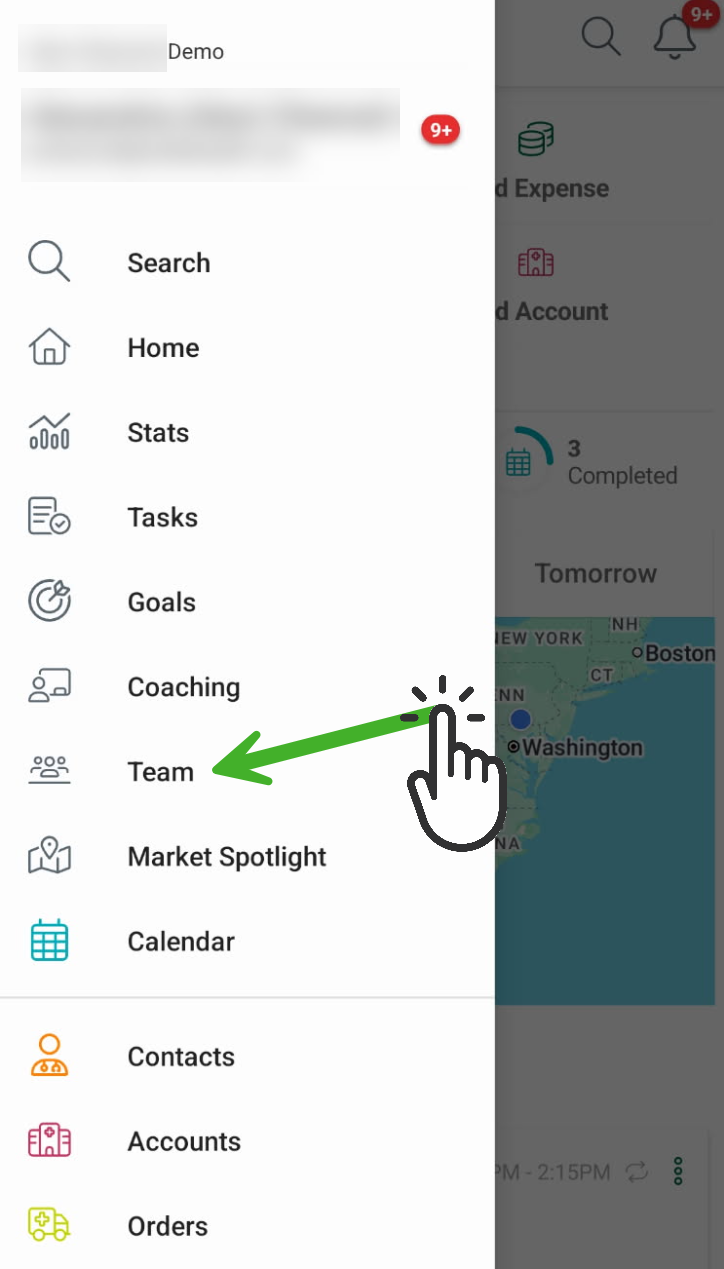 |
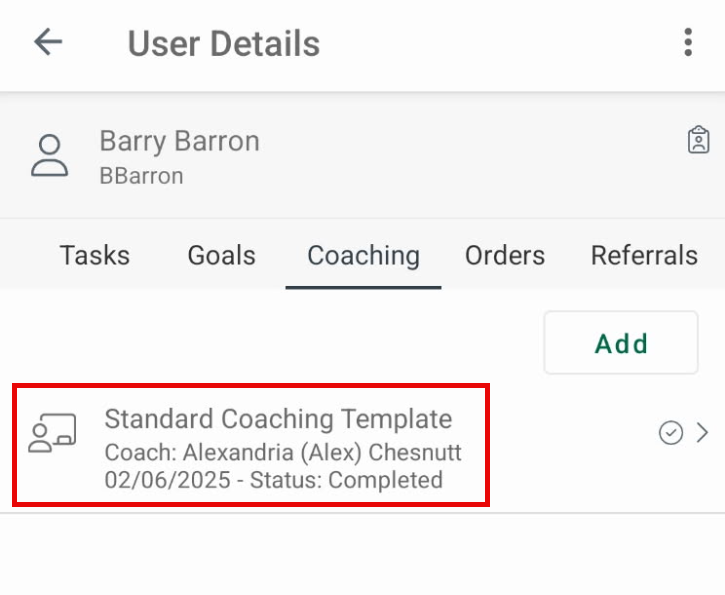
For this example, we tapped on Barry Barron. |
 |
|
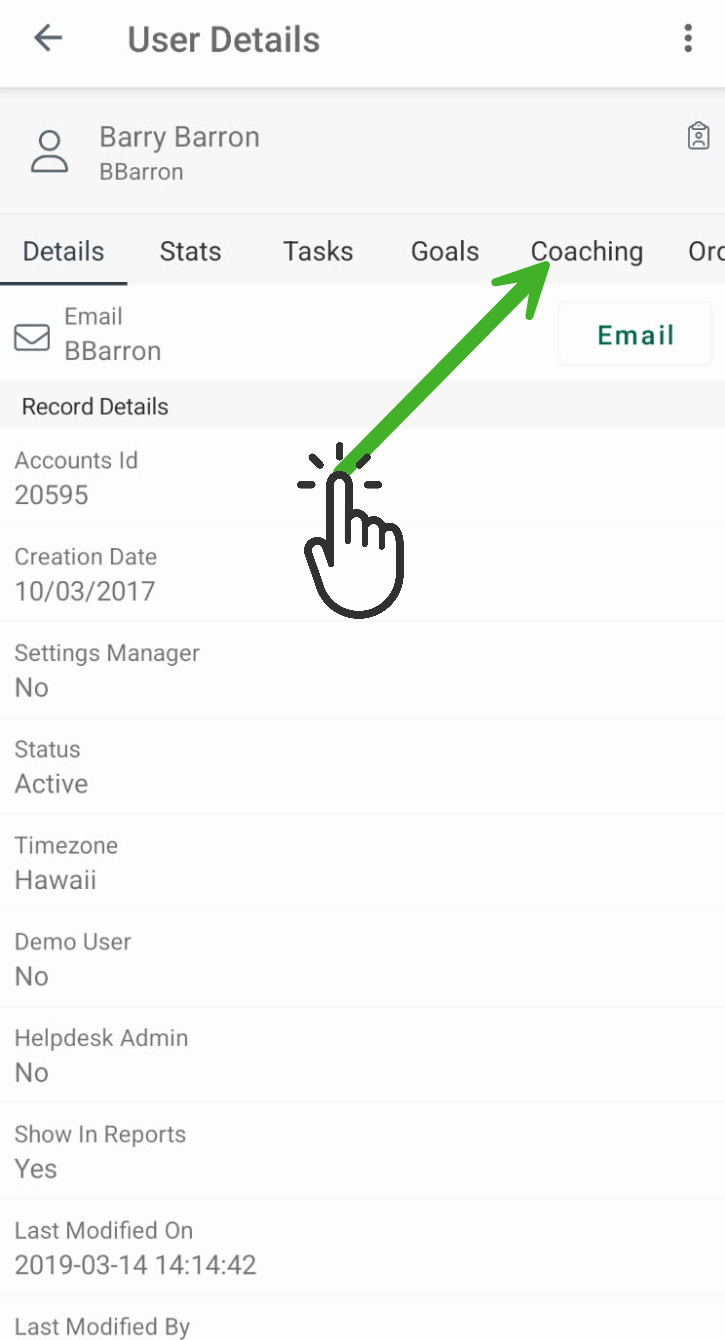
The User Details page includes information about the selected user. Since our focus is on coaching, the next step is to tap on the "Coaching" link to open the Coaching tab.
|
 |
|
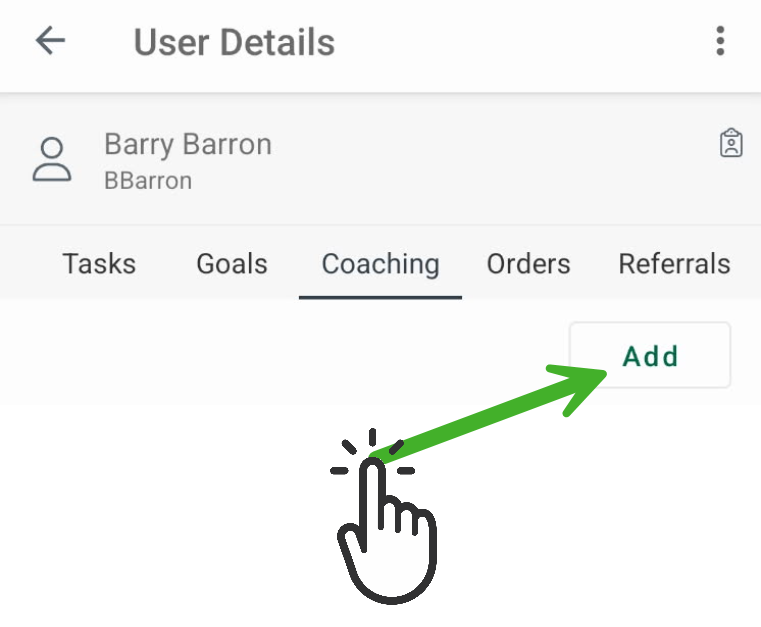
The Coaching tab will show any existing coaching sessions for the selected user. The image at right does not show any sessions, we are about to create the first. To start a coaching session, tap the "Add" button. |
 |
|
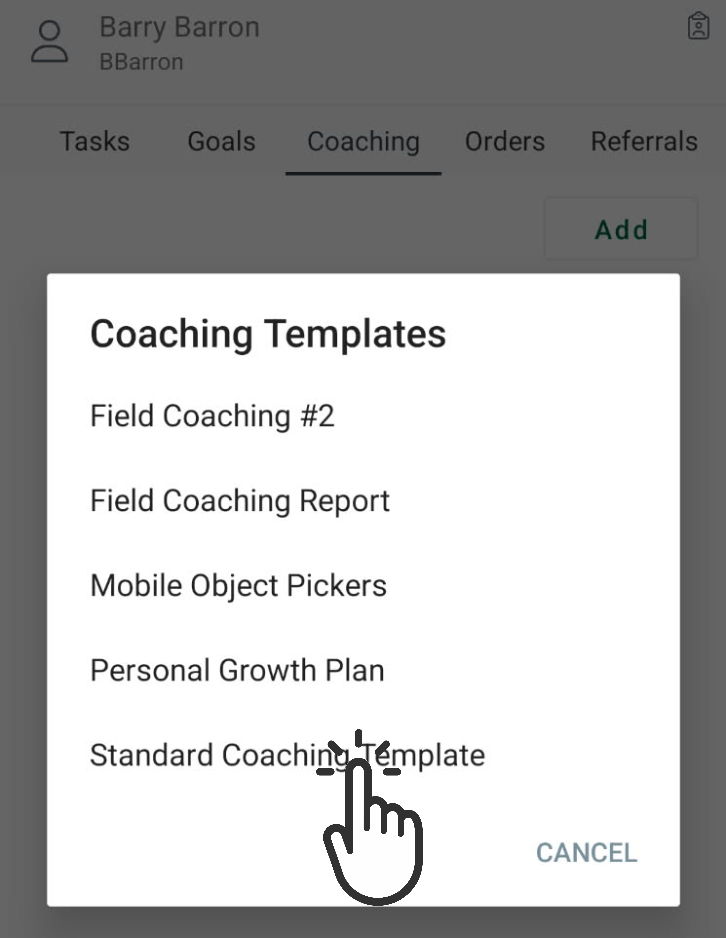
A dialog box will open that displays the existing coaching forms from which you can choose. The image on the right is an example. What you will see will depend on the templates your company creates for use.
|
 |
|
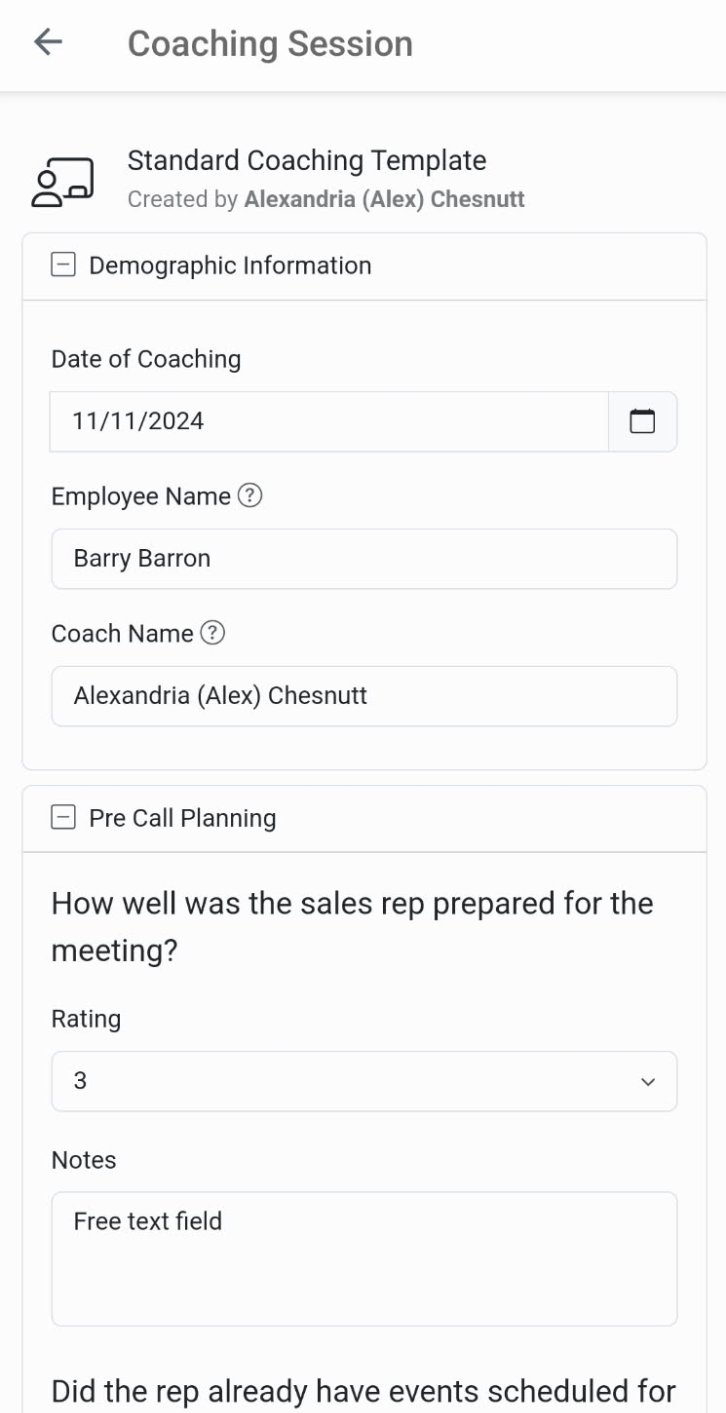
Coaching Session - some details
|
 |
|
Same image - more details
|
|
|
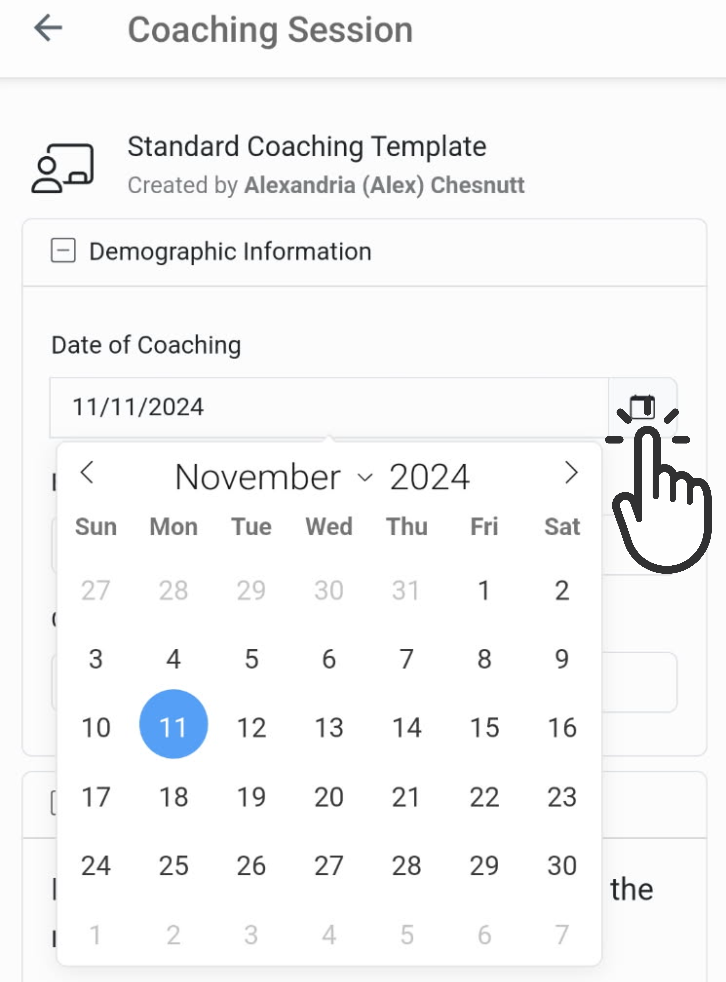
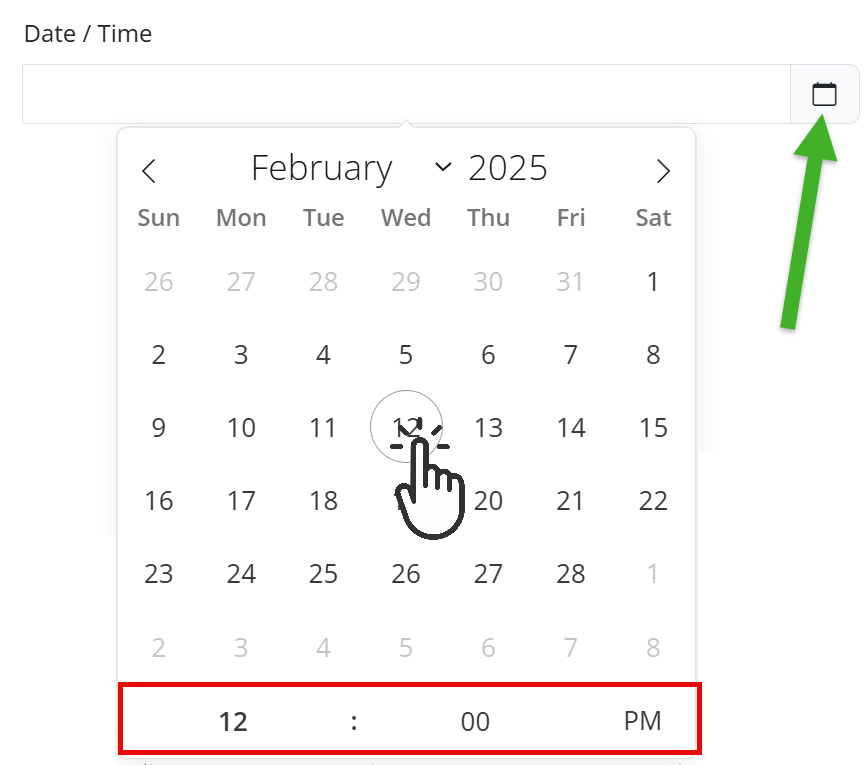
Dates/Calendar One field type available in the coaching template is a date. Tapping the small calendar icon to the right of the date field will open a calendar interface that makes it easy to set a date by tapping the date on the calendar. In a template, this is a "Date" component. |
 |
|
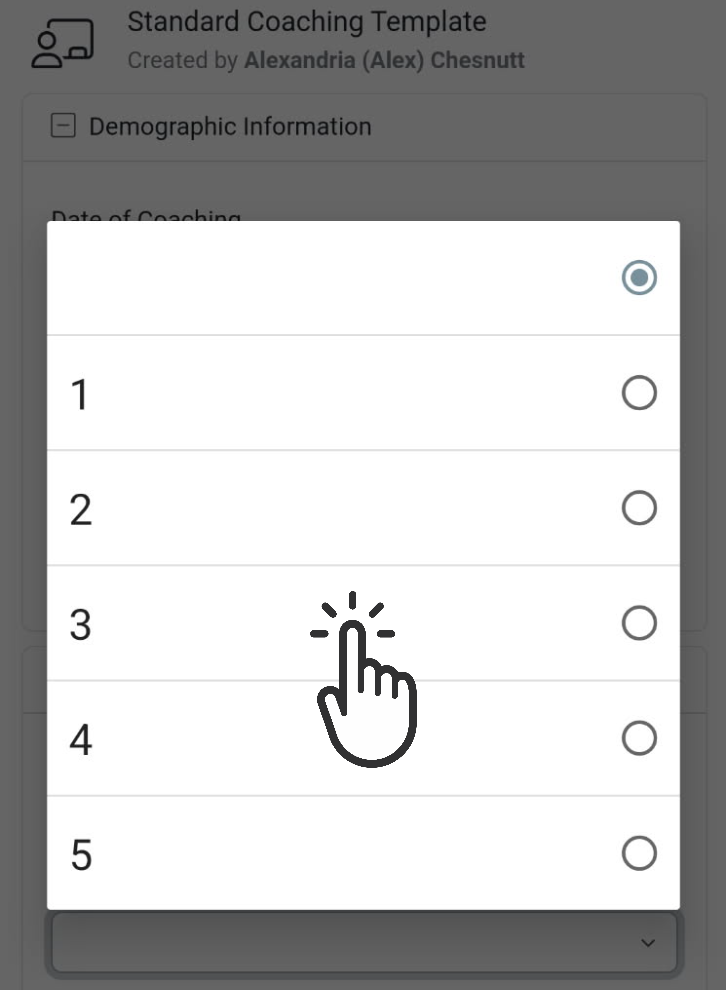
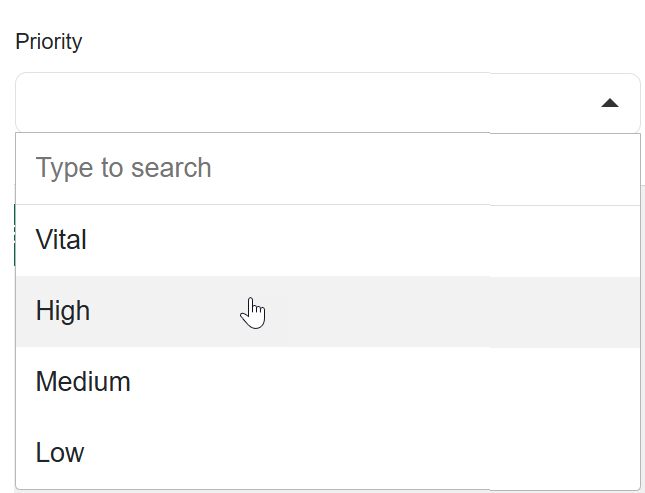
Ratings Part of the coaching interaction includes rating performance in response to specific questions. For example, "How well did the sales rep introduce themselves at the beginning of the meeting?" The coaching interface allows a coach to enter a numbered rank in response to a coaching question. Tapping the number in the dialog box records the rating for each question. In a template, this is a "Radio" component. |
 |
|
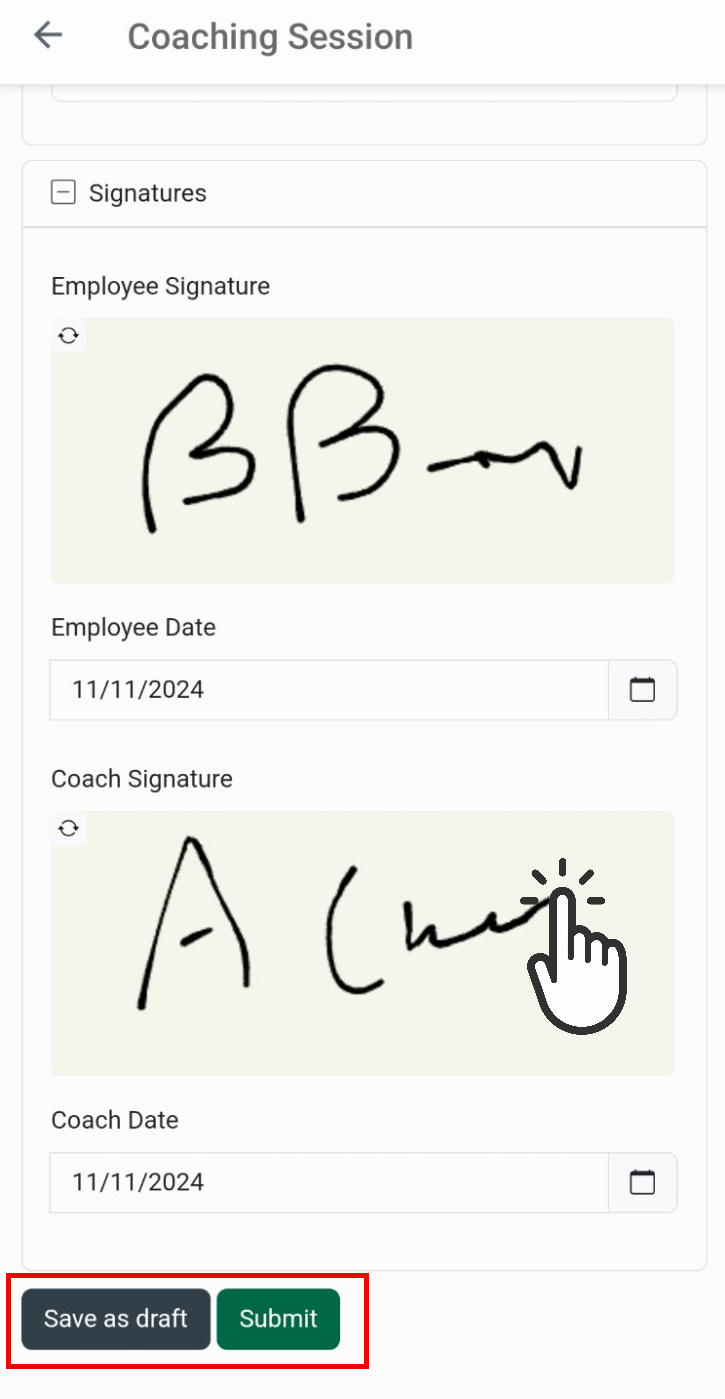
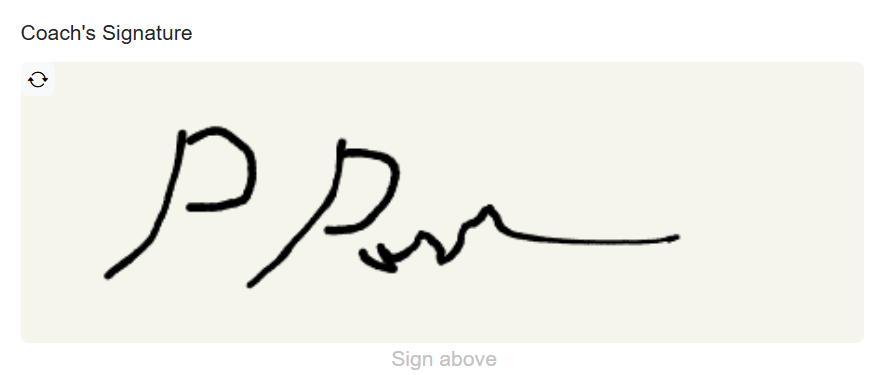
Signatures This is really too cool, but, in order to validate the coaching session, the coaching form includes fields that can capture the date and signature of the coach and rep. Sign the signature field with your finger. At the top left of the field is an icon that allows you to clear the field and sign again. At the bottom of the form are two buttons:
|
 |
|
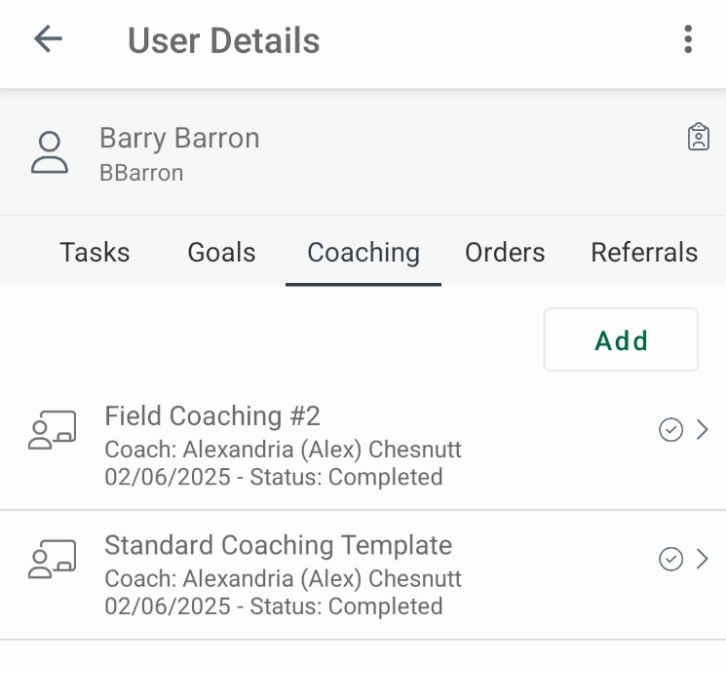
Back to User Details Once the coaching session is complete, it will show up under the Coaching tab on the User Details page for the selected user. In the image to the right, note that the session in the box is completed. Tapping the session will open up a page that shows all of the feedback. |
 |
|
Additional Coaching sessions As additional coaching sessions are completed for our selected user, they will show up under the Coaching tab on the User Details page for that user. |
 |
|
The Coaching page Remember when we opened the coaching page earlier? (top image) Well, the bottom image shows what a rep will see on the Coaching page when they open it after they receive a coaching session. Think of it this way. A manager completes coaching sessions for a selected team member through the Team page by using the User Details page. That manager can also view existing sessions on the User Details page. A sales rep will see their coaching sessions on their Coaching page. Tap the coaching session and the details page will open.
|
|
 Draft vs. Completed/Submitted
At the bottom of every form are two options, "Save as Draft" and "Submit."
-
Save as Draft - this is a temporary save, allowing time for the coach and the sales rep to make changes to the coaching session.
- The Manager can re-open the coaching session with these steps:
- Open the mobile menu
- Tap "Teams"
- Find the sales rep in the list - tap on their name
- Tap on the "Coaching" tab at the top of the page
- Tap on the coaching session in the "Drafts" list.
- The Sales Rep will open the session with these steps
- Open the mobile menu
- Tap on "Coaching"
- Tap on "Drafts" - a list Draft coaching sessions will be displayed
- Tap on the coaching session in the list.
- The Manager can re-open the coaching session with these steps:
- Submit - when both parties are finished editing and signing the form, the coach will tap the "Submit" button. The coaching session will be saved permanently; no further edits can be made.

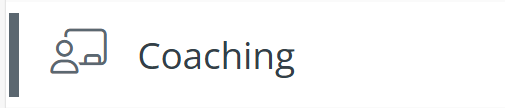
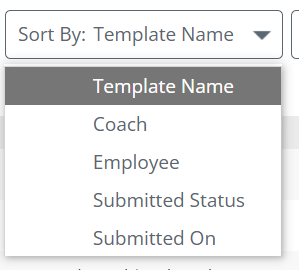
Coaching on Web
Page Overview
Use the image below to orient yourself to the basics of the Coaching page.
![]() There is no button to "Add" a new coaching session. All coaching sessions are created on a mobile device.
There is no button to "Add" a new coaching session. All coaching sessions are created on a mobile device.
|
|
 |
|
|
 |
|
In the example above, the filter will limit the sessions displayed in the table to reps named Barry.
|
 |
|
Examples: Once you have a lot of coaching sessions completed, you might want to sort by "Template Name" in order to group all standard sessions together. Or, you can sort by the order the sessions were completed so that you can review coaching historically with a rep.
When you have set the search filters, click the "Go" button to activate your choices. | |
![]() If you do not make any search/filter choices, all coaching sessions will appear in the table. You can then browse the table to find what you want. The search/filter tool will become more useful as the number of coaching sessions build up!
If you do not make any search/filter choices, all coaching sessions will appear in the table. You can then browse the table to find what you want. The search/filter tool will become more useful as the number of coaching sessions build up!
|
For Managers Draft - As a manager, you will be able to edit any white fields in any session in "Draft" mode. You might find it easier to complete the coaching session at your desktop. Completed - You can only view the content - no changes can be made. As a rep, you will only be able to view the content.
|
 |

![]() Coaching Sessions - All existing sessions will appear in the table. Use the details shown to identify a session or sessions you want to review with a rep.
Coaching Sessions - All existing sessions will appear in the table. Use the details shown to identify a session or sessions you want to review with a rep.
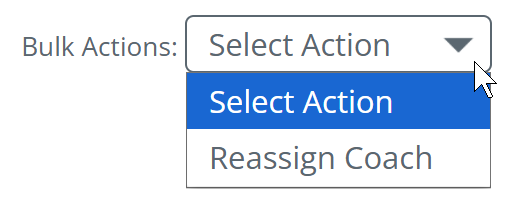
![]() Bulk Actions - There is only one bulk action, Reassign Coach, but you can apply it to as many coaching sessions as you want.
Bulk Actions - There is only one bulk action, Reassign Coach, but you can apply it to as many coaching sessions as you want.
- Click on the checkboxes to the left of the coaching sessions you want to reassign
- Then click on the Bulk Actions dropdown and select "Reassign Coach."
The following dialog box opens.
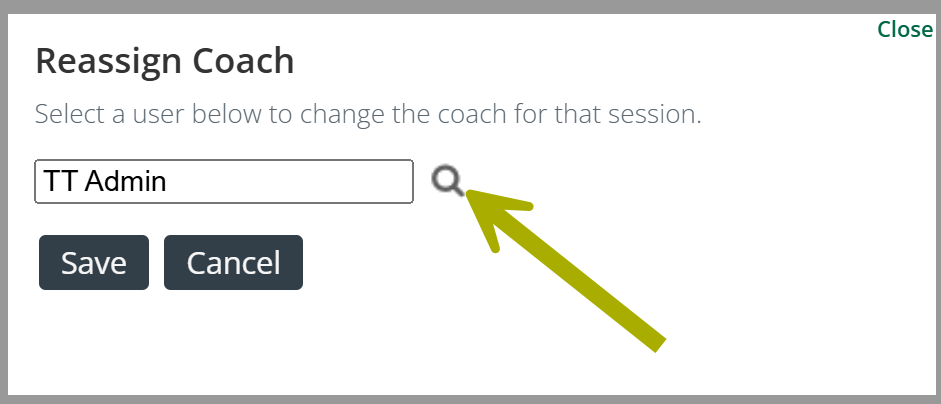
- Click on the magnifying glass icon
 to open the "Find a User" dialog box
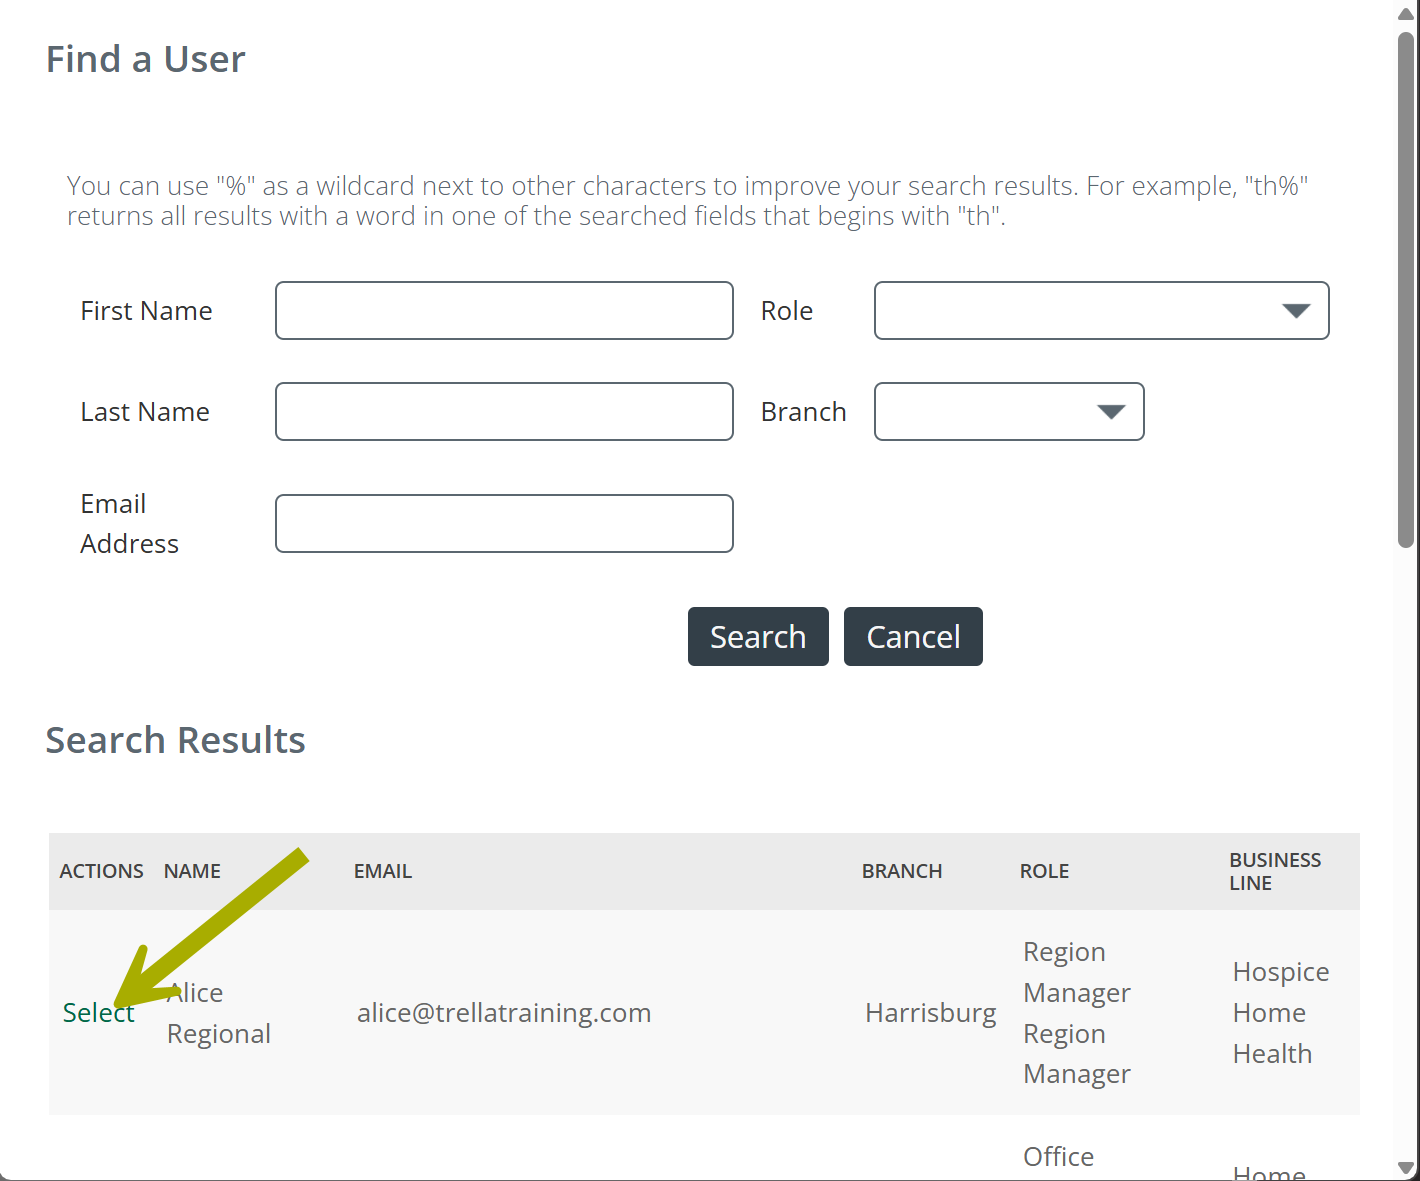
The top section allows you to search for a specific user by using the fields shown.
- Click on the "Select" link to the left of the user's name
 What will I see on the Coaching page?
What you will see is determined by the permissions assigned to your role.
- An account administrator will see all coaching sessions for all users.
- A sales manager will see all coaching sessions for their reps. (The coaching sessions they completed.)
- A sales rep will see their own coaching sessions
Coaching!
A sales manager and one of their reps can sit together and view an entire history of a coaching sessions using Trella CRM on the web.
- Opening the most recent session will facilitate conversation on strengths and weaknesses demonstrated during the most recent evaluation.
- The notes in the coaching session will help both coach and rep to remember details from the visit. This could spark a conversation about successes or areas for growth.
- And, of course, all previous sessions are available. Looking at past coaching sessions can identify trends over time.
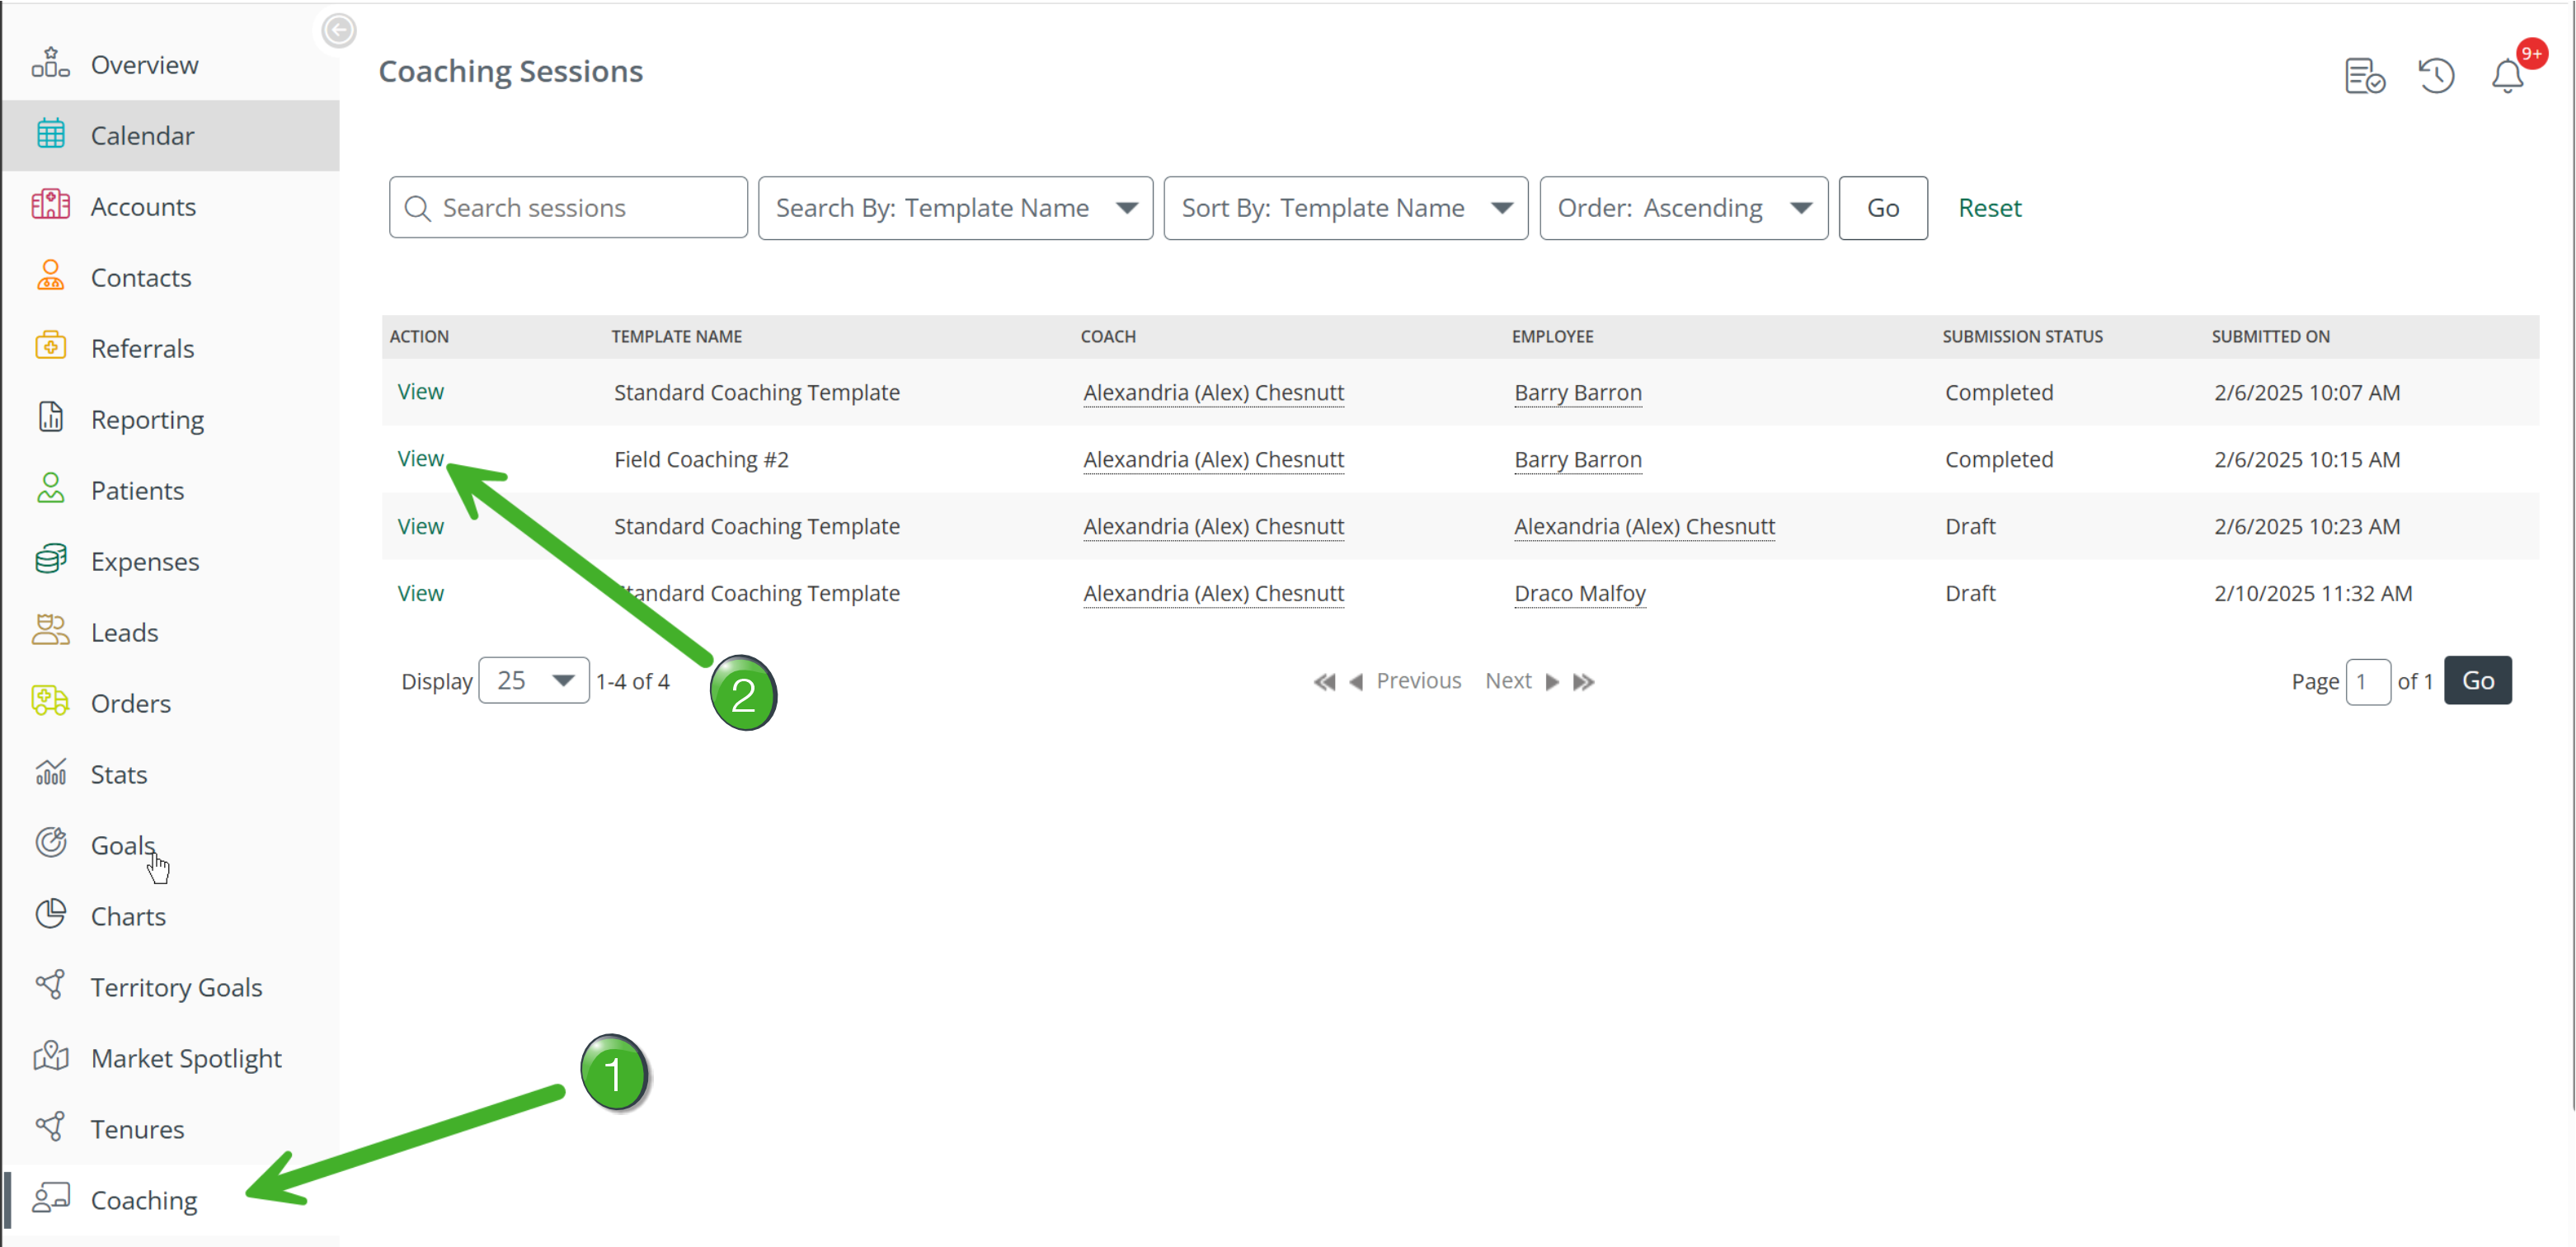
Duplicating a Coaching Session
Often, you may want to save time filling out all the details of a coaching session because the evaluation is so similar to a previous session. To save time, an admin or manager is able to duplicate a previous coaching session for a rep to make filling out the new session quicker.
 A few requirements
- To duplicate a session, it must be complete, that is, a prior coaching session that is in draft mode can't be duplicated.
- The user being coached needs to be active in Trella CRM
- Access to this feature depends on the setting in the Coaching Template Details - Settings > Coaching Templates > Edit > Access (See Editing Existing Coaching Templates - below.)
Two Steps
Use the following steps to duplicate a coaching session.
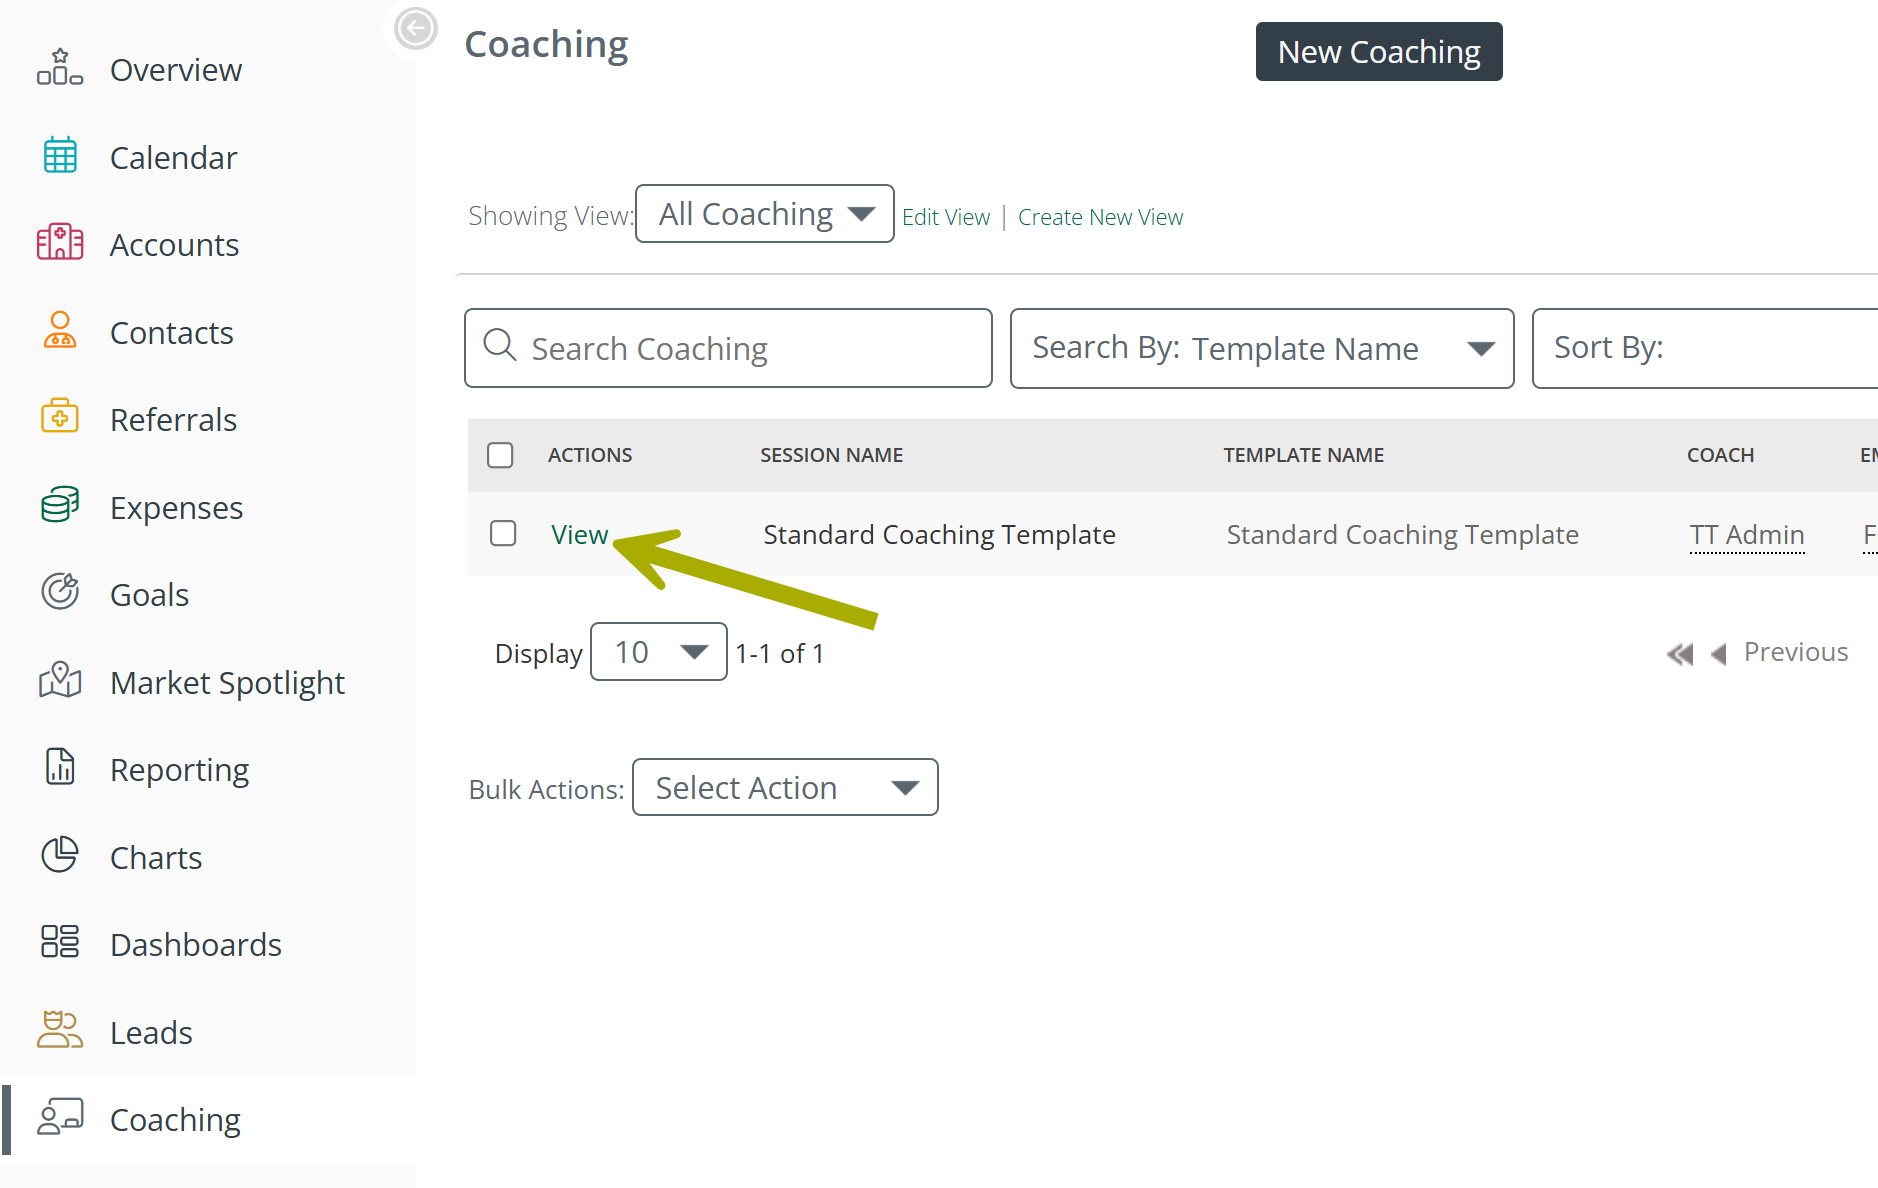
- On the coaching page, find the coaching session you want to duplicate.
- Click on the "View" link to the left of the Session name.
![]() Every coaching session of the same type will have the same name. Look for the name of the employee in the "Employee" column to differentiate which session to duplicate.
Every coaching session of the same type will have the same name. Look for the name of the employee in the "Employee" column to differentiate which session to duplicate.
The selected coaching session will open.
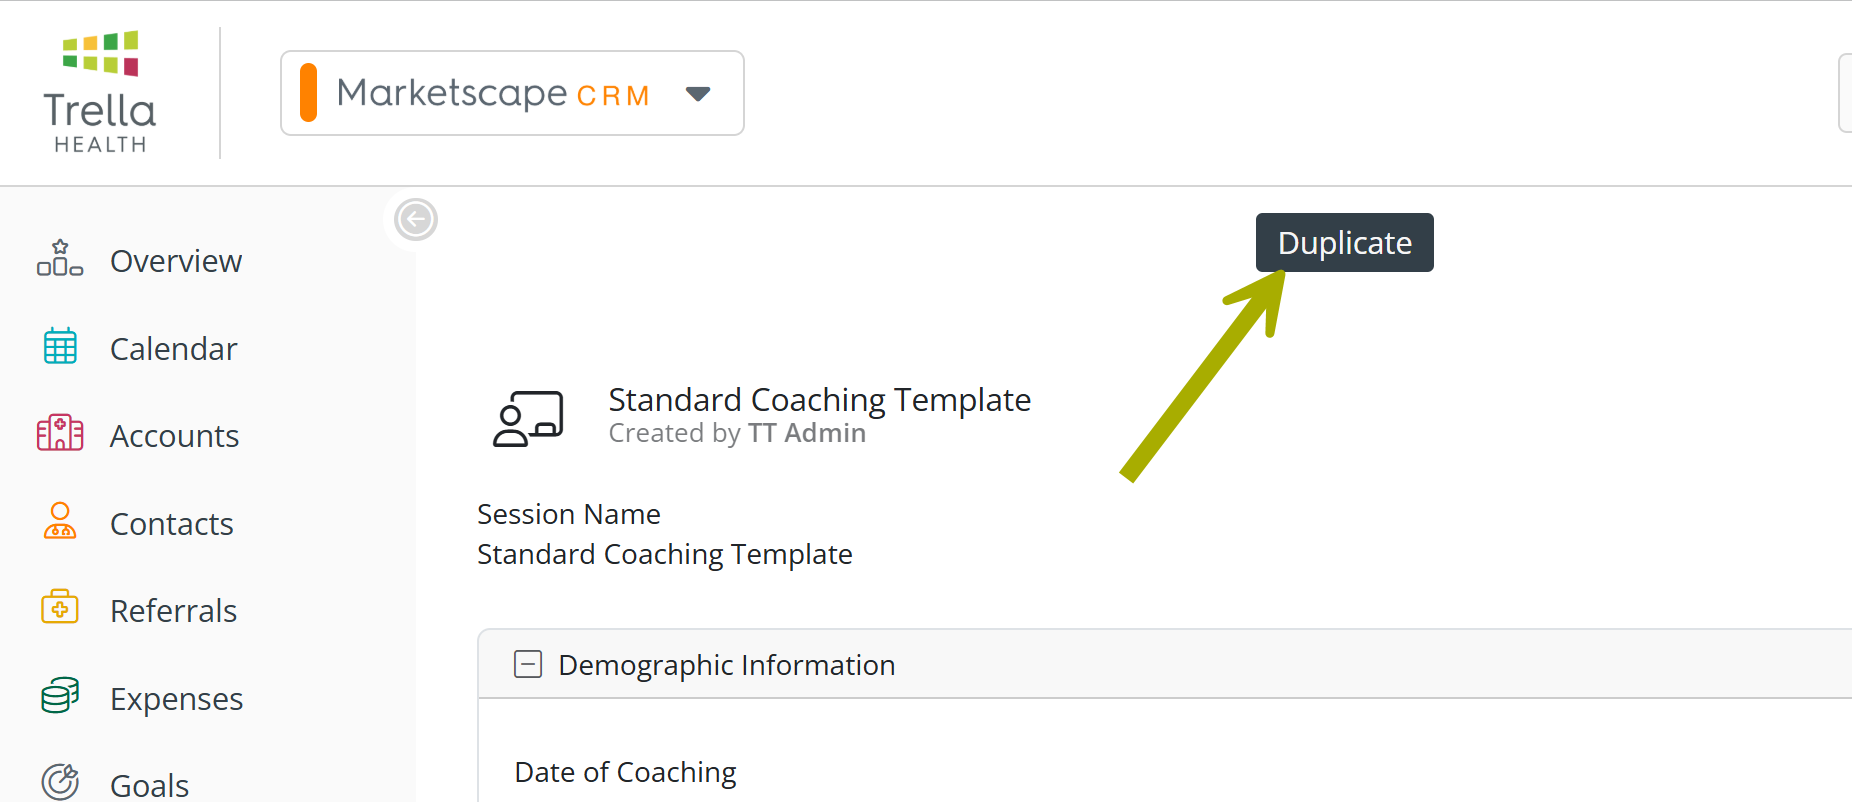
- Click on the "Duplicate" button
![]() True Duplicate - Every field will be duplicated - notes, selections, signatures, everything. This allows you to do a new coaching session which will only require changes to be made.
True Duplicate - Every field will be duplicated - notes, selections, signatures, everything. This allows you to do a new coaching session which will only require changes to be made.
Coaching Notifications
When a new coaching session is created or completed, a notification will be sent to the person being coached... that is, if notifications are turned on.
![]() Turning on notifications in Trella CRM happens at two levels.
Turning on notifications in Trella CRM happens at two levels.
- Phone - Your phone has settings for each application installed on it. One setting is to turn notifications on for a specific application. Specifically, if you want to receive coaching notifications in Trella CRM, you will need to turn them on in your phone settings. The process could be called enabling or unblocking notifications.
- Trella CRM - Once you have enabled notifications on your phone, you can enable specific notifications within Trella CRM. Instructions below.
![]() Coaching Notifications are enabled by default.
Coaching Notifications are enabled by default.
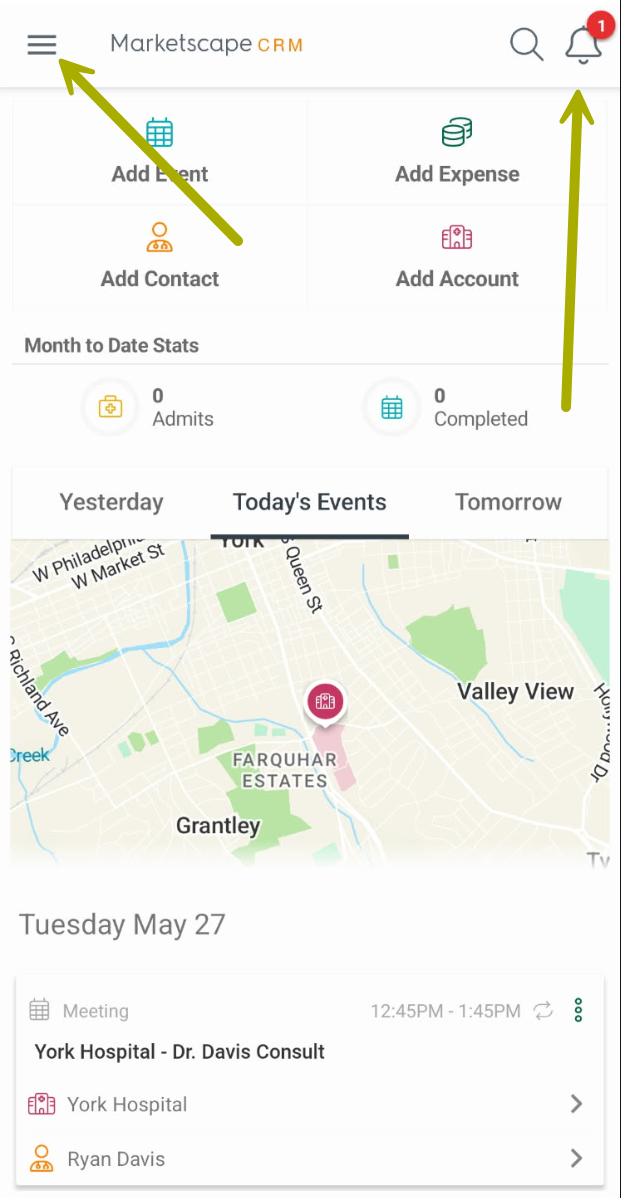
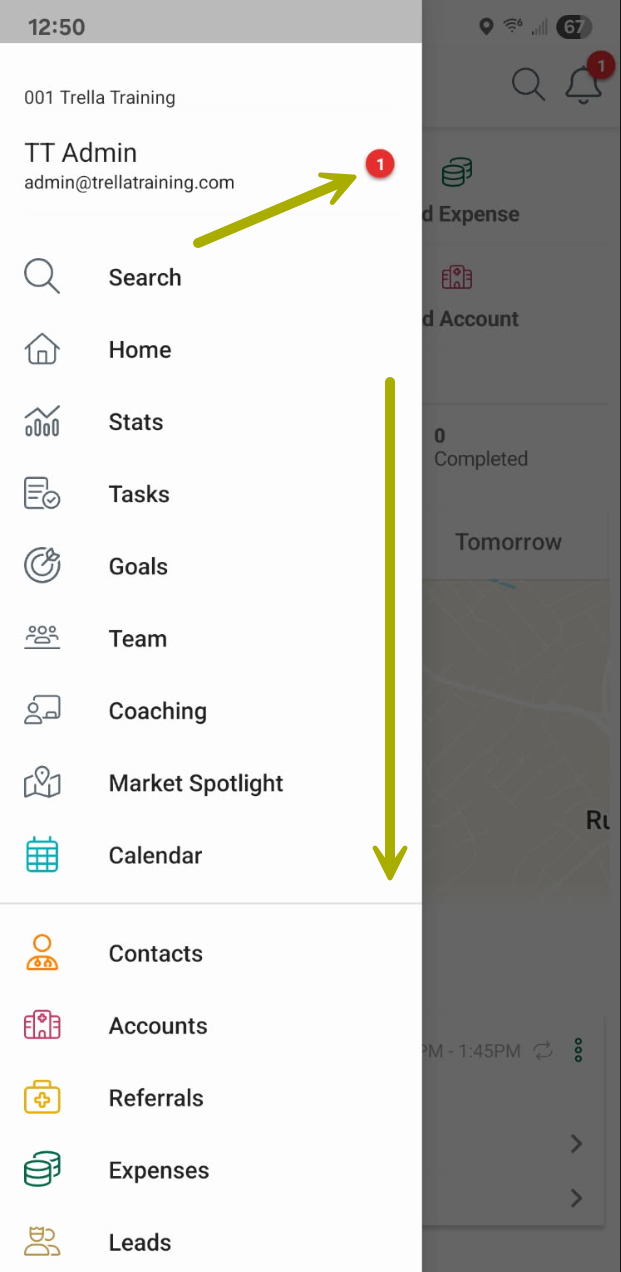
How to enable coaching notifications
Follow the listed steps to turn on coaching notifications.
|
|
 |
|
The count of unread notifications is shown in the menu (arrow)
|
 |
|
 |
|
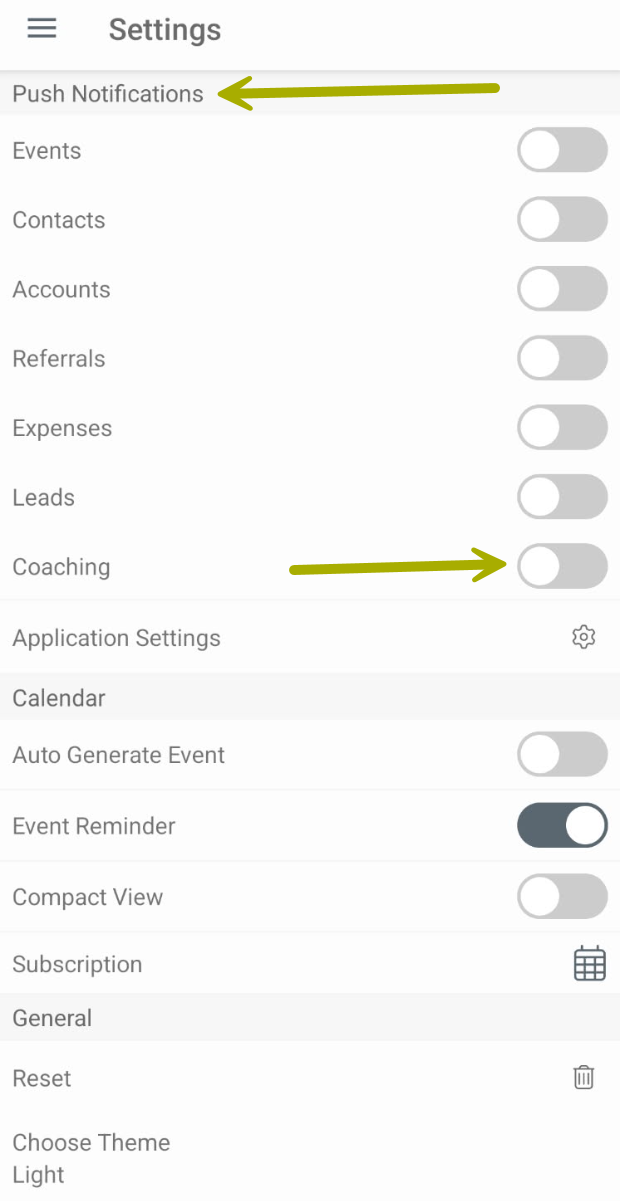
The Settings page includes numerous settings for Trella CRM. The first section is for turning push notifications on or off.
|
 |
|
There are two possible responses when you attempt to enable a push notification in the Trella CRM Settings page.
| |
| With phone notifications enabled/off | With phone notifications disabled/on |
|
If notifications for Trella CRM are disabled on your phone, you will be prompted to enable notifications and you will be asked if you want to do so. The process to enable notifications for Trella CRM on your phone will be different depending on your phone. Once you have enabled notifications for Trella CRM on your phone, you will be able to tap the toggle next to Coaching on the Settings page. (At right)
|
If notifications for Trella CRM are enabled on your phone the toggle will change as shown. Notifications are now on.
Turning on notifications for any of the other features shown in the image above will work the same way. |
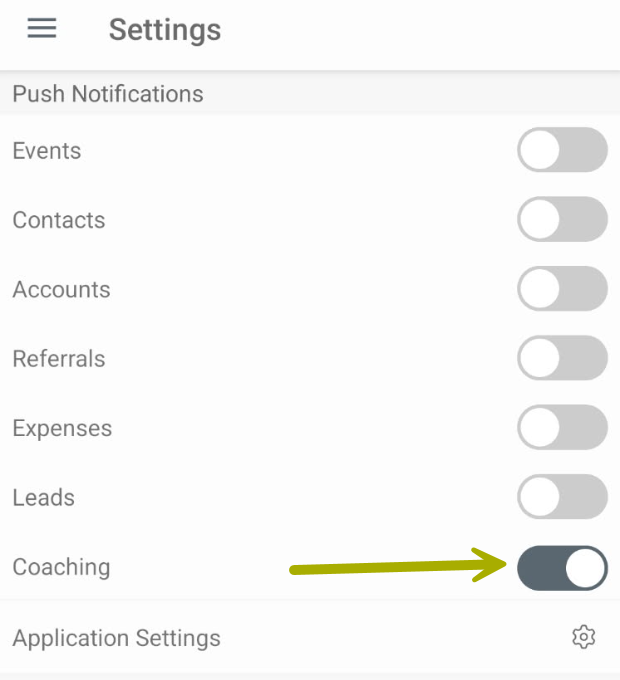
Once you have turned on the toggle, you will received coaching notifications.
What Notifications will I see?
You will receive a notification on both mobile and web when a coaching form is created for you and you will receive another notification when the coaching from is completed.
Editing and Creating Coaching Templates
Trella Health provides a standard coaching form to all customers. Use this form or edit it to more closely align with your company objectives. Or create your own custom form. Instructions for editing an existing form or for creating a new form are included below.
![]() If you want Trella Health to create a custom form for you, please make contact with your customer success manager for pricing.
If you want Trella Health to create a custom form for you, please make contact with your customer success manager for pricing.
Coaching Templates Page Overview
 Getting Oriented
Use the following image to get started with the Coaching Templates page.
|
|
 |
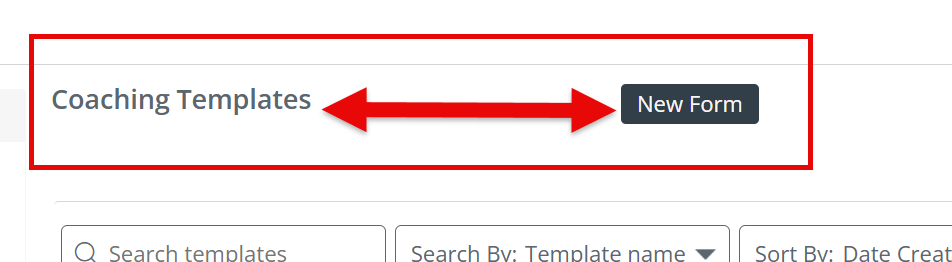
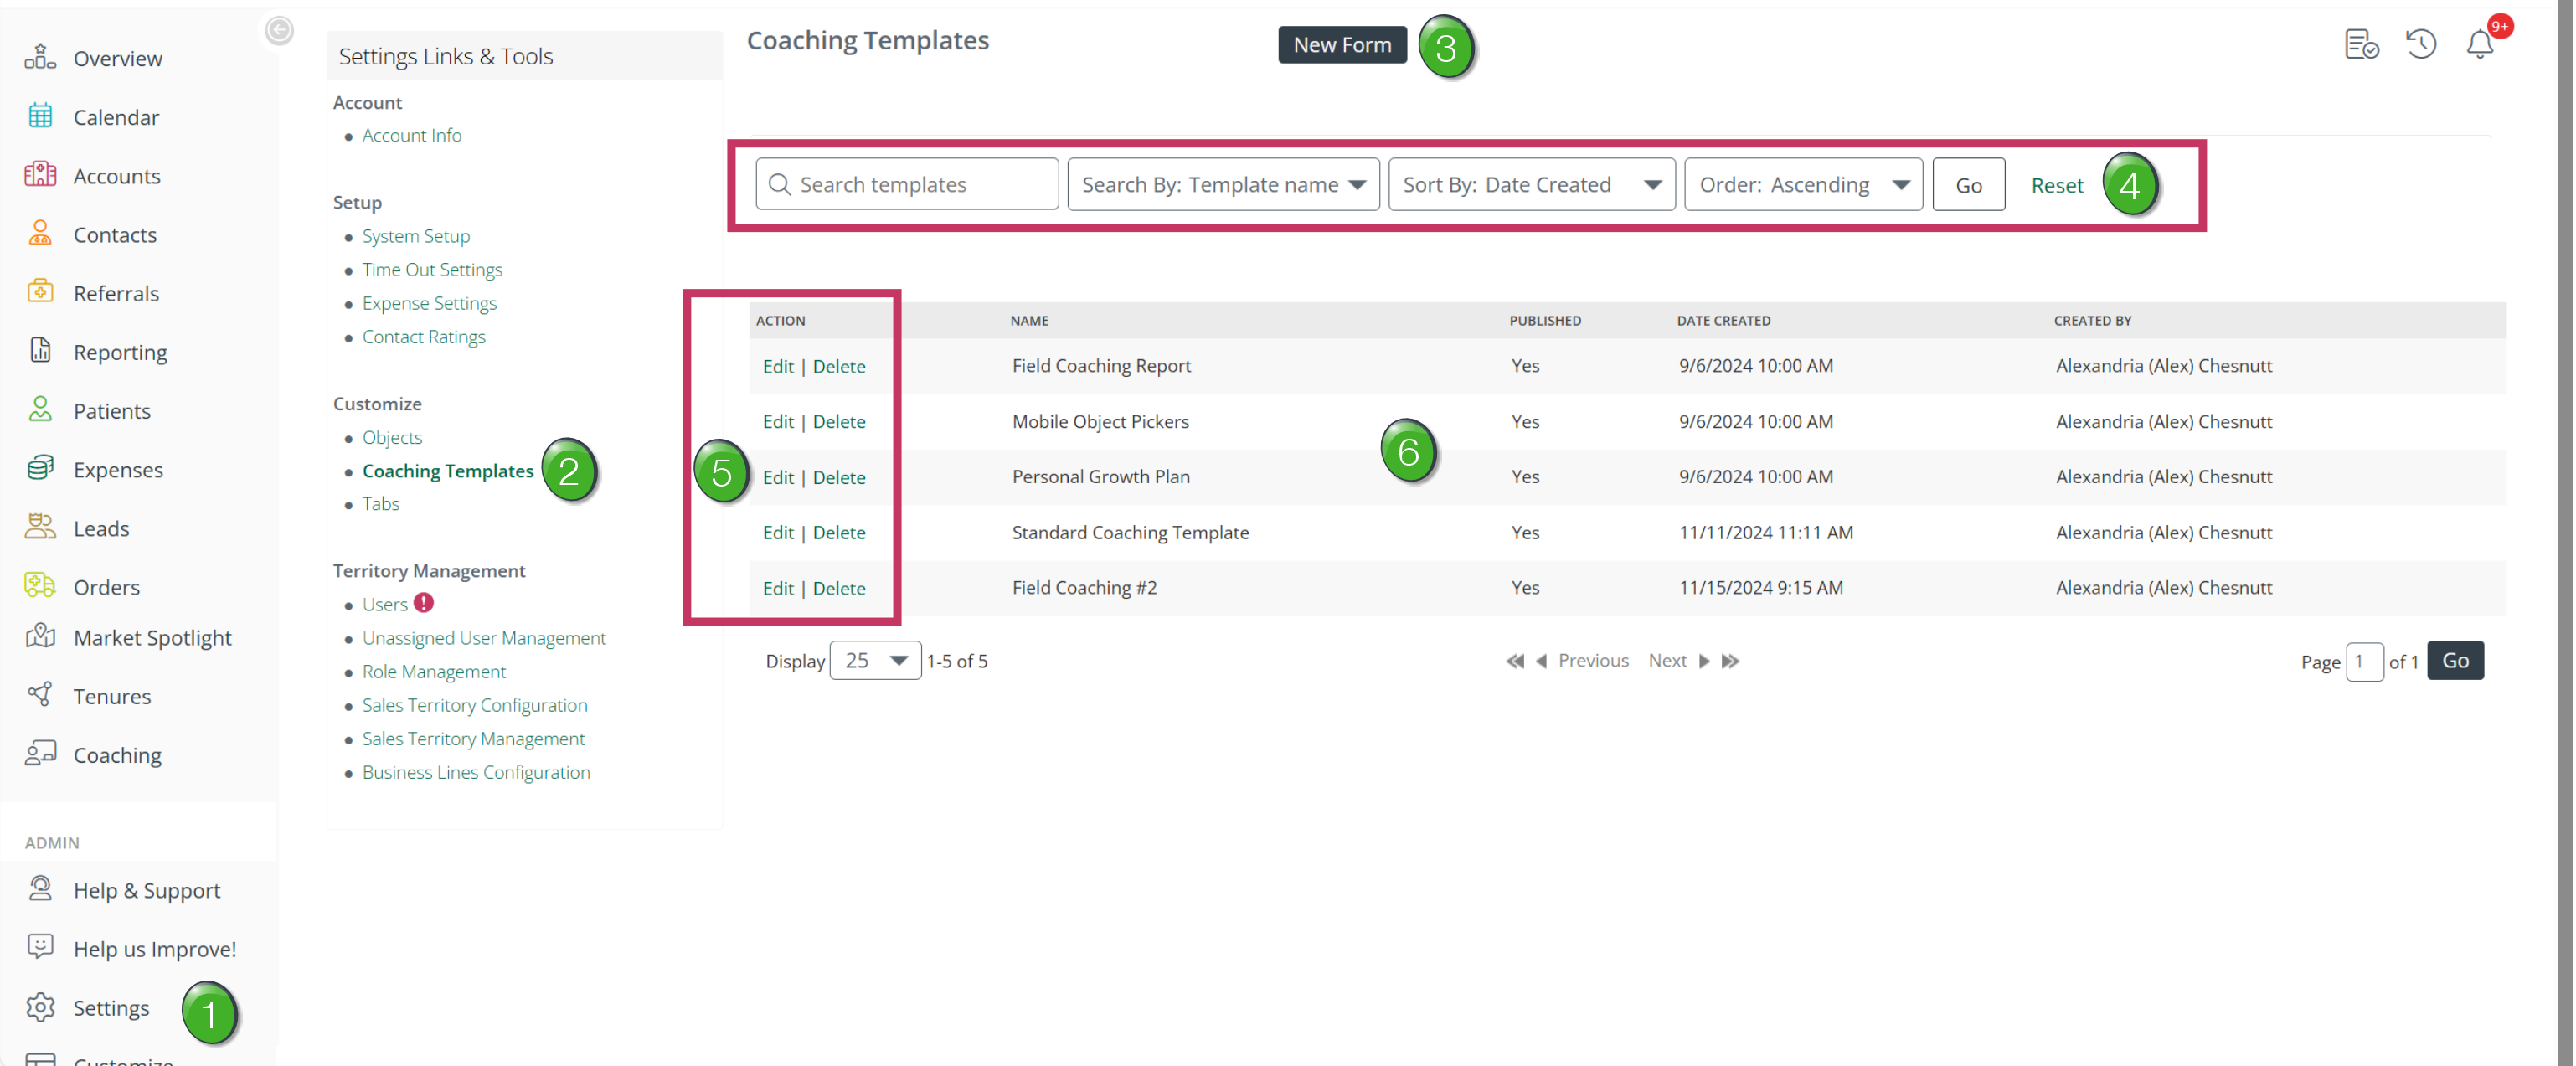
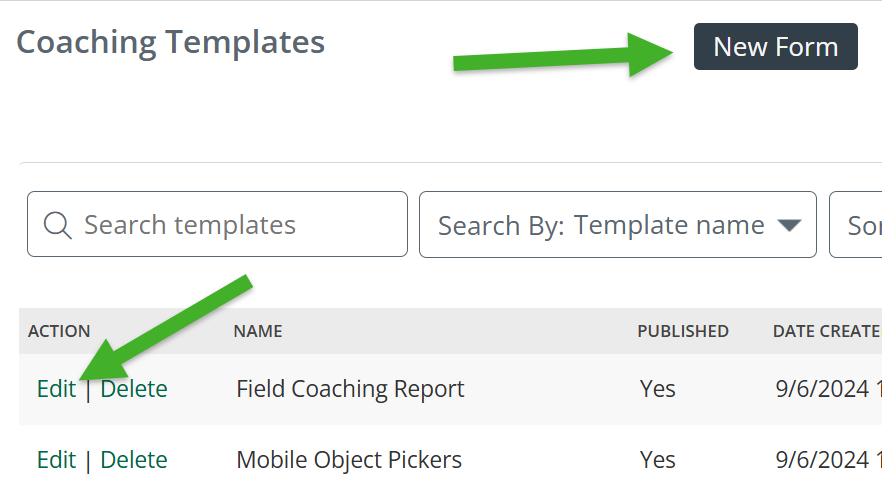
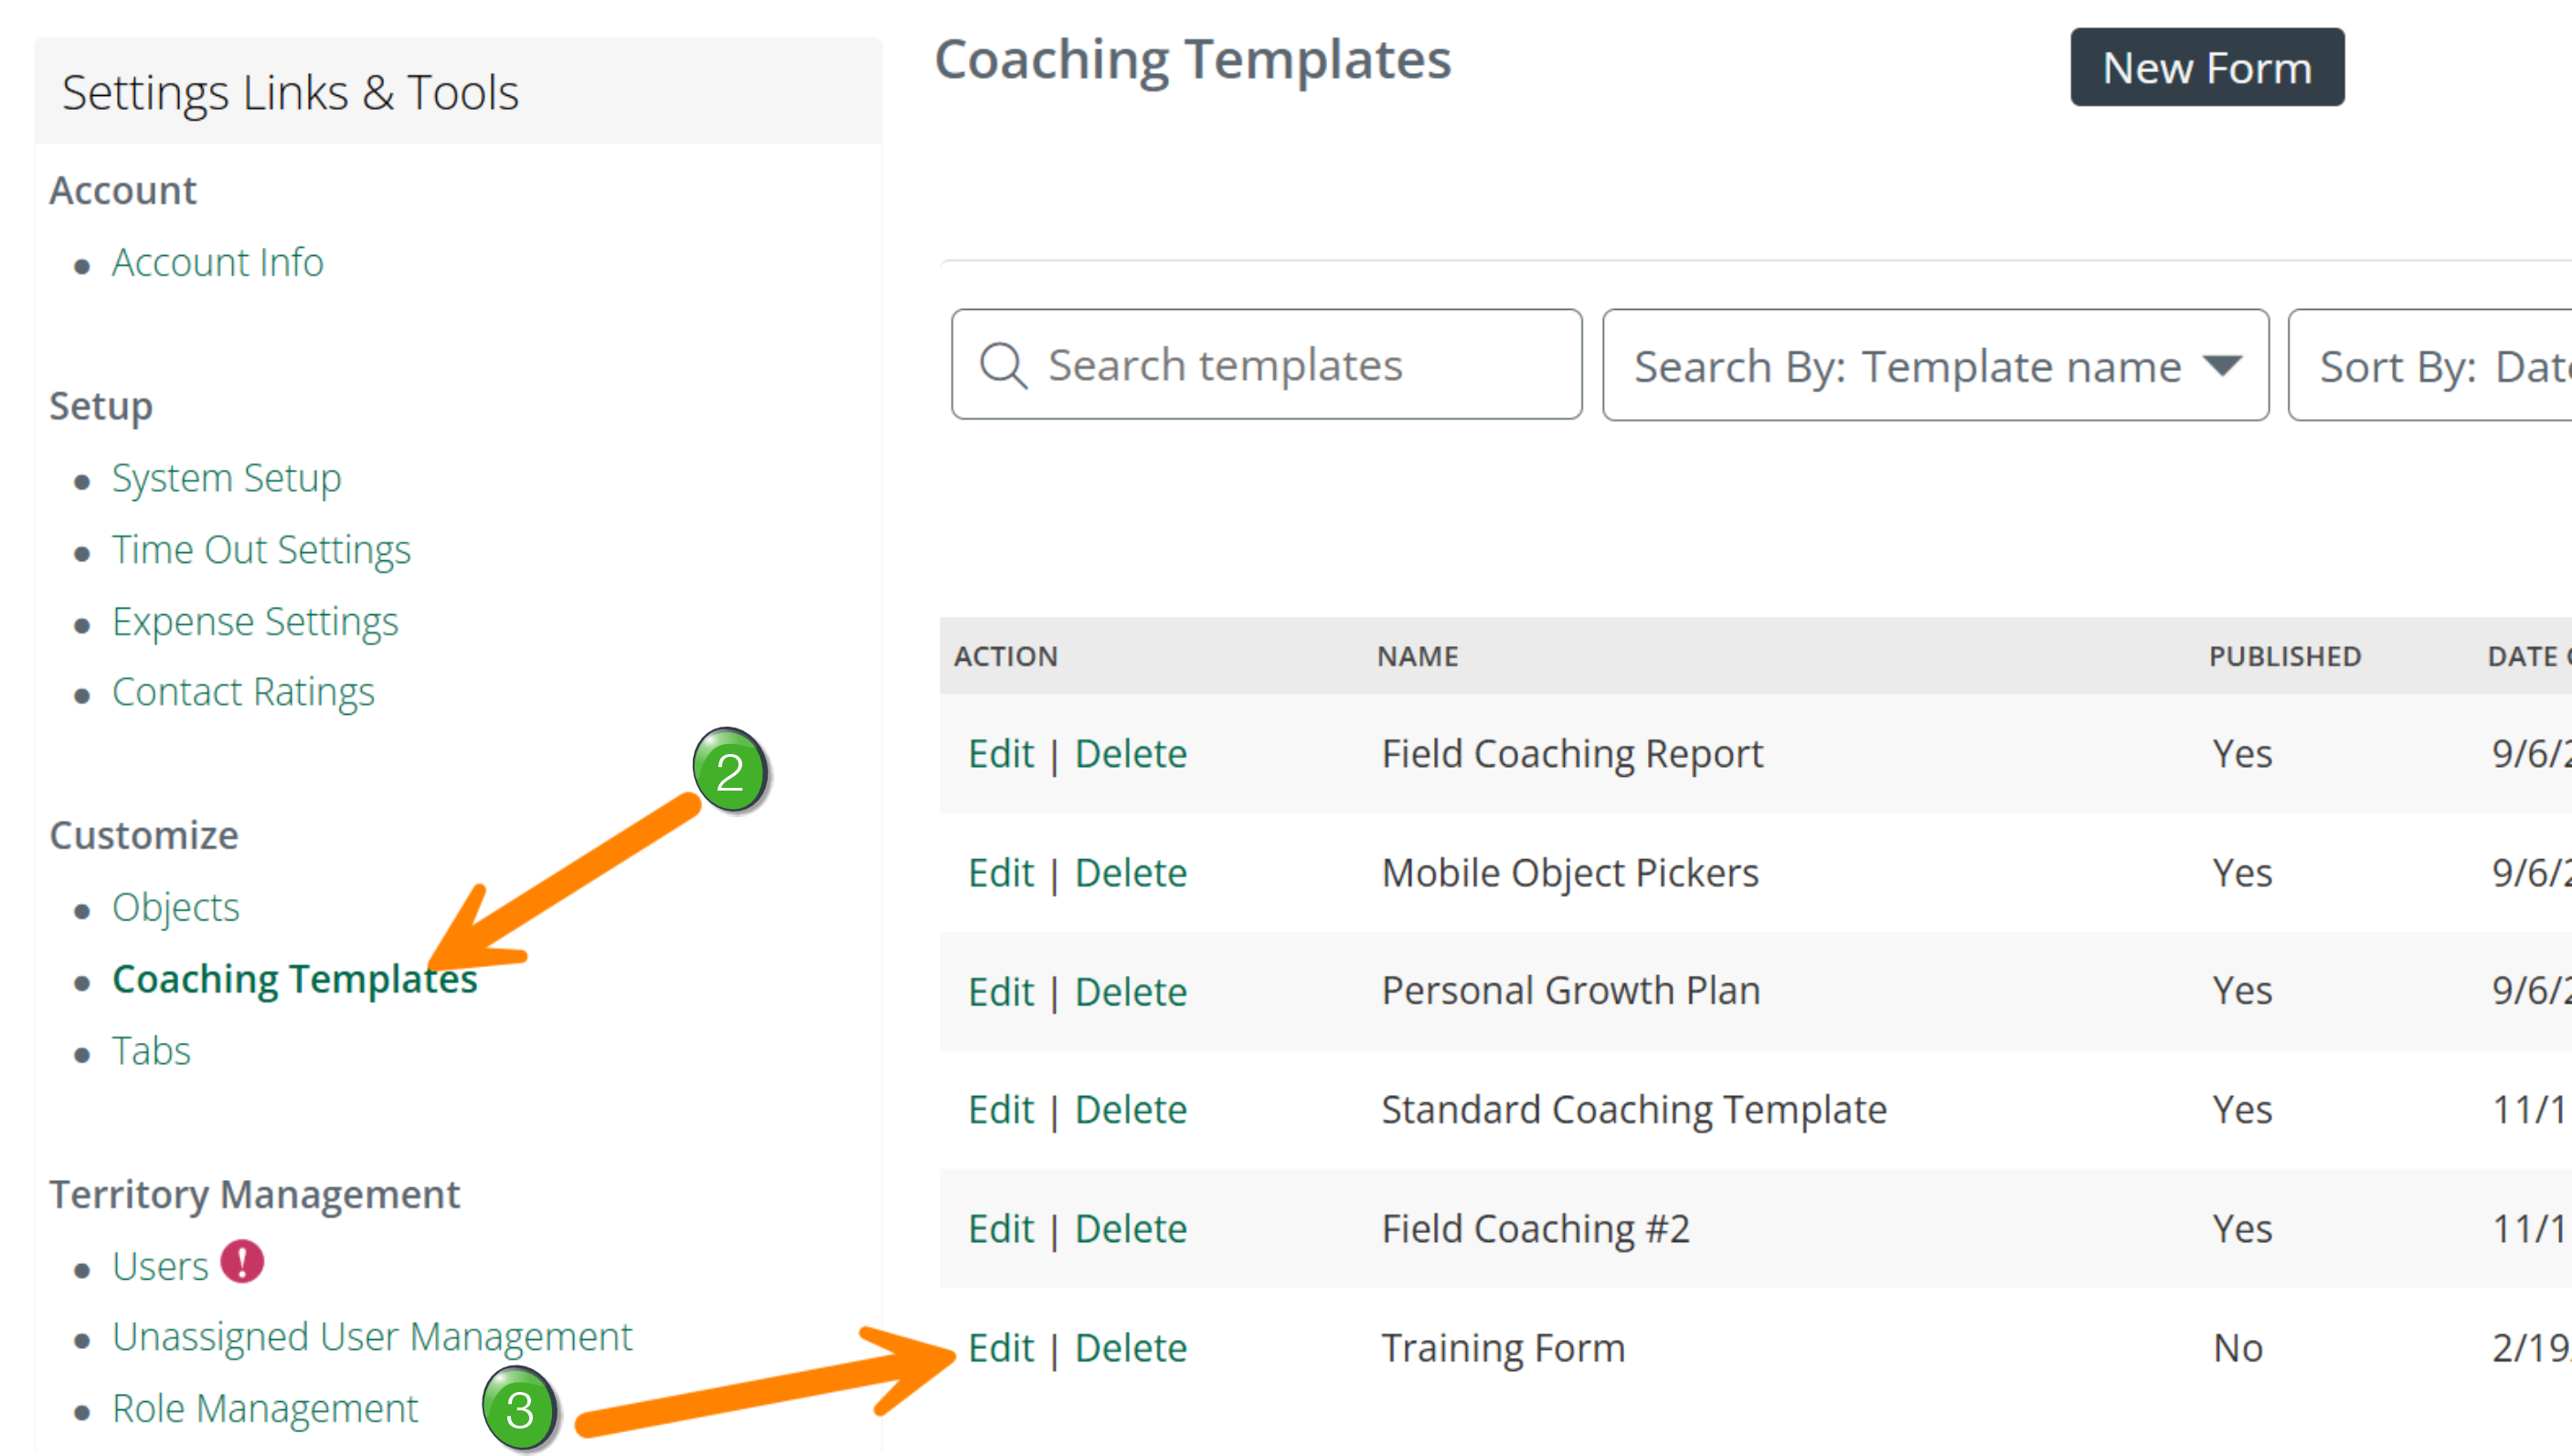
![]() Click on the "Coaching Templates" link in the menu. This will open the Coaching Templates page. The image above shows what this interface looks like.
Click on the "Coaching Templates" link in the menu. This will open the Coaching Templates page. The image above shows what this interface looks like.
![]() Click the "New Form" button to create a new coaching template. see Creating a New Coaching Form below for details.
Click the "New Form" button to create a new coaching template. see Creating a New Coaching Form below for details.
![]() Search/Filters - If your company creates a large number of coaching forms so that there are too many to scroll through, you can use the Search/Filter tool to find a specific coaching template or a group of templates.
Search/Filters - If your company creates a large number of coaching forms so that there are too many to scroll through, you can use the Search/Filter tool to find a specific coaching template or a group of templates.
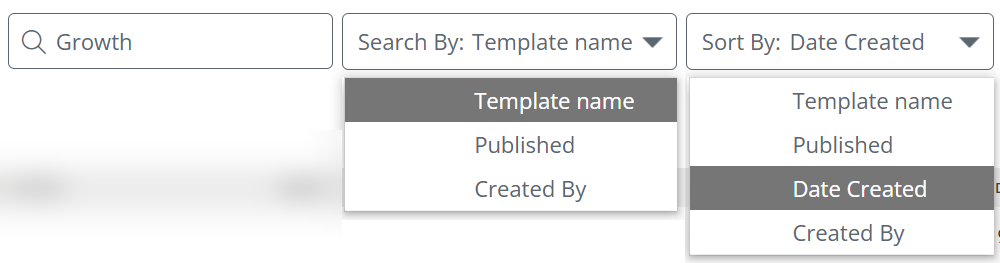
For this example, we are looking for the coaching template, "Personal Growth Plan." We typed "Growth" into the search field and chose "Template name" from the "Search by" dropdown. The other main search parameters you can choose from are shown in the image above.
Click the "Go" button when you are ready to search. All coaching templates that match your search parameters will be displayed in the table.
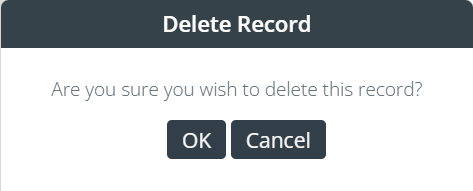
![]() Edit/Delete - Click on the "Edit" link to the left of a specific coaching template in order to edit that coaching template. Click on the "Delete" link to the left of a coaching template to delete it. You will need to confirm that you want to delete the coaching template.
Edit/Delete - Click on the "Edit" link to the left of a specific coaching template in order to edit that coaching template. Click on the "Delete" link to the left of a coaching template to delete it. You will need to confirm that you want to delete the coaching template.
![]() Coaching Templates - All of your company templates will appear in the table. In each row, if the word "Yes" appears in the Published column, the template in the row will be available for use.
Coaching Templates - All of your company templates will appear in the table. In each row, if the word "Yes" appears in the Published column, the template in the row will be available for use.
Form basics
The Form Builder in Trella CRM has two contrasting sides.
On the intimidating side, it is powerful and detailed and has a ton of features and variables.
On the friendly side, it is simple to use.
To prove that powerful can be simple, we will walk through the following:
- What's in a form? - A quick review of what you already know about forms from living in the modern world. We'll examine the basic form building blocks.
- Planning - using the tool is easier if you already have in mind what you want to build
- Overview of the Awesome Form Builder - once you know what you want to do, we will look at the tool.
- Creating a New Coaching Template - because then the form matches exactly what you are trying to accomplish
- Editing existing Coaching Templates - sometimes, updating existing templates can save time
- Advanced Usage - What about all those advanced tools?
What's in a form?
![]() Stop and think about a form you have filled out. Whether it is an application, a tax form, registration for classes, or even a test. All of these are familiar, and they have similarities irrespective of whether they are on paper or on a computer or on your phone. Let's look at some data basics and then the basic pieces.
Stop and think about a form you have filled out. Whether it is an application, a tax form, registration for classes, or even a test. All of these are familiar, and they have similarities irrespective of whether they are on paper or on a computer or on your phone. Let's look at some data basics and then the basic pieces.
Data Basics
Imagine that you are filling out your address while making a purchase on your computer. You would type your name in a box for text called "Name" of maybe "First Name" and "Last Name." You would also type your street address in a text field and your city would go in a field called "City." Hopefully, the field for your state would have a little chevron ![]() that allows you to open a dropdown and select your state from a list. There might be a checkbox that allows you to identify that the address you entered is your billing address.
that allows you to open a dropdown and select your state from a list. There might be a checkbox that allows you to identify that the address you entered is your billing address.
Each of these fields have some similarities, and some differences.
- Each field has a Label name
- Each field has specific requirements to be filled out correctly - think of this as a parameter or characteristic of the field
- Each field has a specific location on the page - another parameter or characteristic
- But fields have different types, text, dropdown, checkbox, radio, etc. We examine several below.
The takeaway is that when you build your own form, you will be choosing different types of fields and defining specific parameters for each.
Lotsa Common Form Elements
The following is a list of the most common building blocks for a form.
- Sections - You can break up the form into different sections. For example, one section, call it "Participants," can include fields to capture the coach's name and the name of the person being evaluated. Throw in a date for when the coaching took place, and maybe the location of the event. The next section might be "Evaluation," which is a list of questions used to keep the coaching steps focused. Throw in some ratings and comments. Sections change the layout of your form and provide guideposts for the content required.
- Text Fields - A field that allows you to type whatever you want. A text field can't be sized, so this option should be used for shorter entries, like a person's name.
- Text Area - Another field for typing text, but this one can be expanded to display more content. Useful for comments or notes.
|
 |
|
 |
|
 |
|
 |
|
 |
|
 |
|
 |
Let's review
- The fields we just looked at are the building blocks you will use to create or edit a coaching template in Trella CRM.
- How to use the tool is shown below in greater detail.
- Let's get ready to create a form.
Planning
Yes. You can jump right into creating a form - the Form Builder in Trella CRM is easy enough to use if you want to wing it. And you can always go back and make edits, move content, anything.
However, a little preparation in advance might help. Some tips:
- A form on a computer is very similar to a written form. Sketching the layout of your form on a piece of paper might help you to visualize the design you want to use for the digital form you create.
- Some information is required like names of people involved, account information, contact information, dates, times, location, contact information. Make a list.
- Think through what kind of information you want to collect in a coaching session. Jotting down questions you want to have answered will allow you to think through the sequence. Brainstorming your questions in advance will keep you from forgetting them while you are poking around in the form building tool.
- Think through what type of form field (from the list above) fits each piece of information you want to gather.
- Once you have a good idea of all the information you want to collect, logical groupings for sections will also be easier to identify
![]() This doesn't need to be perfect. Even after you create a new template, you can edit the template, adding, removing, and changing any content.
This doesn't need to be perfect. Even after you create a new template, you can edit the template, adding, removing, and changing any content.
Overview of the Awesome Form Tool
The tool for creating or editing coaching forms will open when you click on either the "New Form" button or an edit link to the left of an existing coaching form.
The tool is the same for either situation, the only difference being that an existing form has components added and a new form is blank. The following two images show this.
Create new form - blank |
Edit existing form - components to edit |
 |
 |
Creating a New Coaching Template
![]() If you haven't looked at the Form Basics yet, we suggest you navigate back up and look through that content, then come back down to learn how to create a new form.
If you haven't looked at the Form Basics yet, we suggest you navigate back up and look through that content, then come back down to learn how to create a new form.
To demonstrate the features of the coaching tools, we will create a form using some of the basic components.
Tool Overview
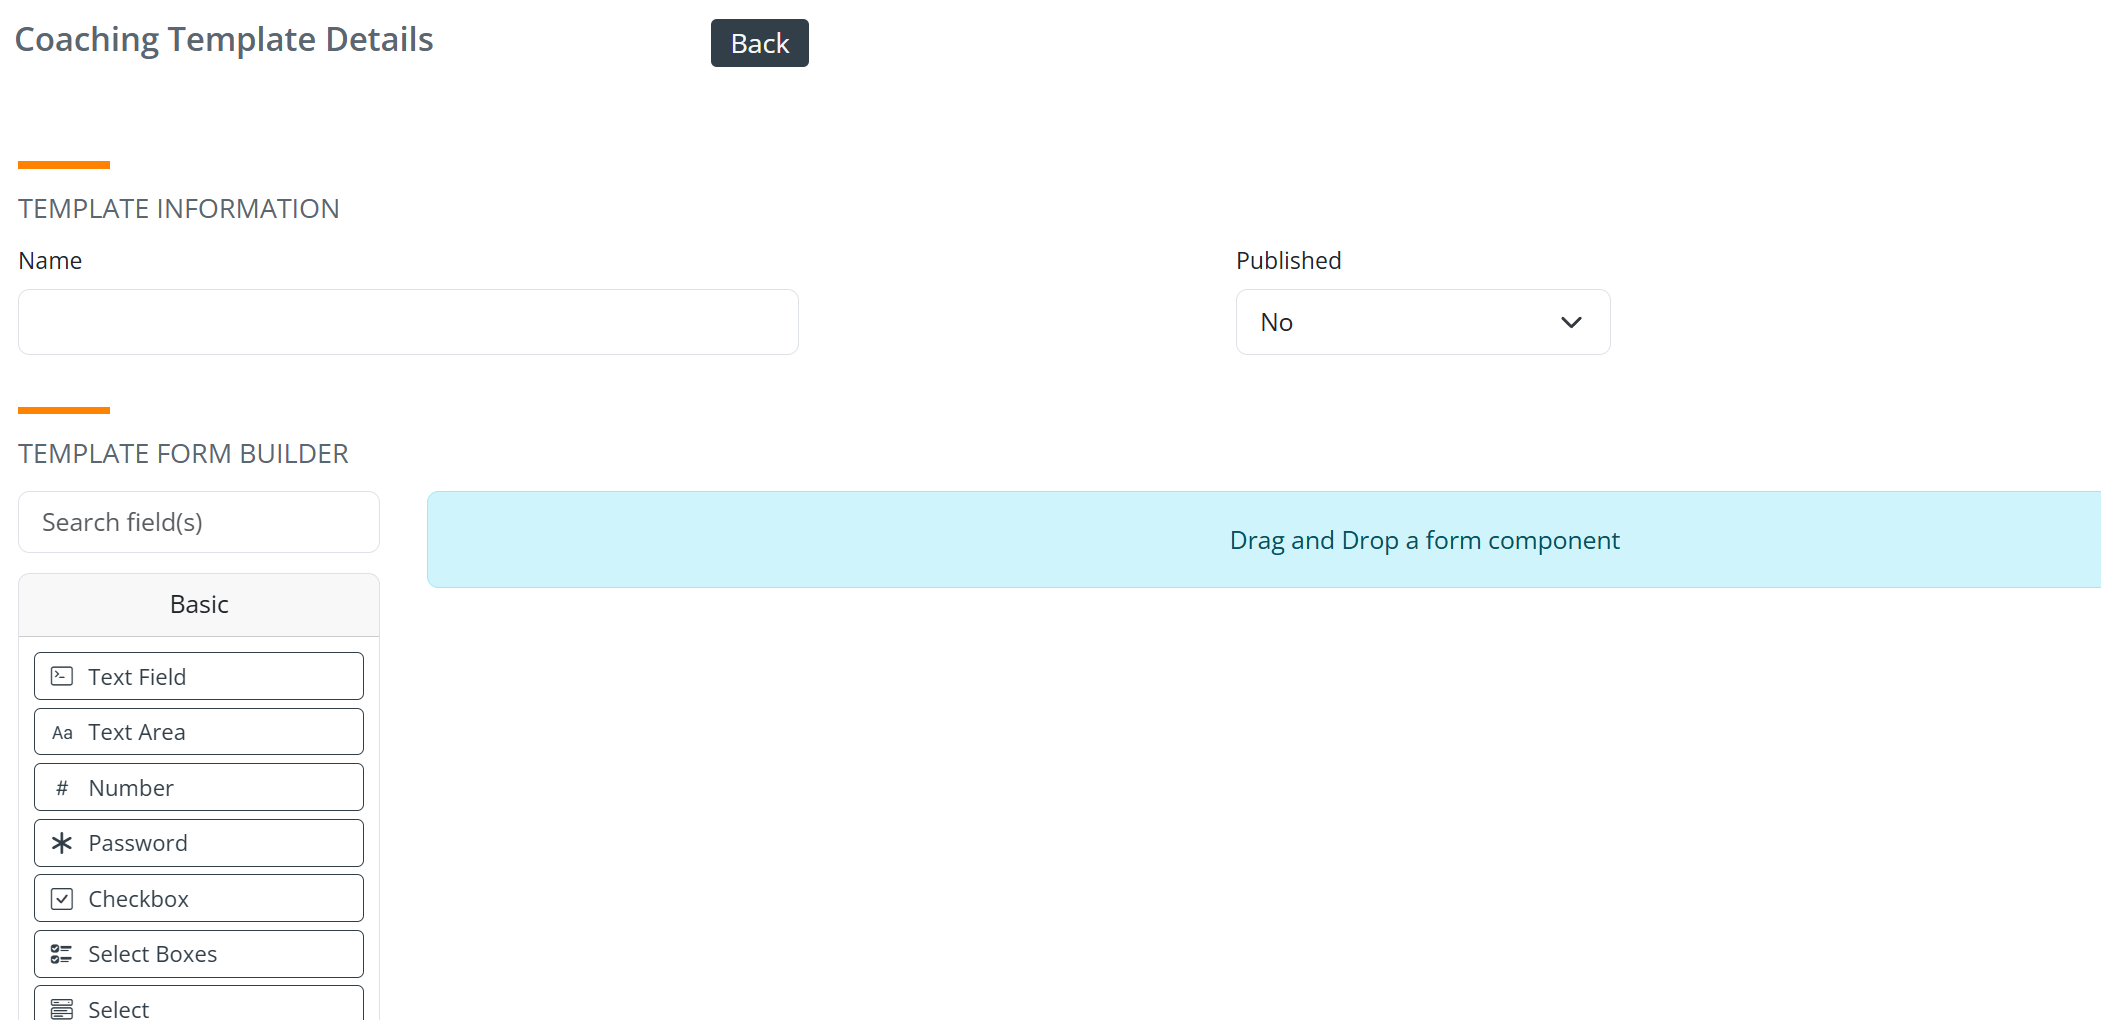
![]() There are three terms that we need to define through using them in a sentence; field, component, and option. Think of it this way: when you look at the Form Builder tool, you will notice that you have the option to choose from among many different components that will become fields in your form.
There are three terms that we need to define through using them in a sentence; field, component, and option. Think of it this way: when you look at the Form Builder tool, you will notice that you have the option to choose from among many different components that will become fields in your form.
When you open the form tool, you will see the following:
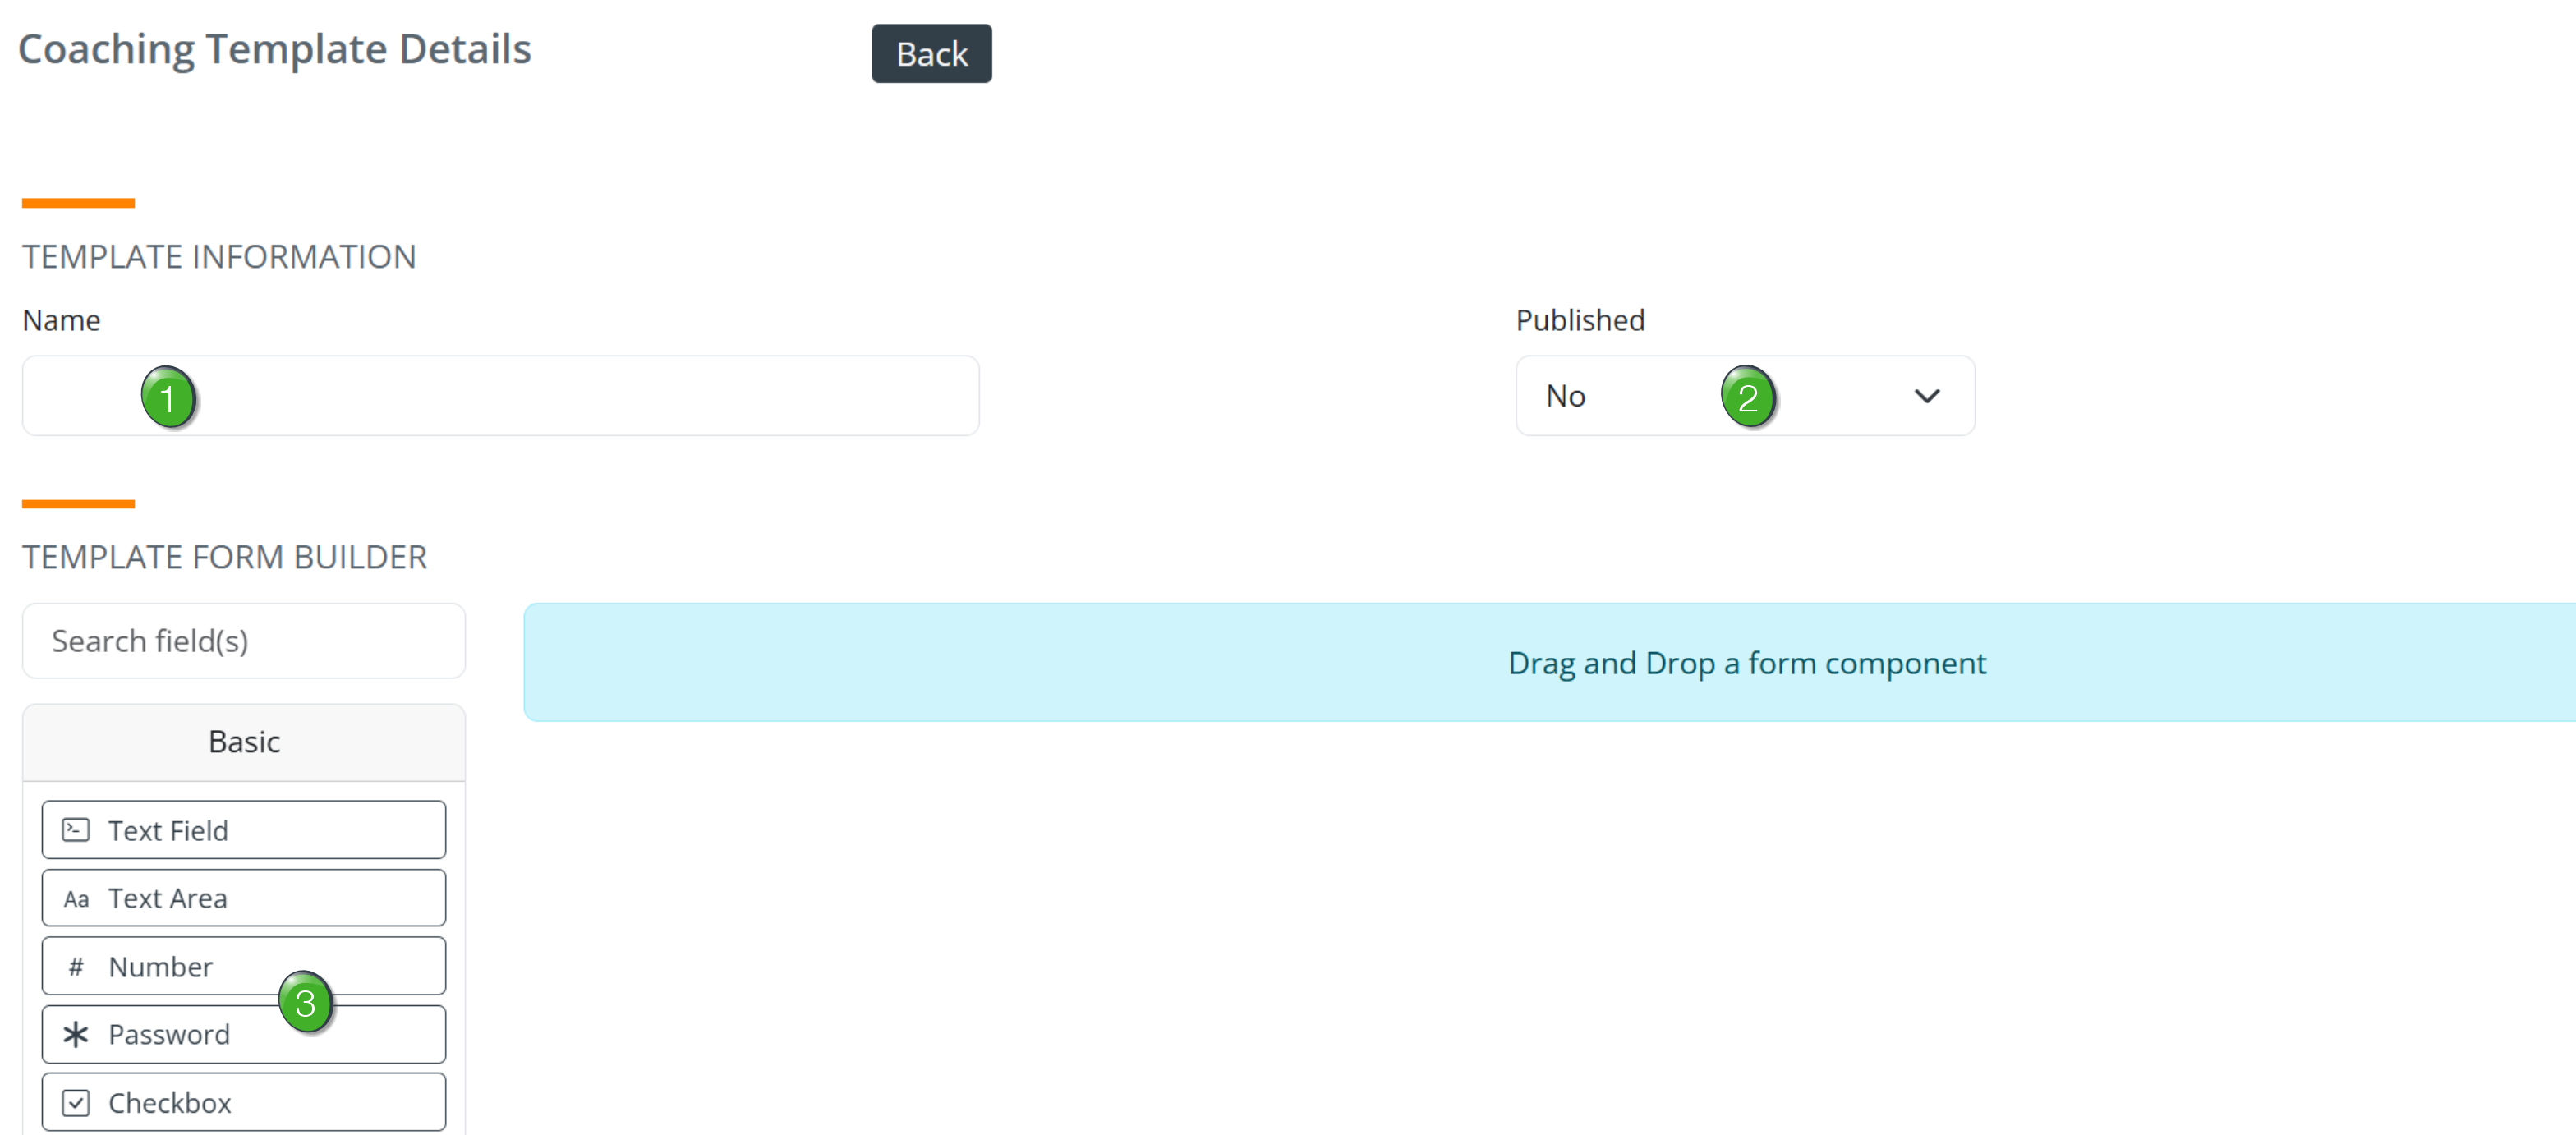
![]() Form Name - Create a name that will stand out so that a user will be able to identify the form in the list of forms when they begin a coaching session. Examples: Standard Coaching form, Personal Growth form, Quarterly Goal Evaluation form.
Form Name - Create a name that will stand out so that a user will be able to identify the form in the list of forms when they begin a coaching session. Examples: Standard Coaching form, Personal Growth form, Quarterly Goal Evaluation form.
![]() Published - When the form is completed, make sure you change the Published option to "Yes." Managers will see the form when it has been published.
Published - When the form is completed, make sure you change the Published option to "Yes." Managers will see the form when it has been published.
![]() Tons of components- The building blocks for your form are displayed on the left.
Tons of components- The building blocks for your form are displayed on the left.
![]() Many of the components shown on the left will match the field types discussed earlier in this article.
Many of the components shown on the left will match the field types discussed earlier in this article.
The following image shows all four collections of components and features available in the form builder.
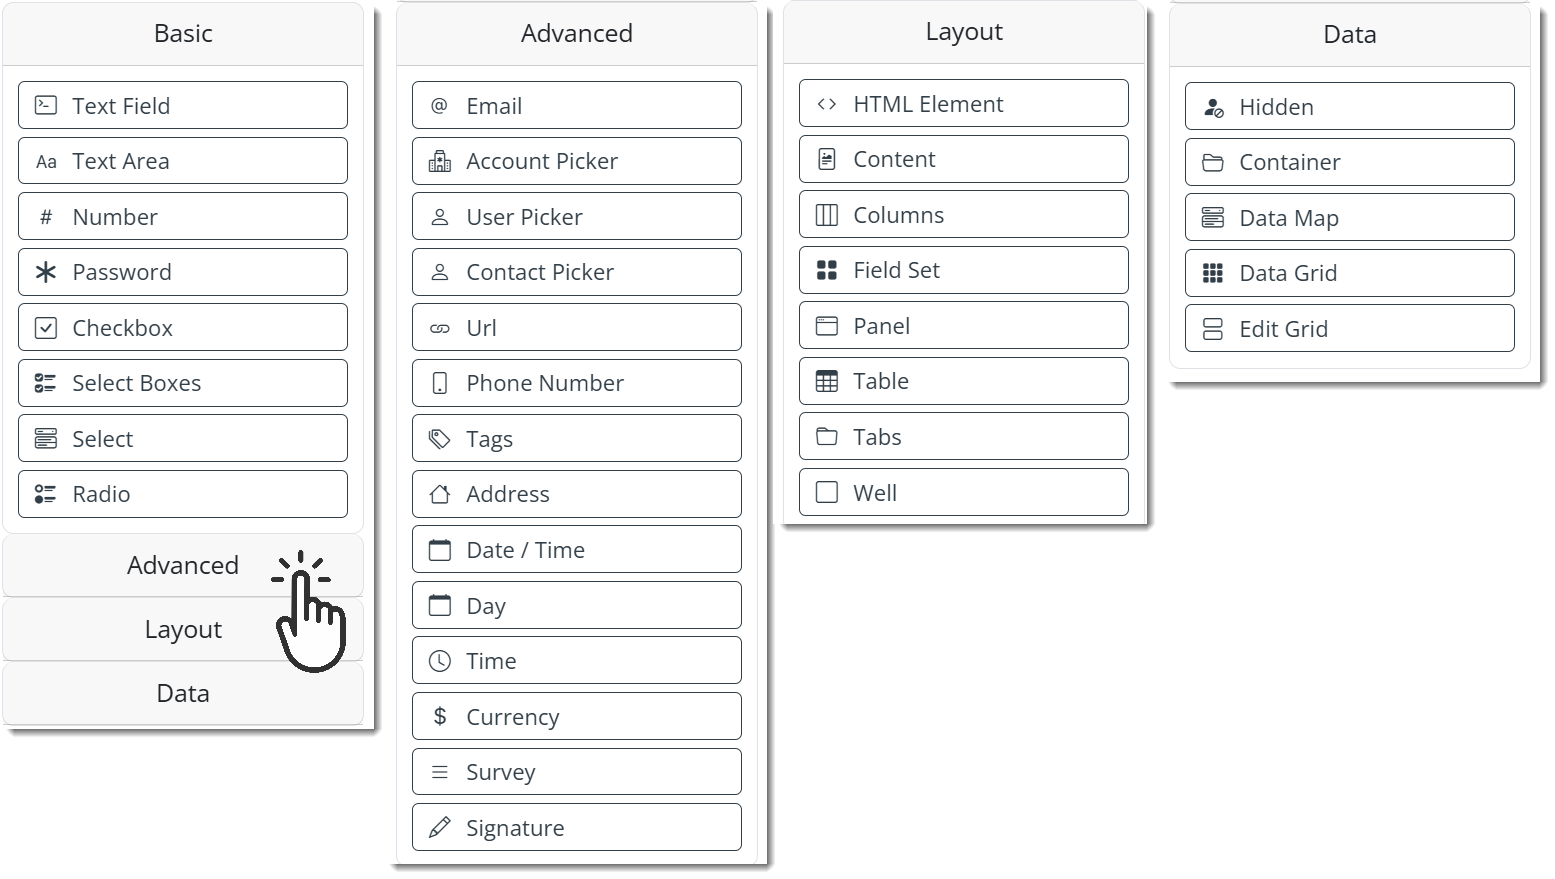
Yes. There are a lot of options. No. Don't try to figure them all out right now.
![]() Open the different collections of tools by clicking on the name of the collection.
Open the different collections of tools by clicking on the name of the collection.
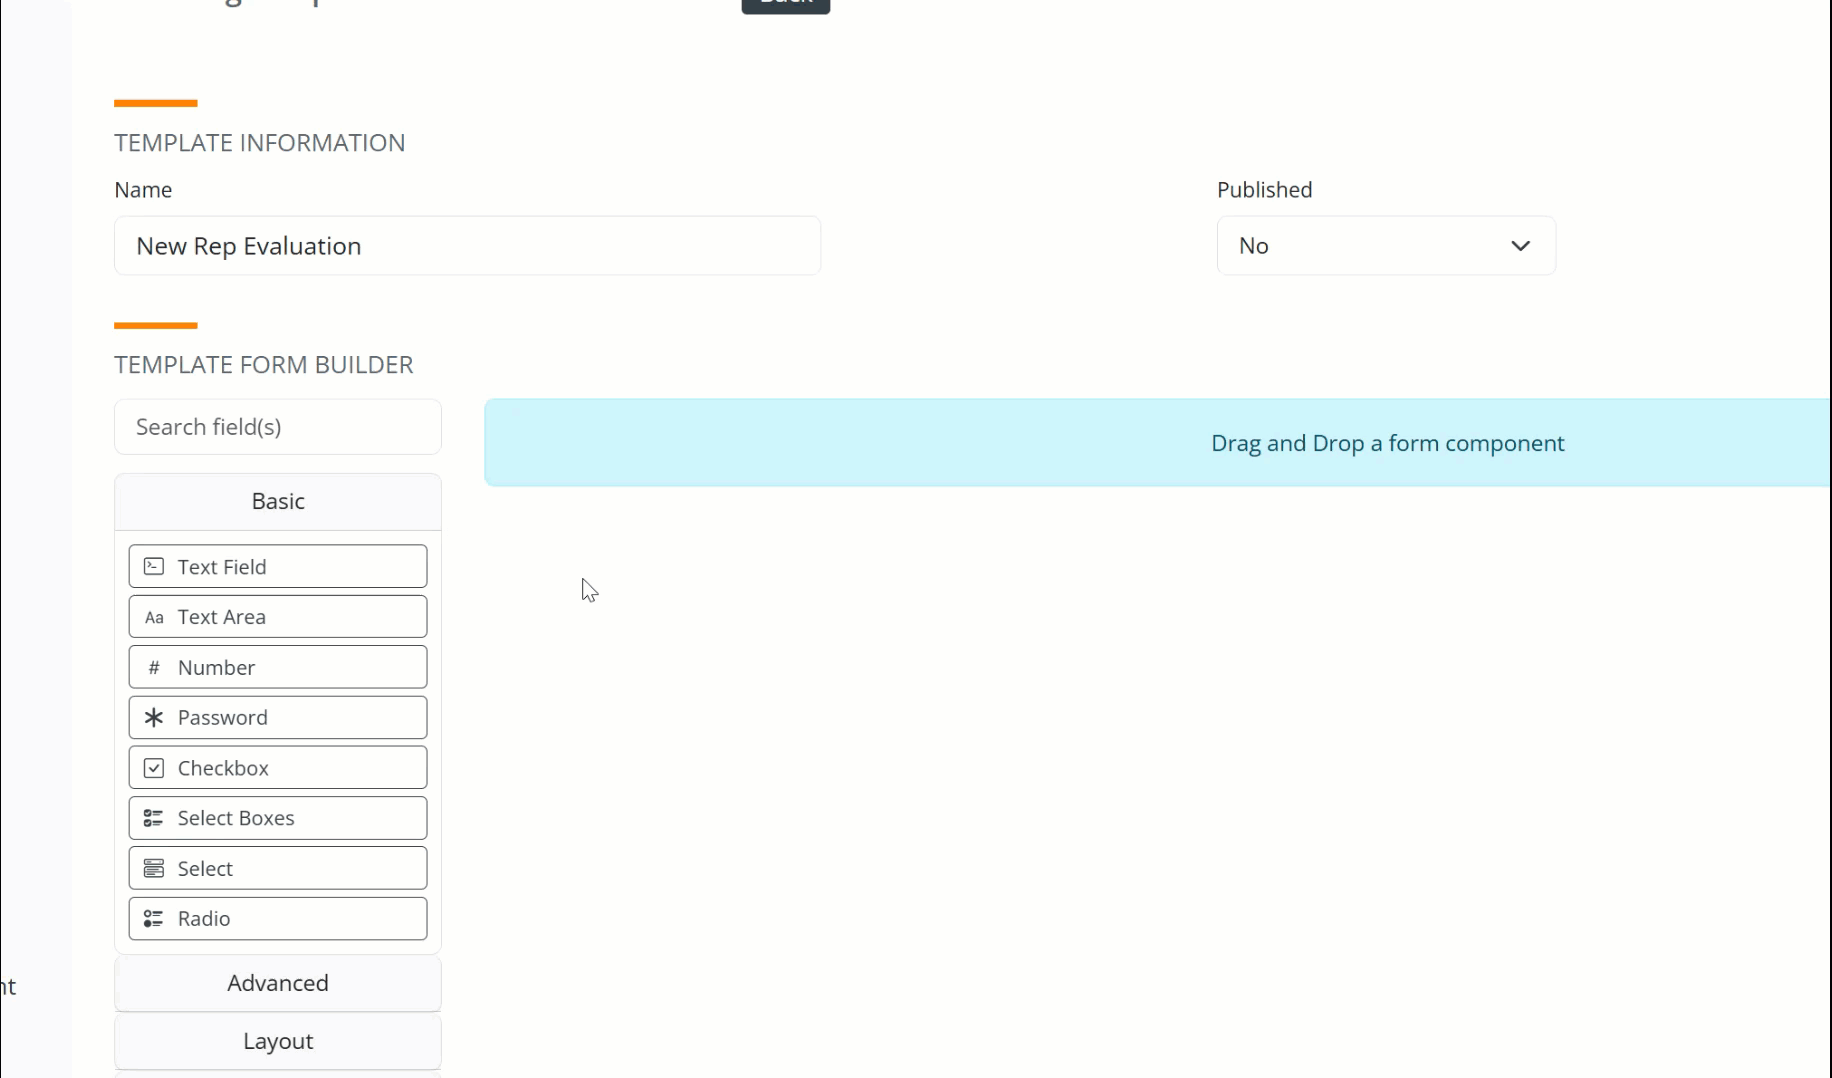
Drag and Drop
Before we start creating a new form watch how easy it is to begin building.
Click on any component you want to add and drag it to the right. When you do so, the detail settings for that item opens immediately.
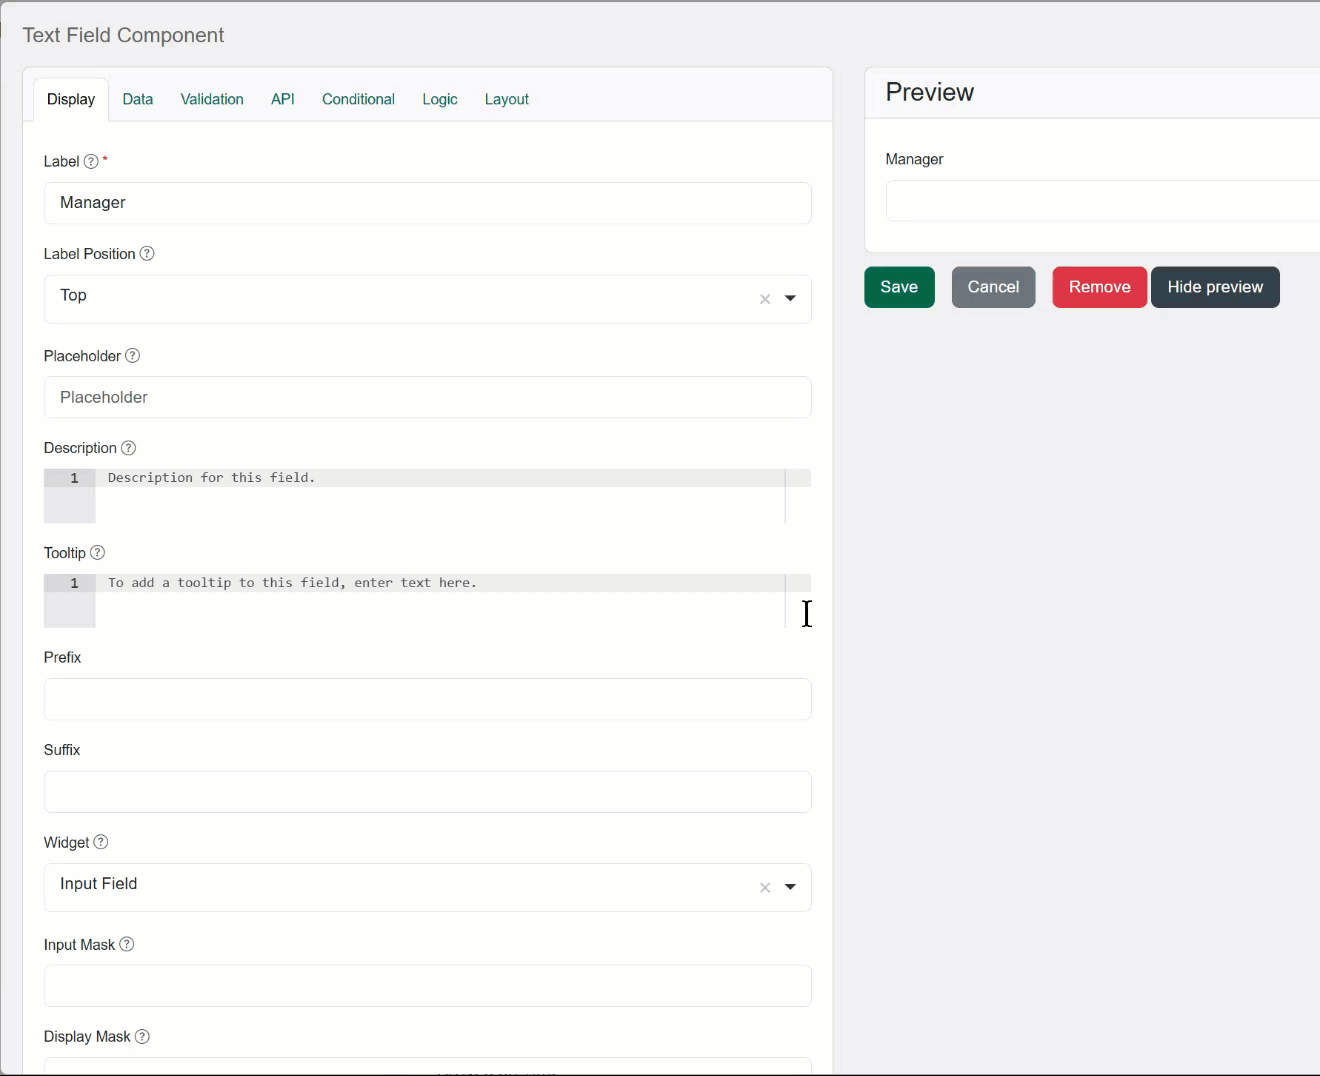
Component Details
This is where the number of settings multiply, but let's keep it simple - a quick one, two.
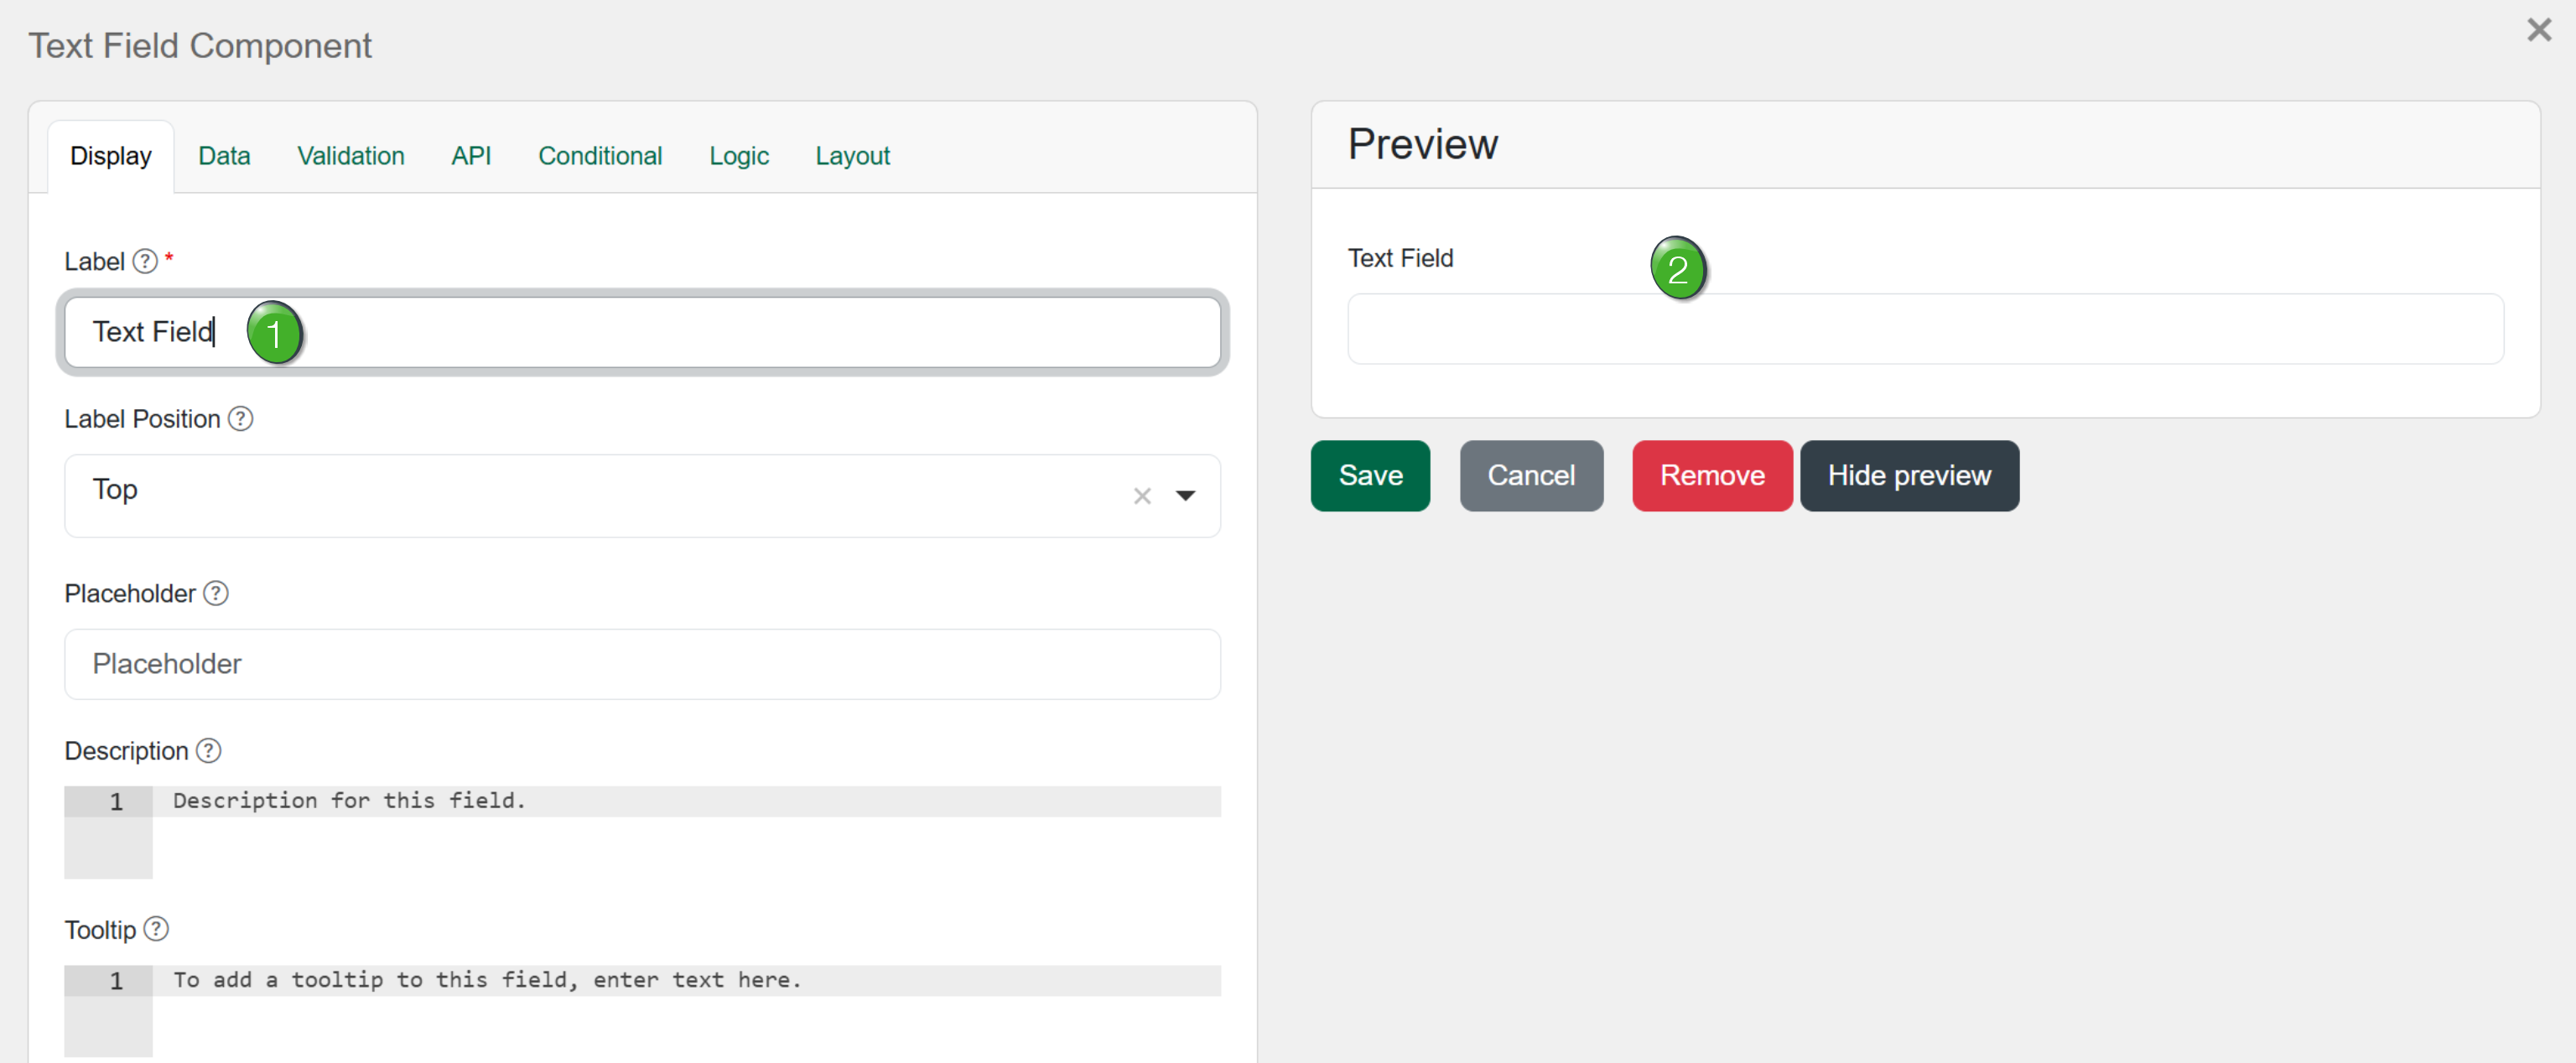
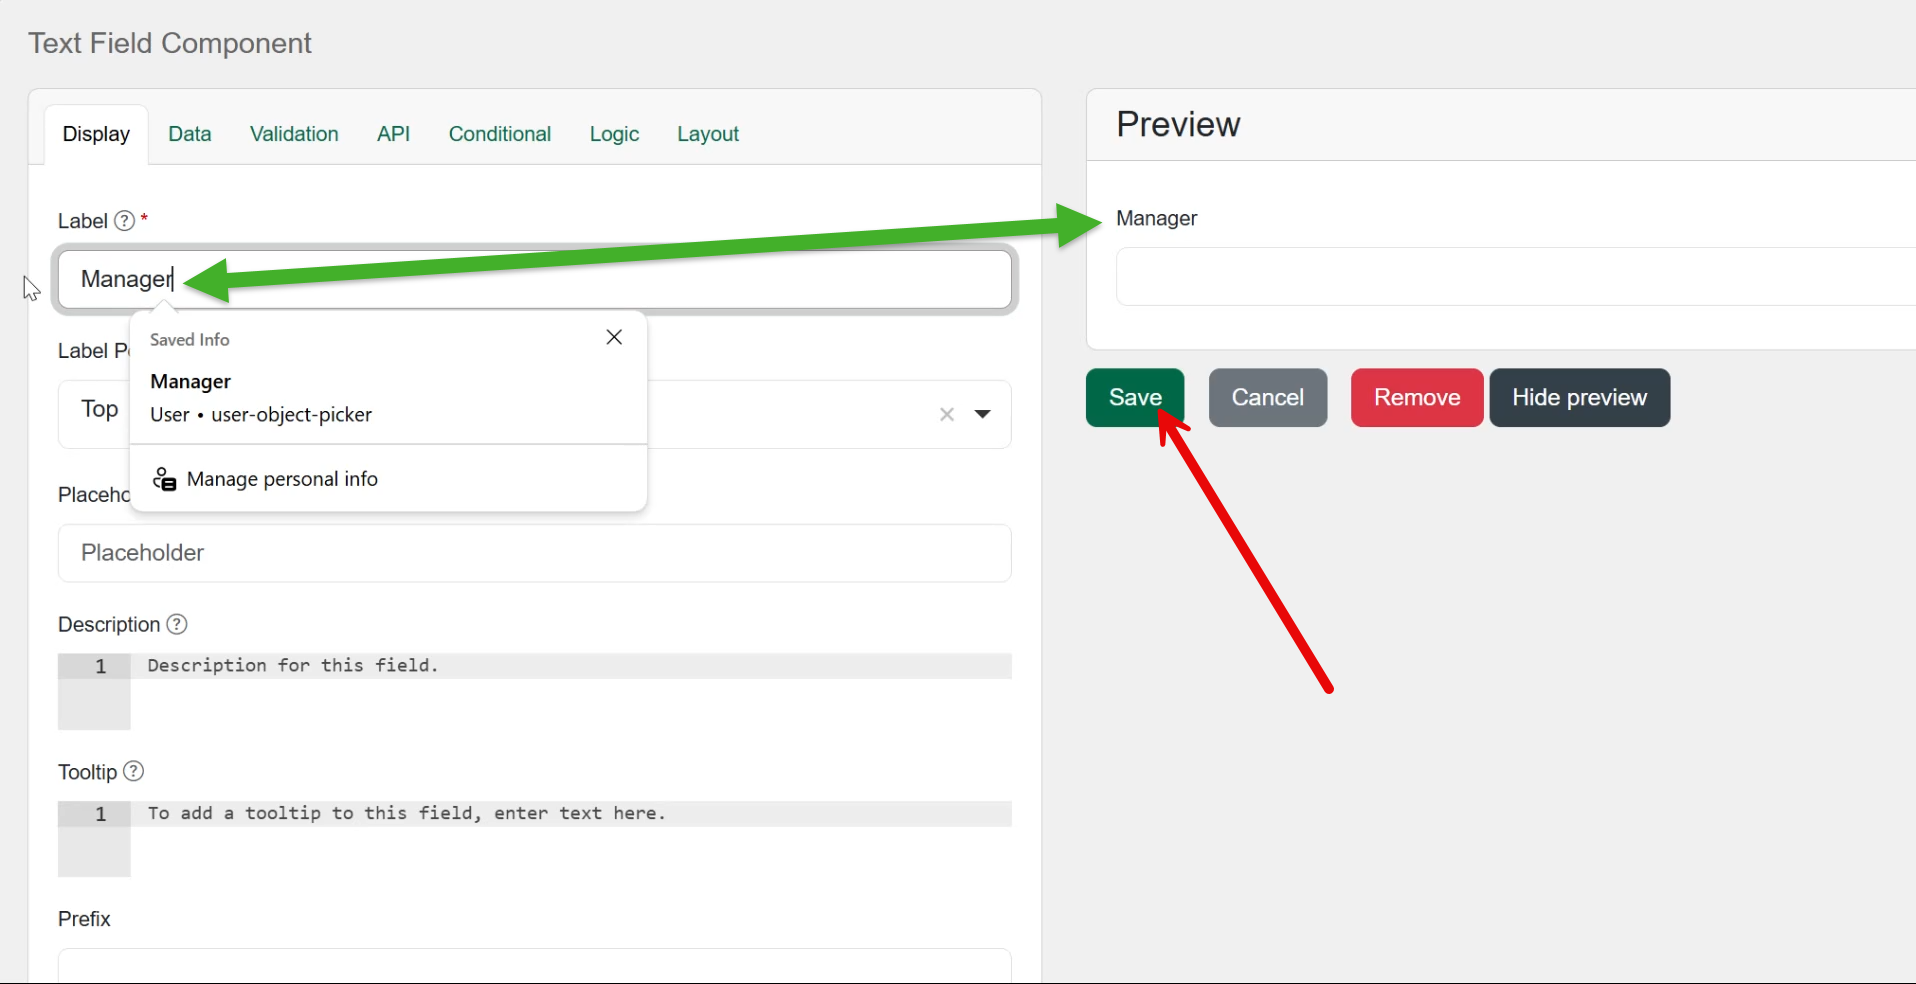
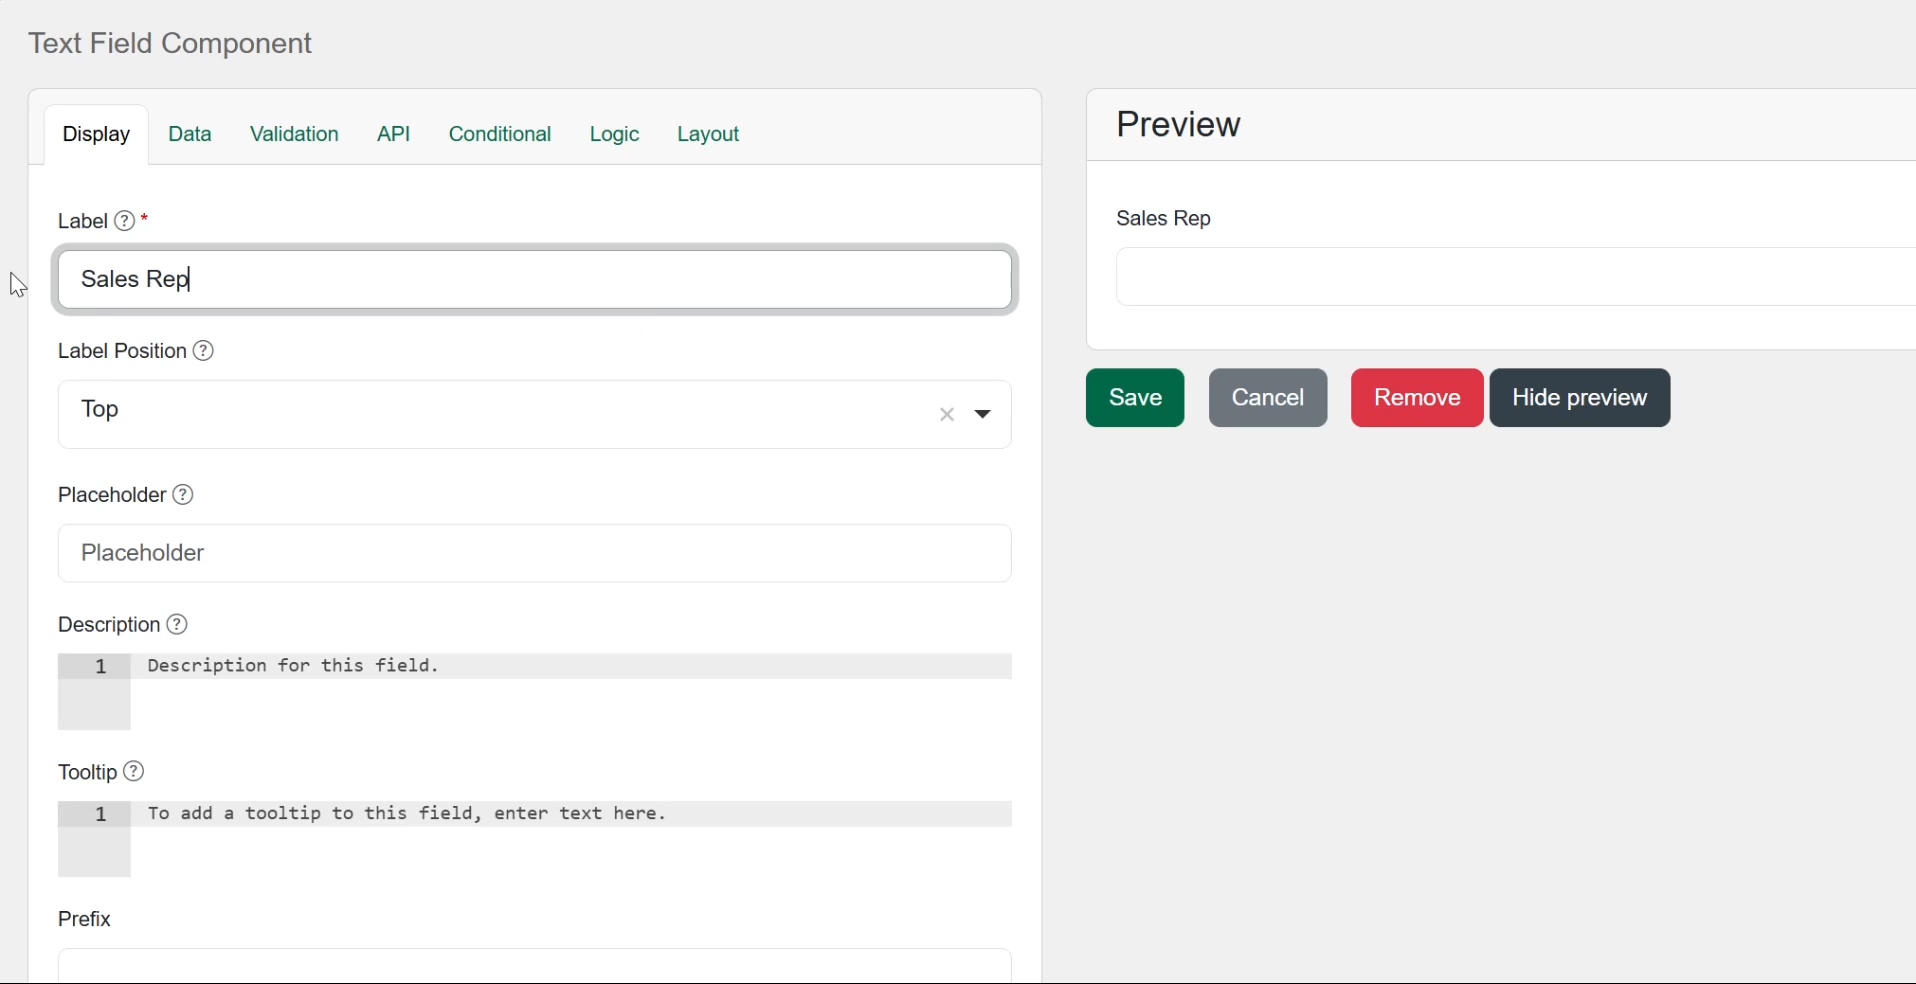
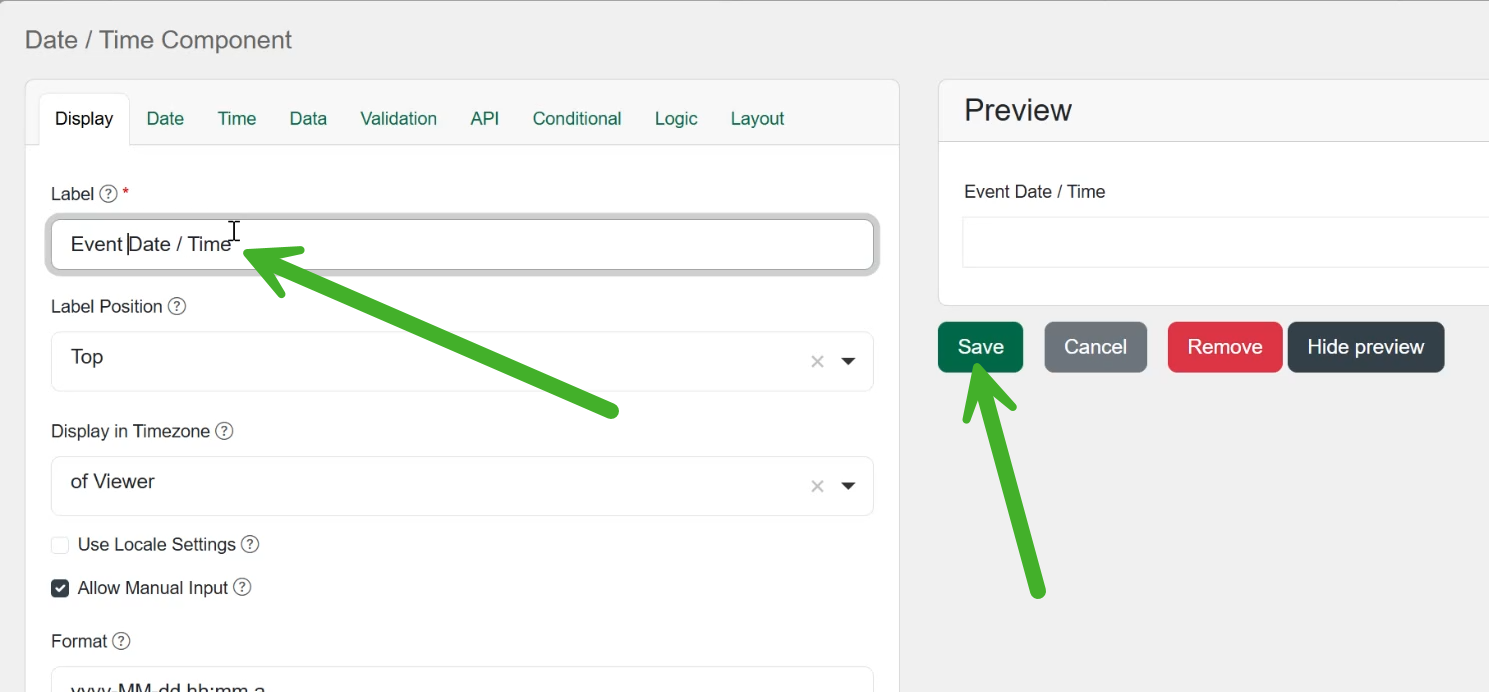
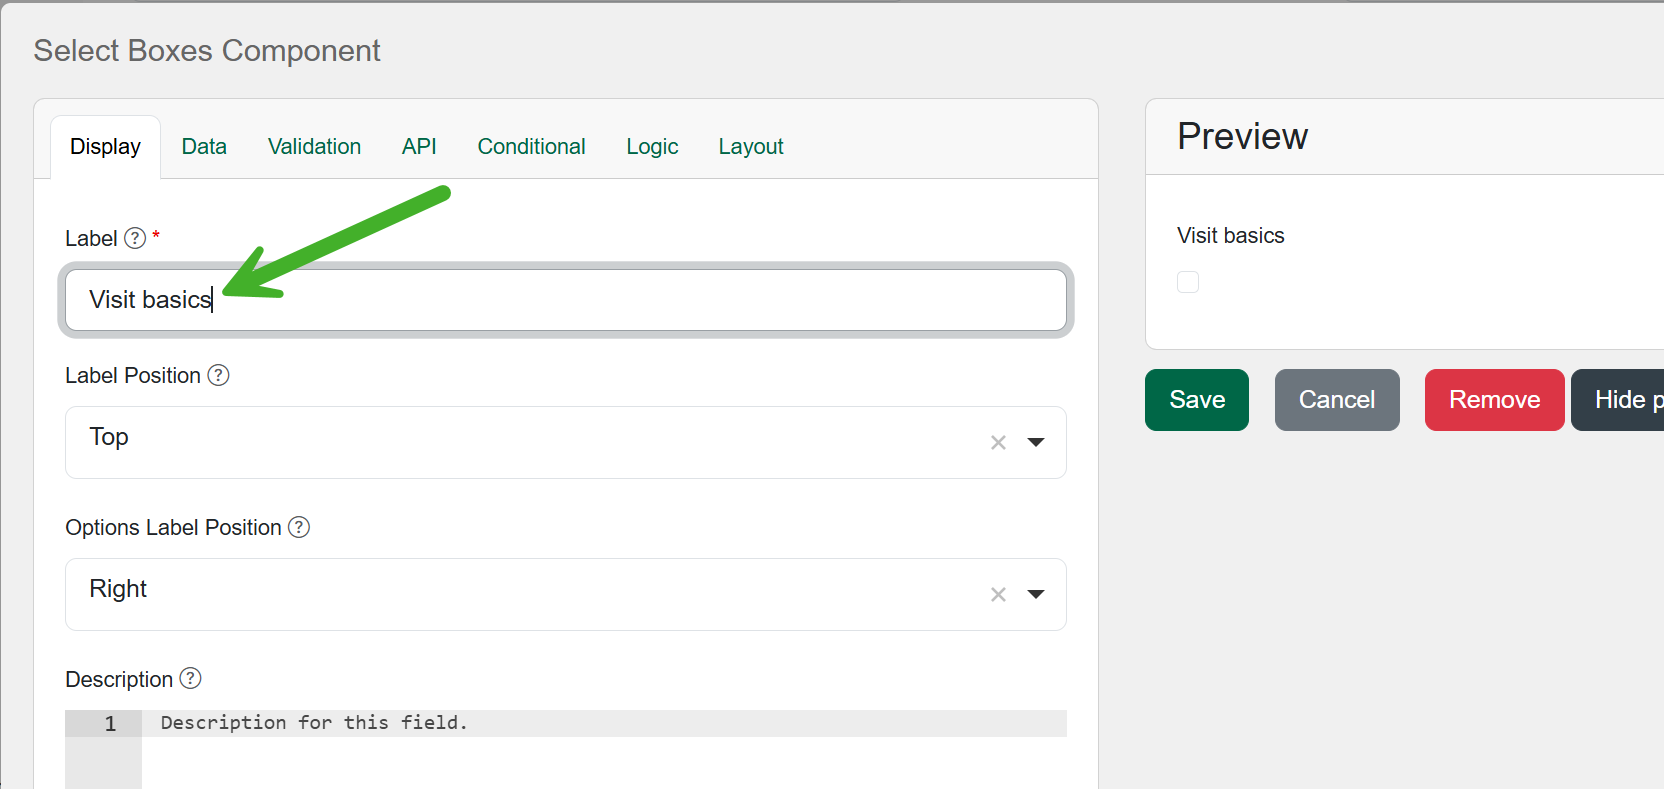
![]() The Label is the title that will appear with the field you are adding that will be displayed on your form.
The Label is the title that will appear with the field you are adding that will be displayed on your form.
![]() On the right hand side you can see what your field is going to look like on your form.
On the right hand side you can see what your field is going to look like on your form.
Click the "Save" button to add the component to your template
![]() Keep it simple - you can build your entire form by dragging, dropping, naming, and saving. Then go back to make any changes to the details.
Keep it simple - you can build your entire form by dragging, dropping, naming, and saving. Then go back to make any changes to the details.
Now, let's build a Template
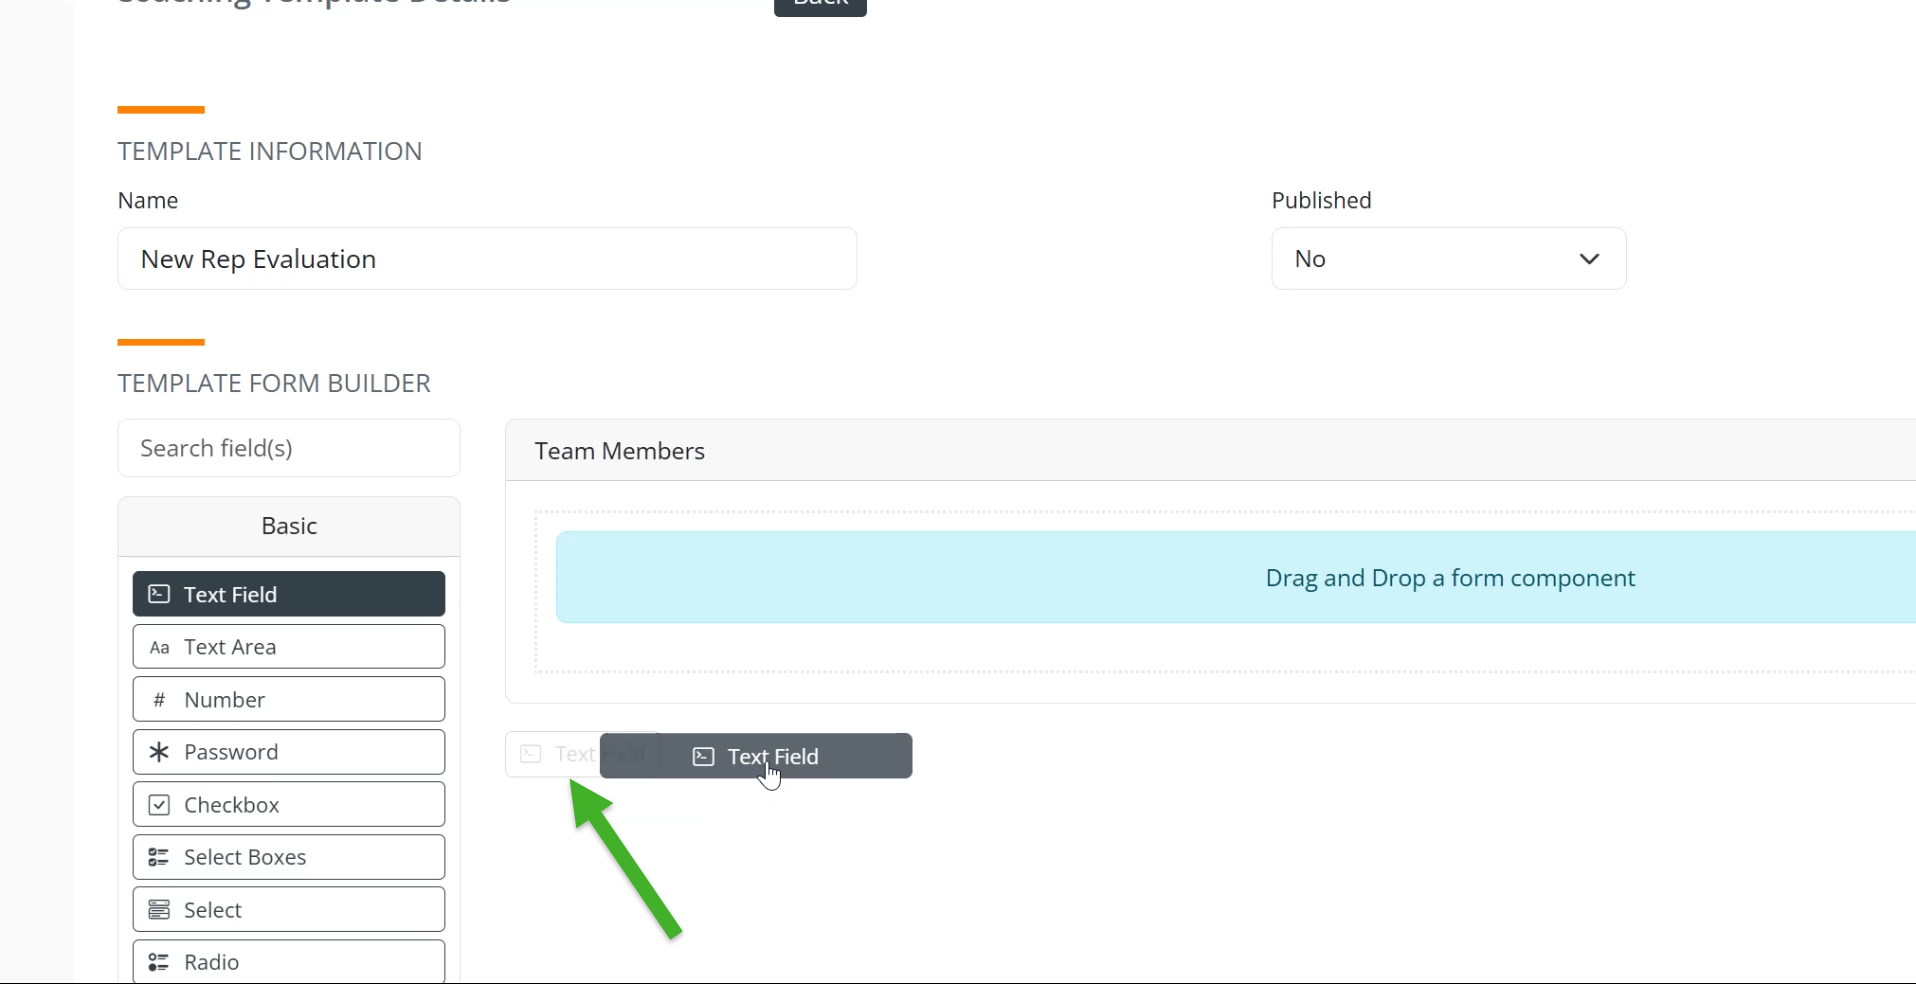
![]() We want to add a panel focused on the people who will be involved in the coaching.
We want to add a panel focused on the people who will be involved in the coaching.
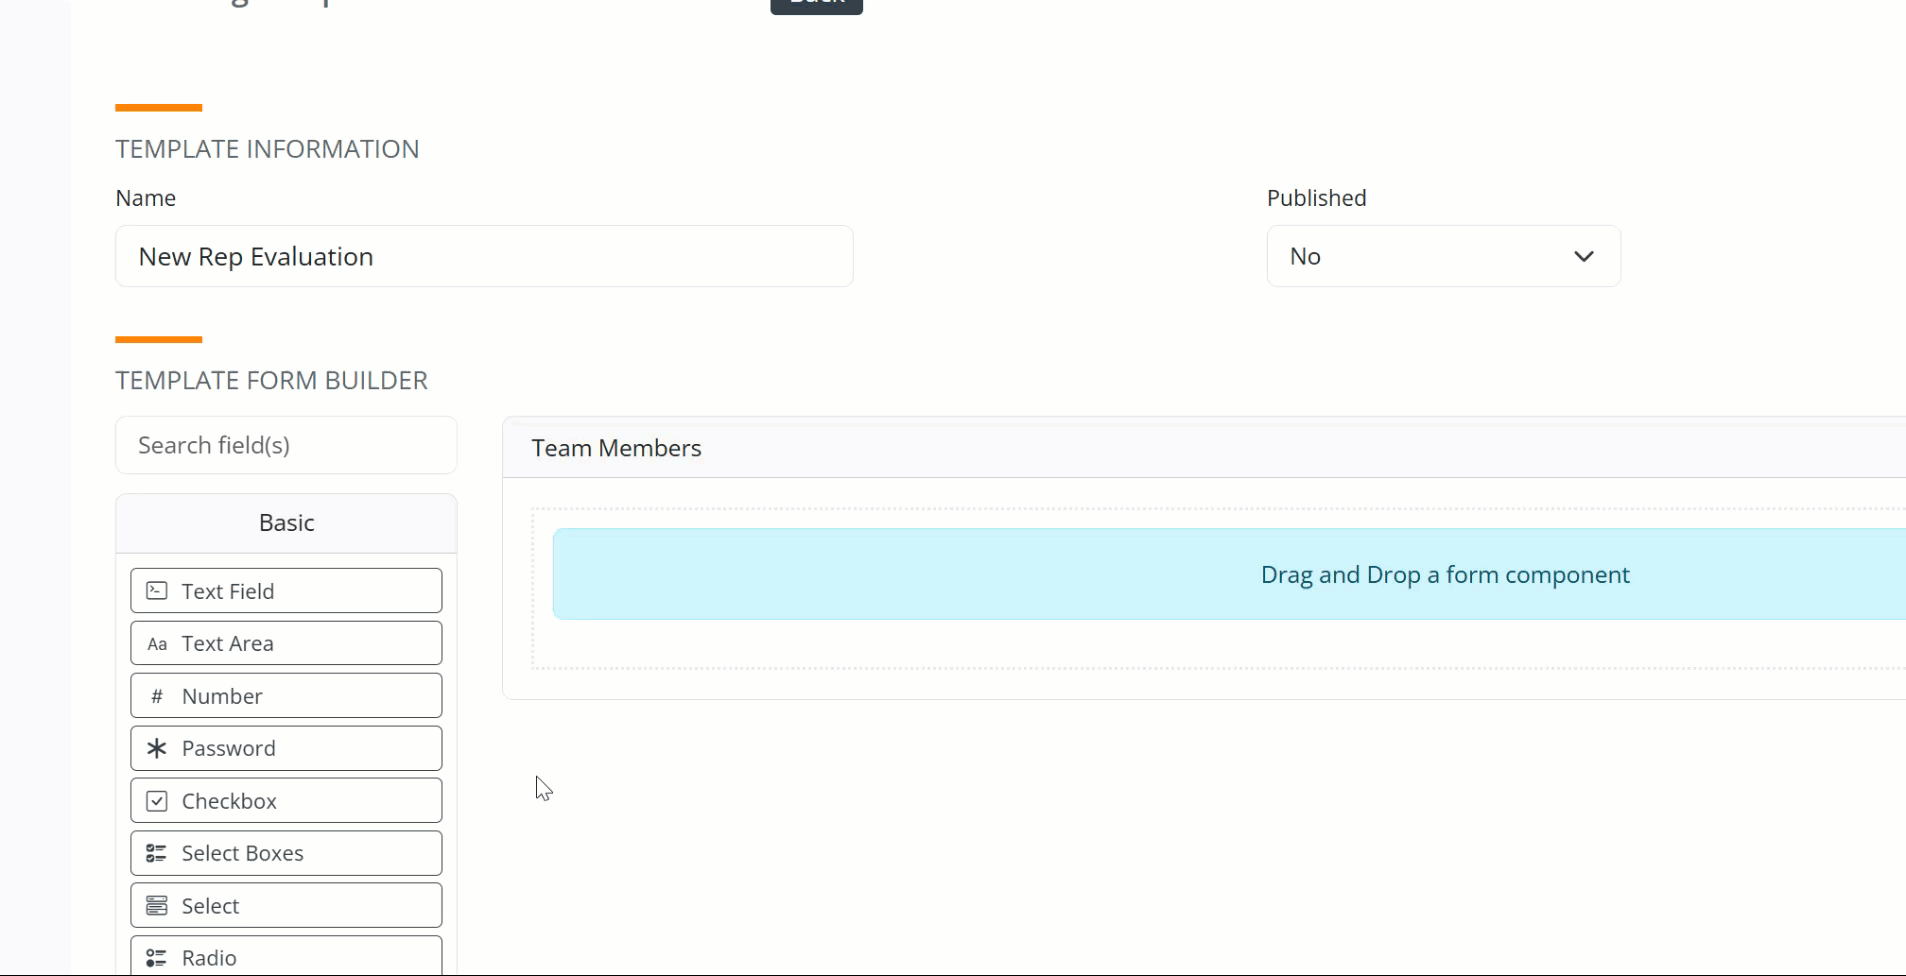
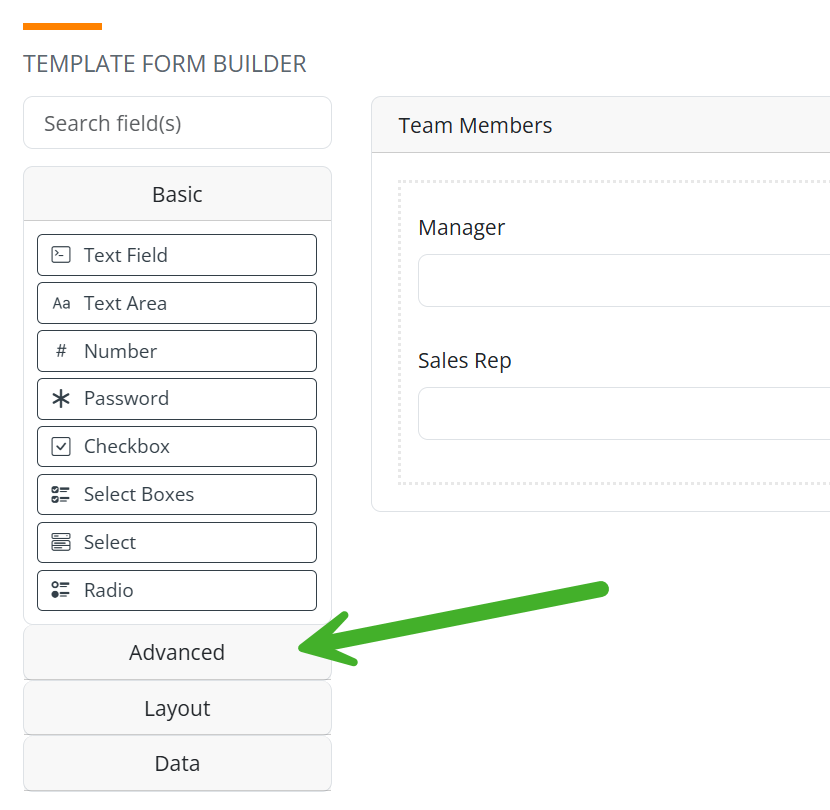
- Click on the Advanced button to open the advanced collection of options. Drag a Panel to the blank form. For the example, we will call the panel, "Team Members."
Yes, this goes by fast, but let's look at the steps.
- Open the "Layout" options
- Drag the "Panel" component to the form - the settings for the panel open
- Type in "Team Members" for the label
- Click the "Save" button
- The panel has been created - the panel will show up in the next images.
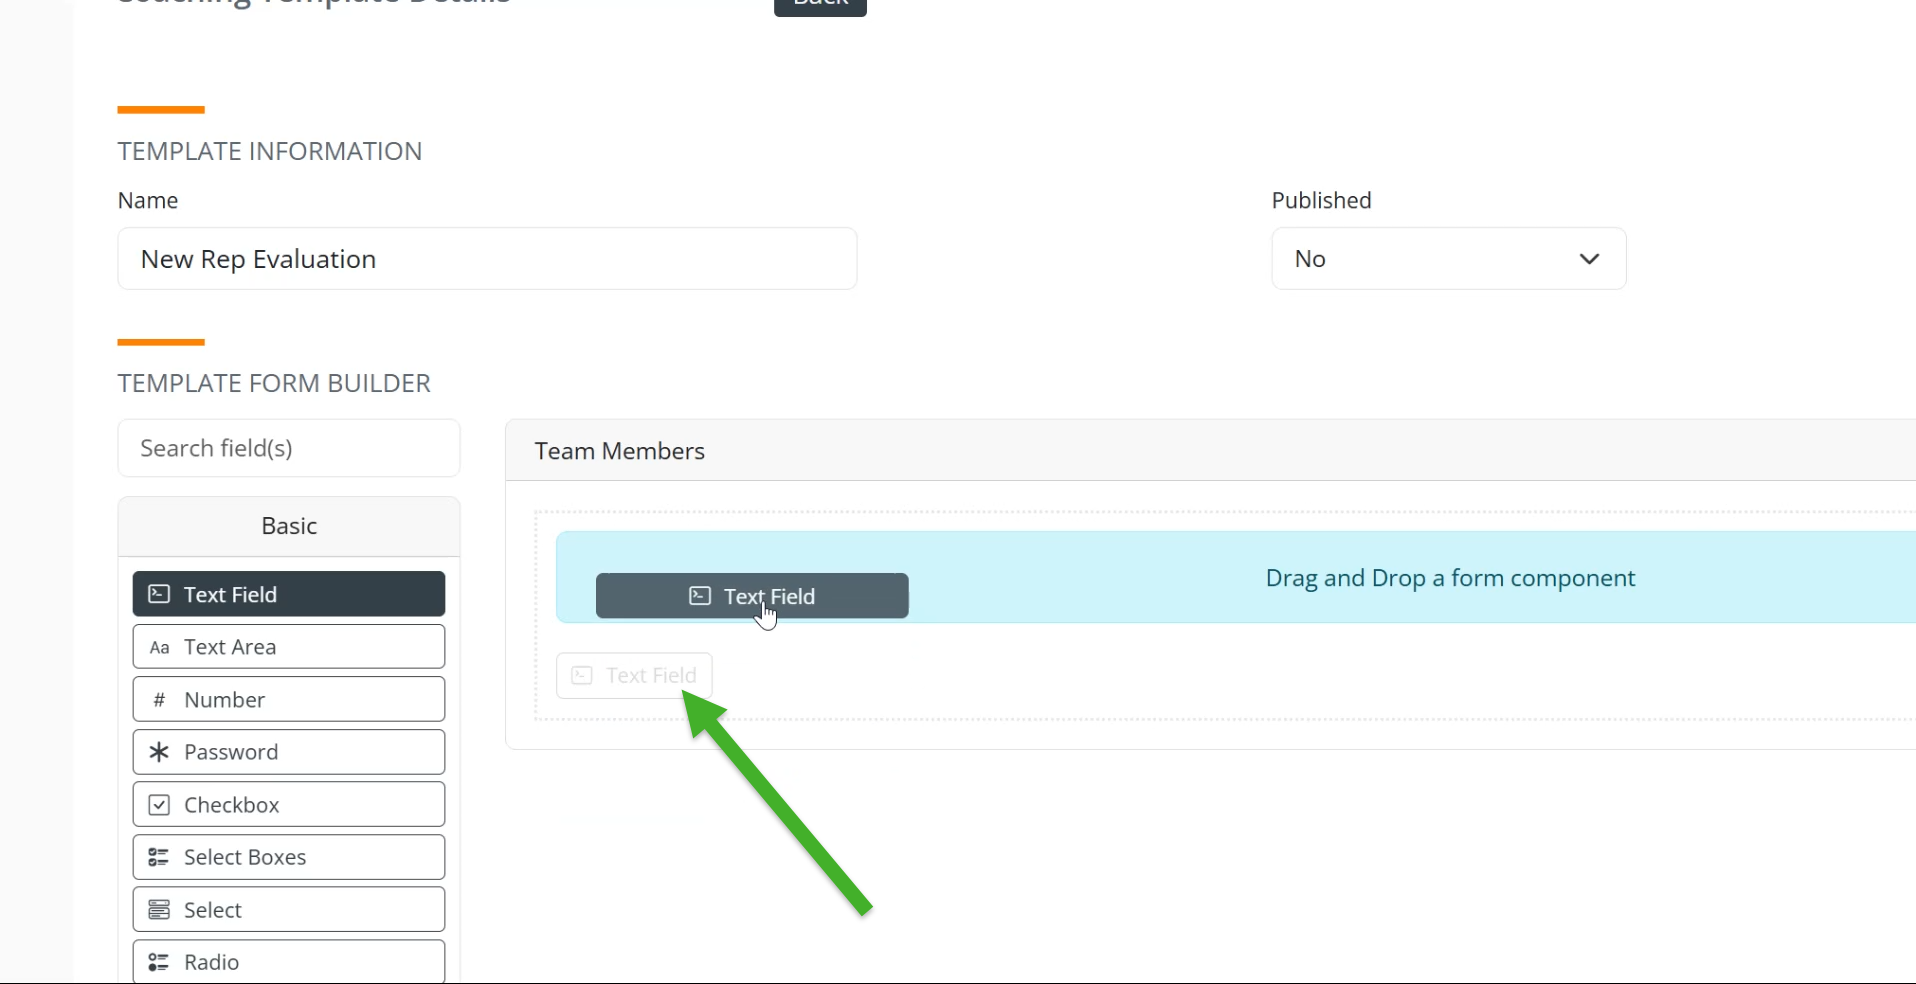
![]() Next we need to add "text field" components for the names.
Next we need to add "text field" components for the names.
|
 |
|
 |
|
 |
|
 |
|
 |
|
The final result is two "Text Field" components with the correct labels on our "Team Members panel."
|
 |
 | |
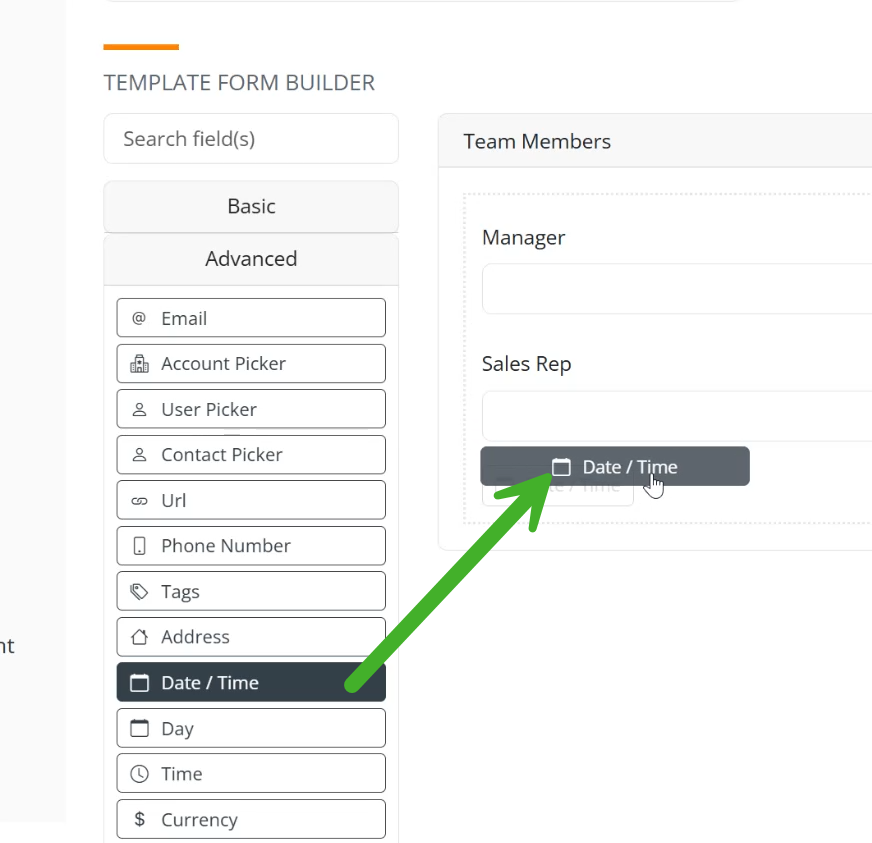
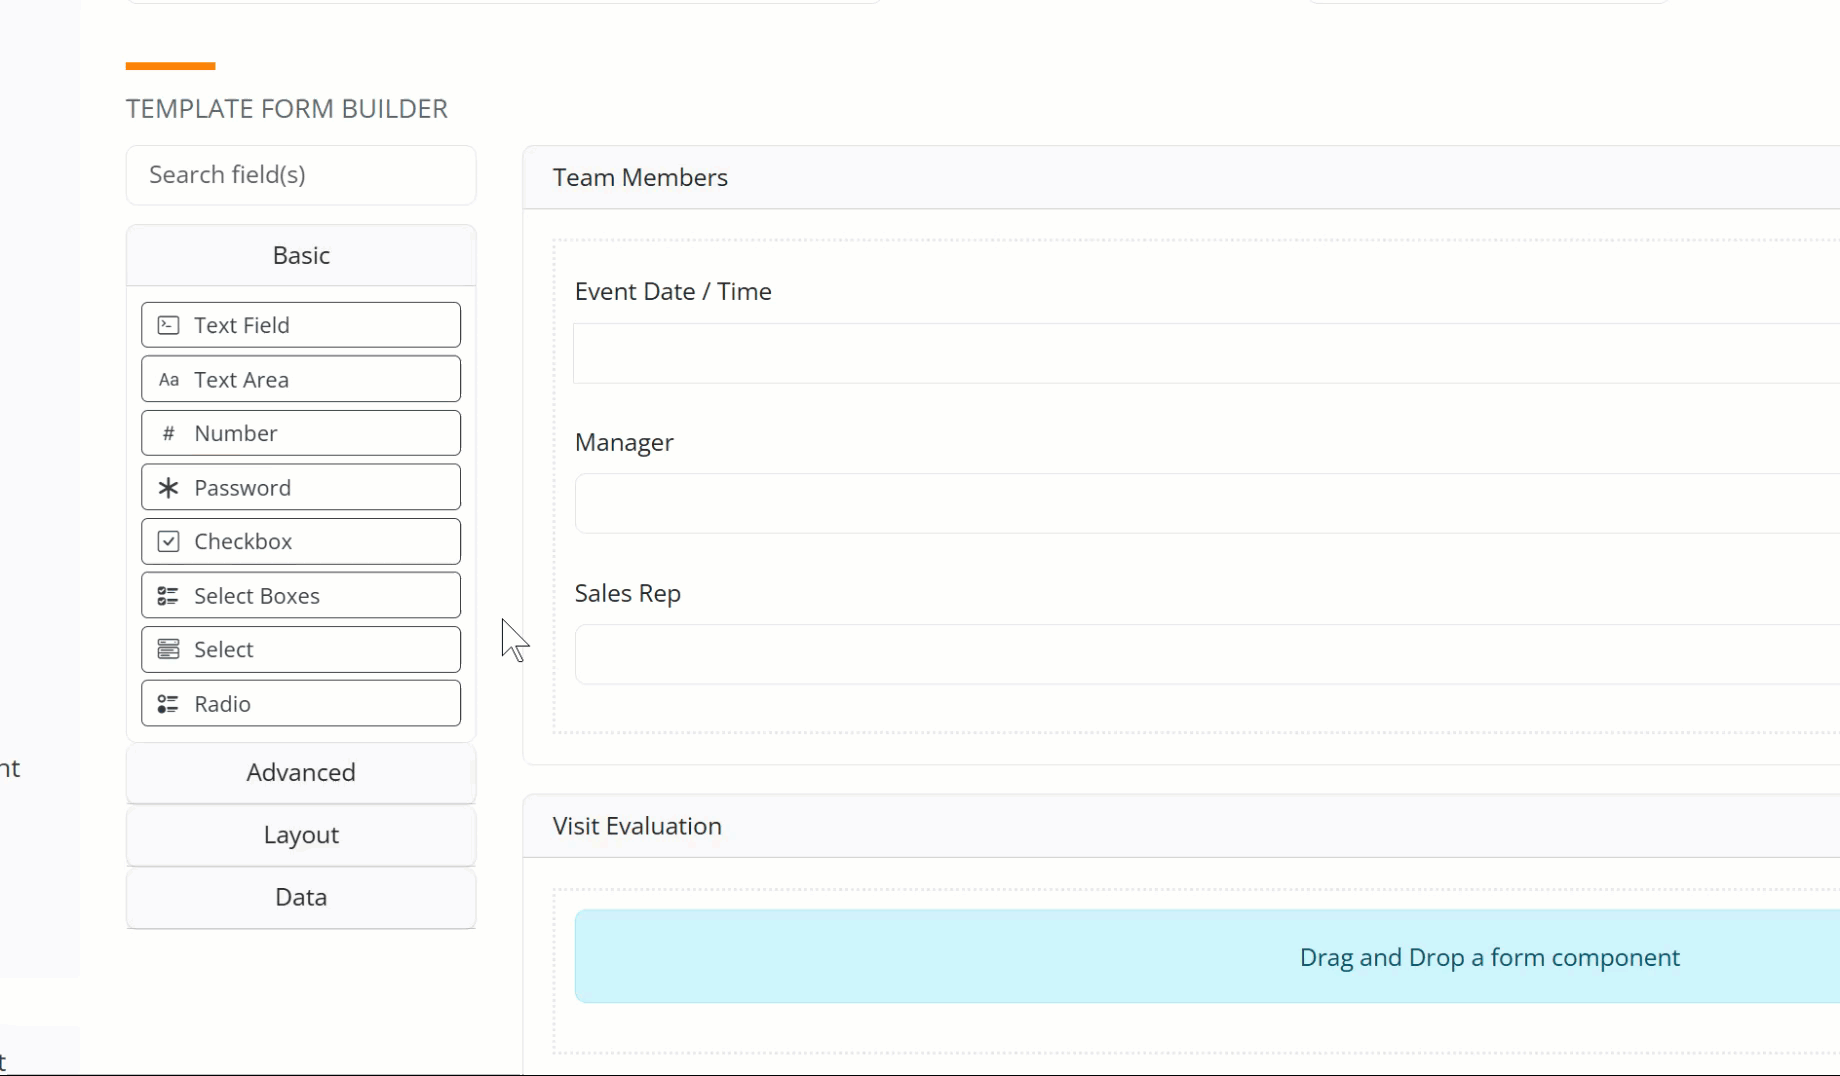
![]() Add a Date/Time component
Add a Date/Time component
|
 |
|
 |
|
 |
|
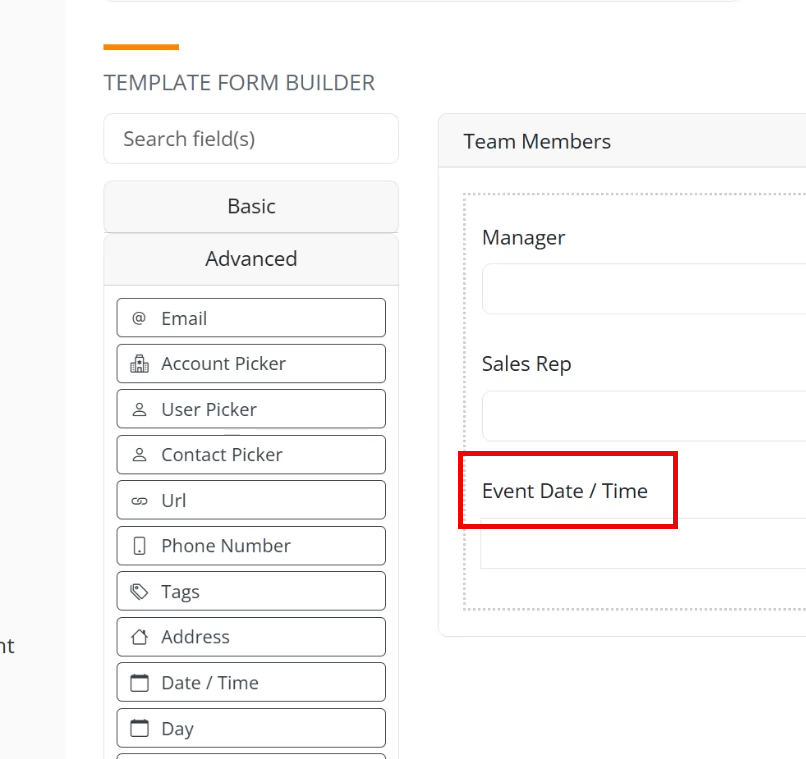
The new Date/Time field is now on our "Team Members" panel.
If you want to watch the whole process, see the animated GIF below. |
 |
 | |
A pause for some details
- In the instructions above, we have focused on the simplest components. Creating more detailed components are demonstrated below.
- Dragging components onto the blank form immediately creates the matching component and allows you to adjust detail settings. All components can be added to your form with a simple click and drag.
- When you hover over any component already in the form, the following options will open to the top right of the component.
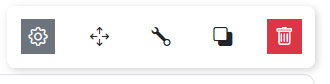
From left to right the Tools shown are
- Edit - Opens the detailed settings for the component
- Move - Another way to move the component (see below)
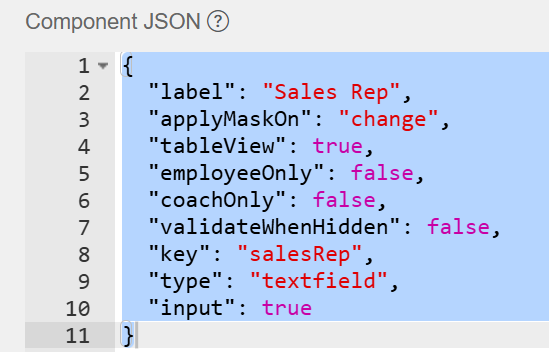
- Edit JSON - Opens a JSON editor for the selected component. This is another way to edit the details. It is much easier to use the edit tool, unless you are familiar with JSON.
- Copy component - Copies the entire component so you can paste it into another location on your form. If you have created a component for your form that you want to use repeatedly, this will save a lot of time. Some of the fields created below will be easier to copy and paste rather than creating them over and over.
- Remove component - removes the component
![]() Some more complicated components
Some more complicated components
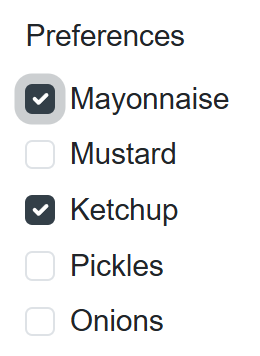
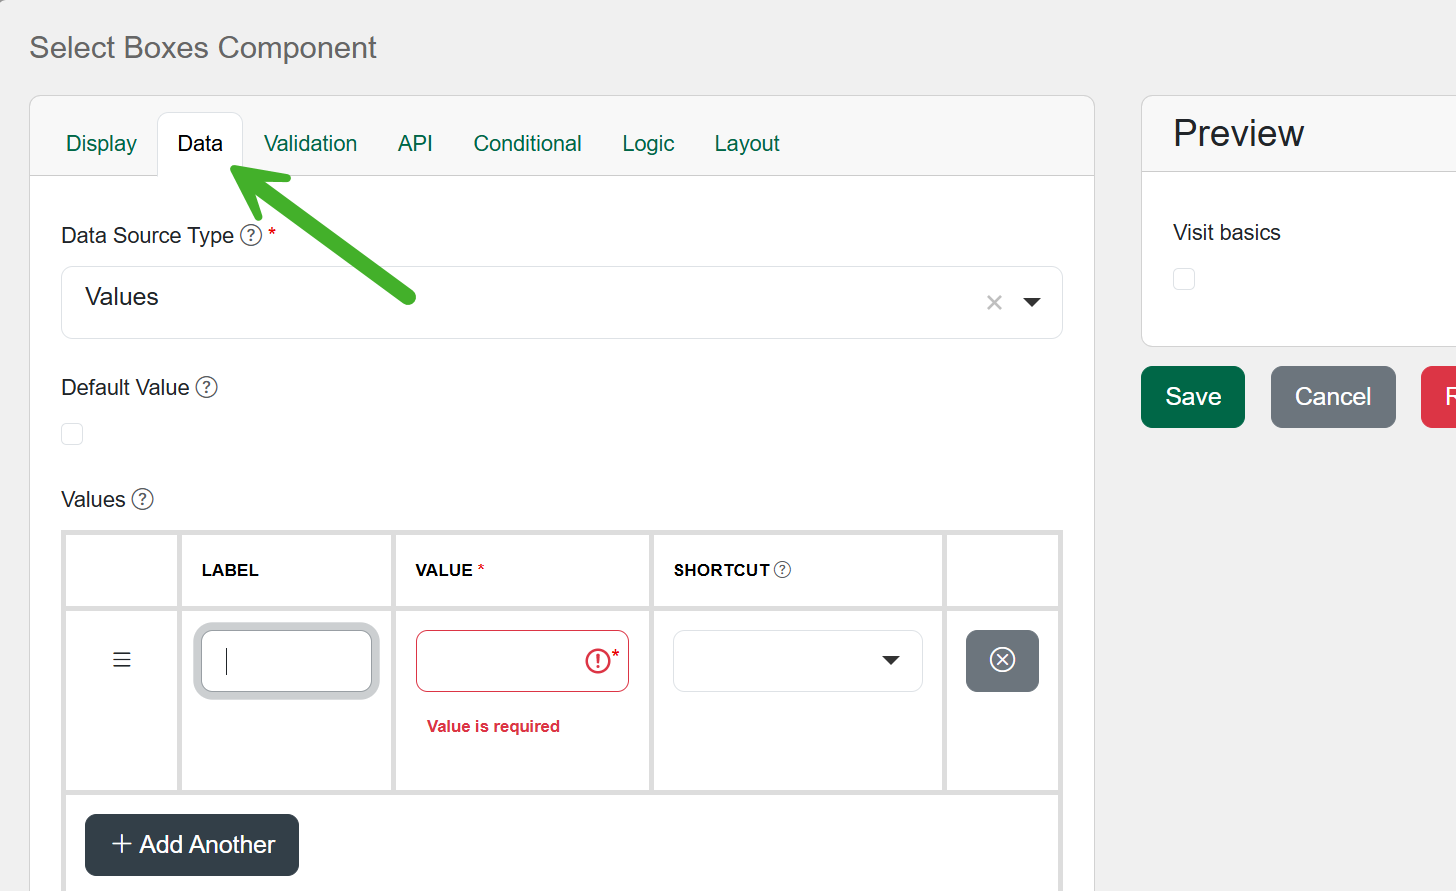
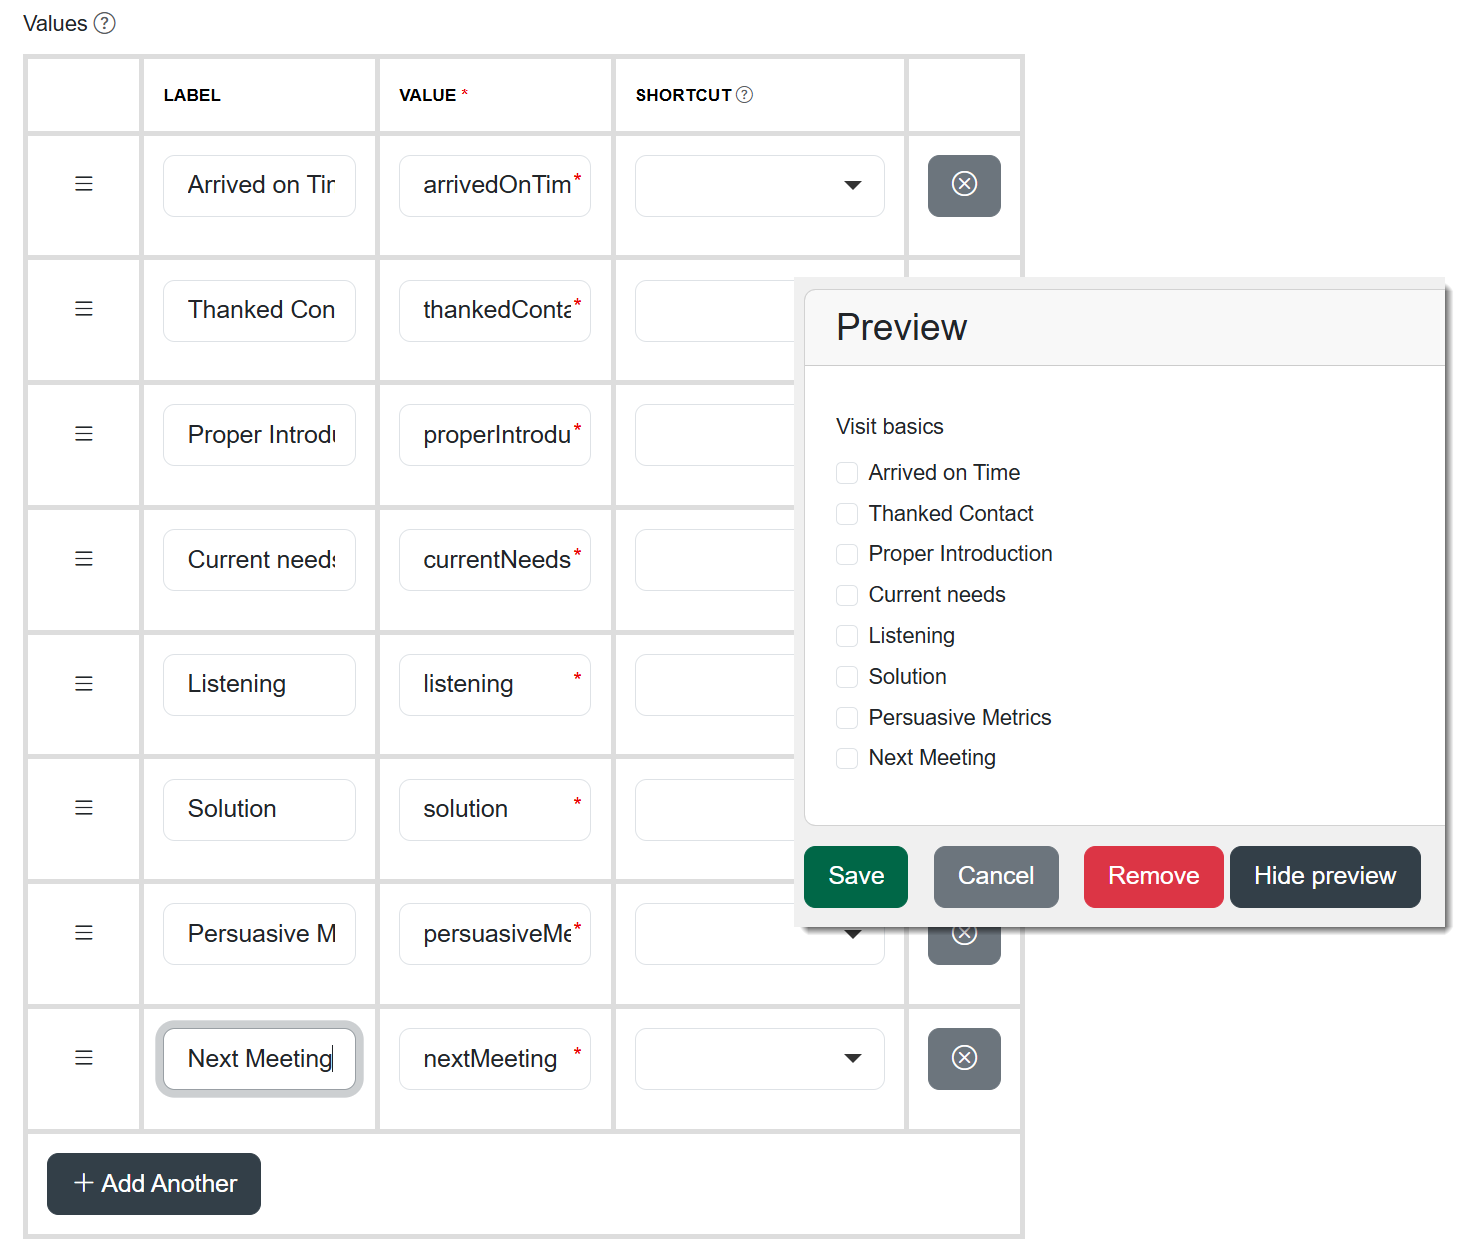
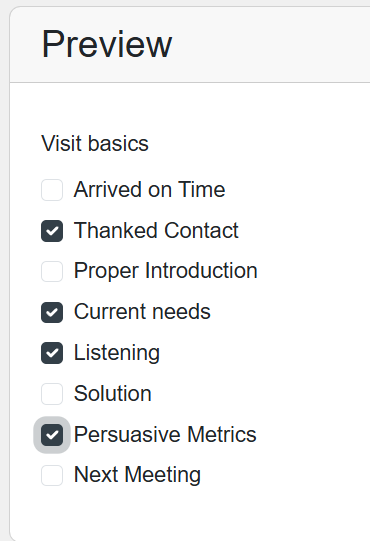
Use Case - I want to be able quickly check off a number of successful evaluation criteria for a visit. For example - Our rep:
- - arrived on time for appointment
- - thanked contact for meeting with us
- - introduced himself following company guidelines
- - prompted contact to describe current needs
- - listened carefully to contact's responses
- - suggested immediate ways we can help with issues
- - used meaningful stats to prove our value
- - inquired about a next meeting
Your list will align with your company's goals and priorities. Let's see how to build this component into our form.
|
 |
|
 |
The "Data" tab allows us to create a data set for the component we are adding. In this case, we need to create several options. |
 |
|
 |
|
When you are finished, you can see the checkboxes included in the component you have created and the Preview displays how the checkboxes will appear in your finished form You can even select a few check boxes in the Preview to see exactly how the component will work in your finished form.
|
 |
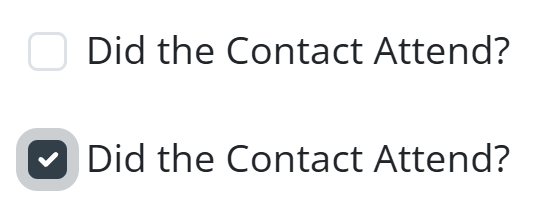
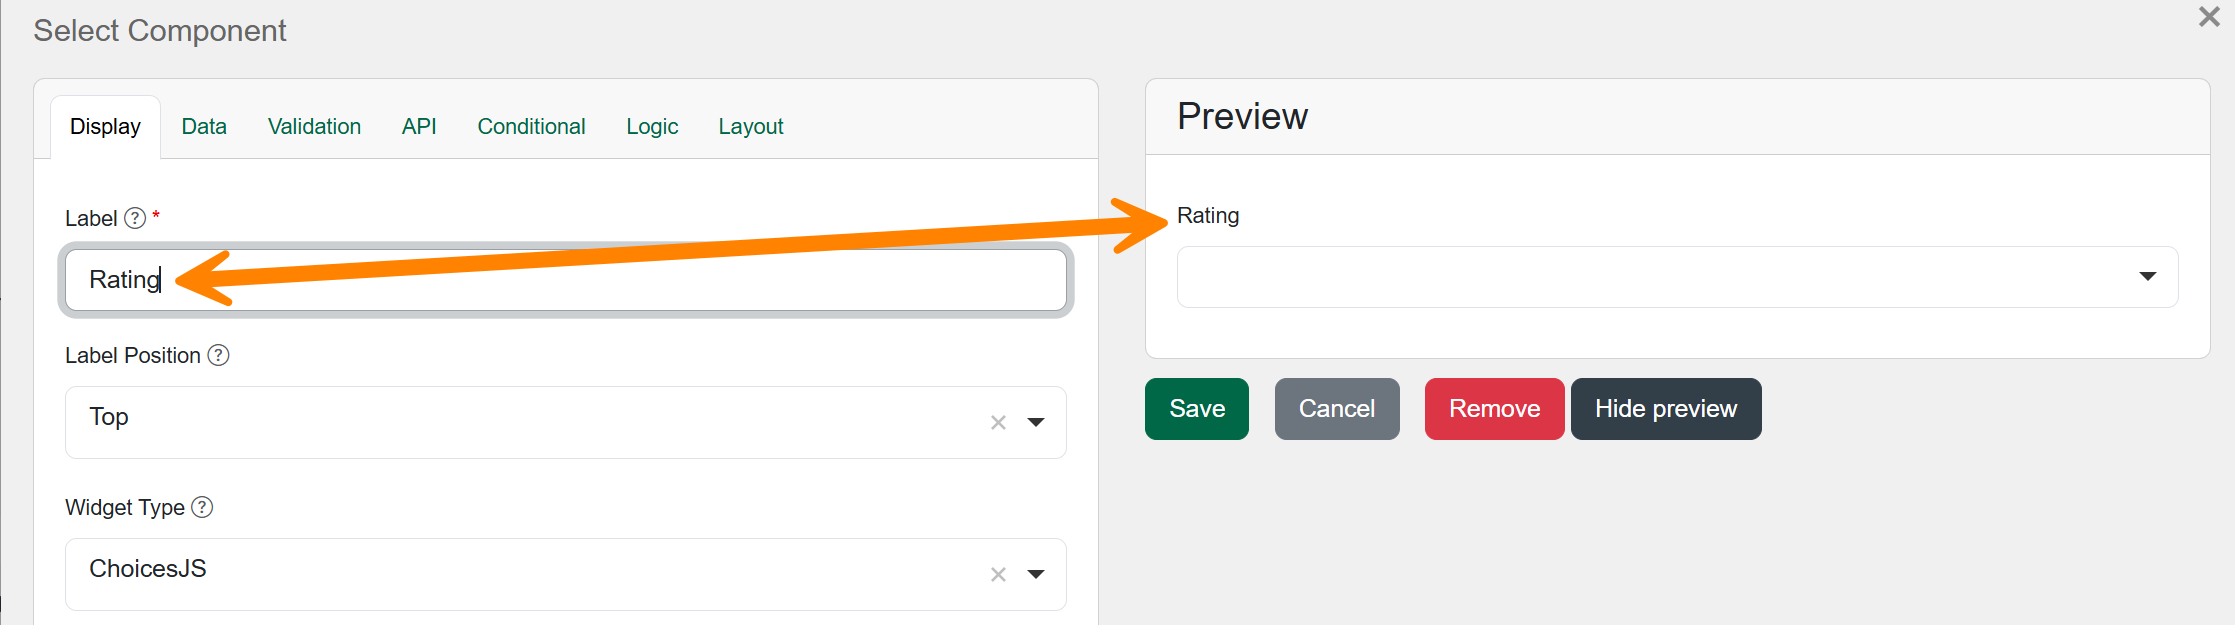
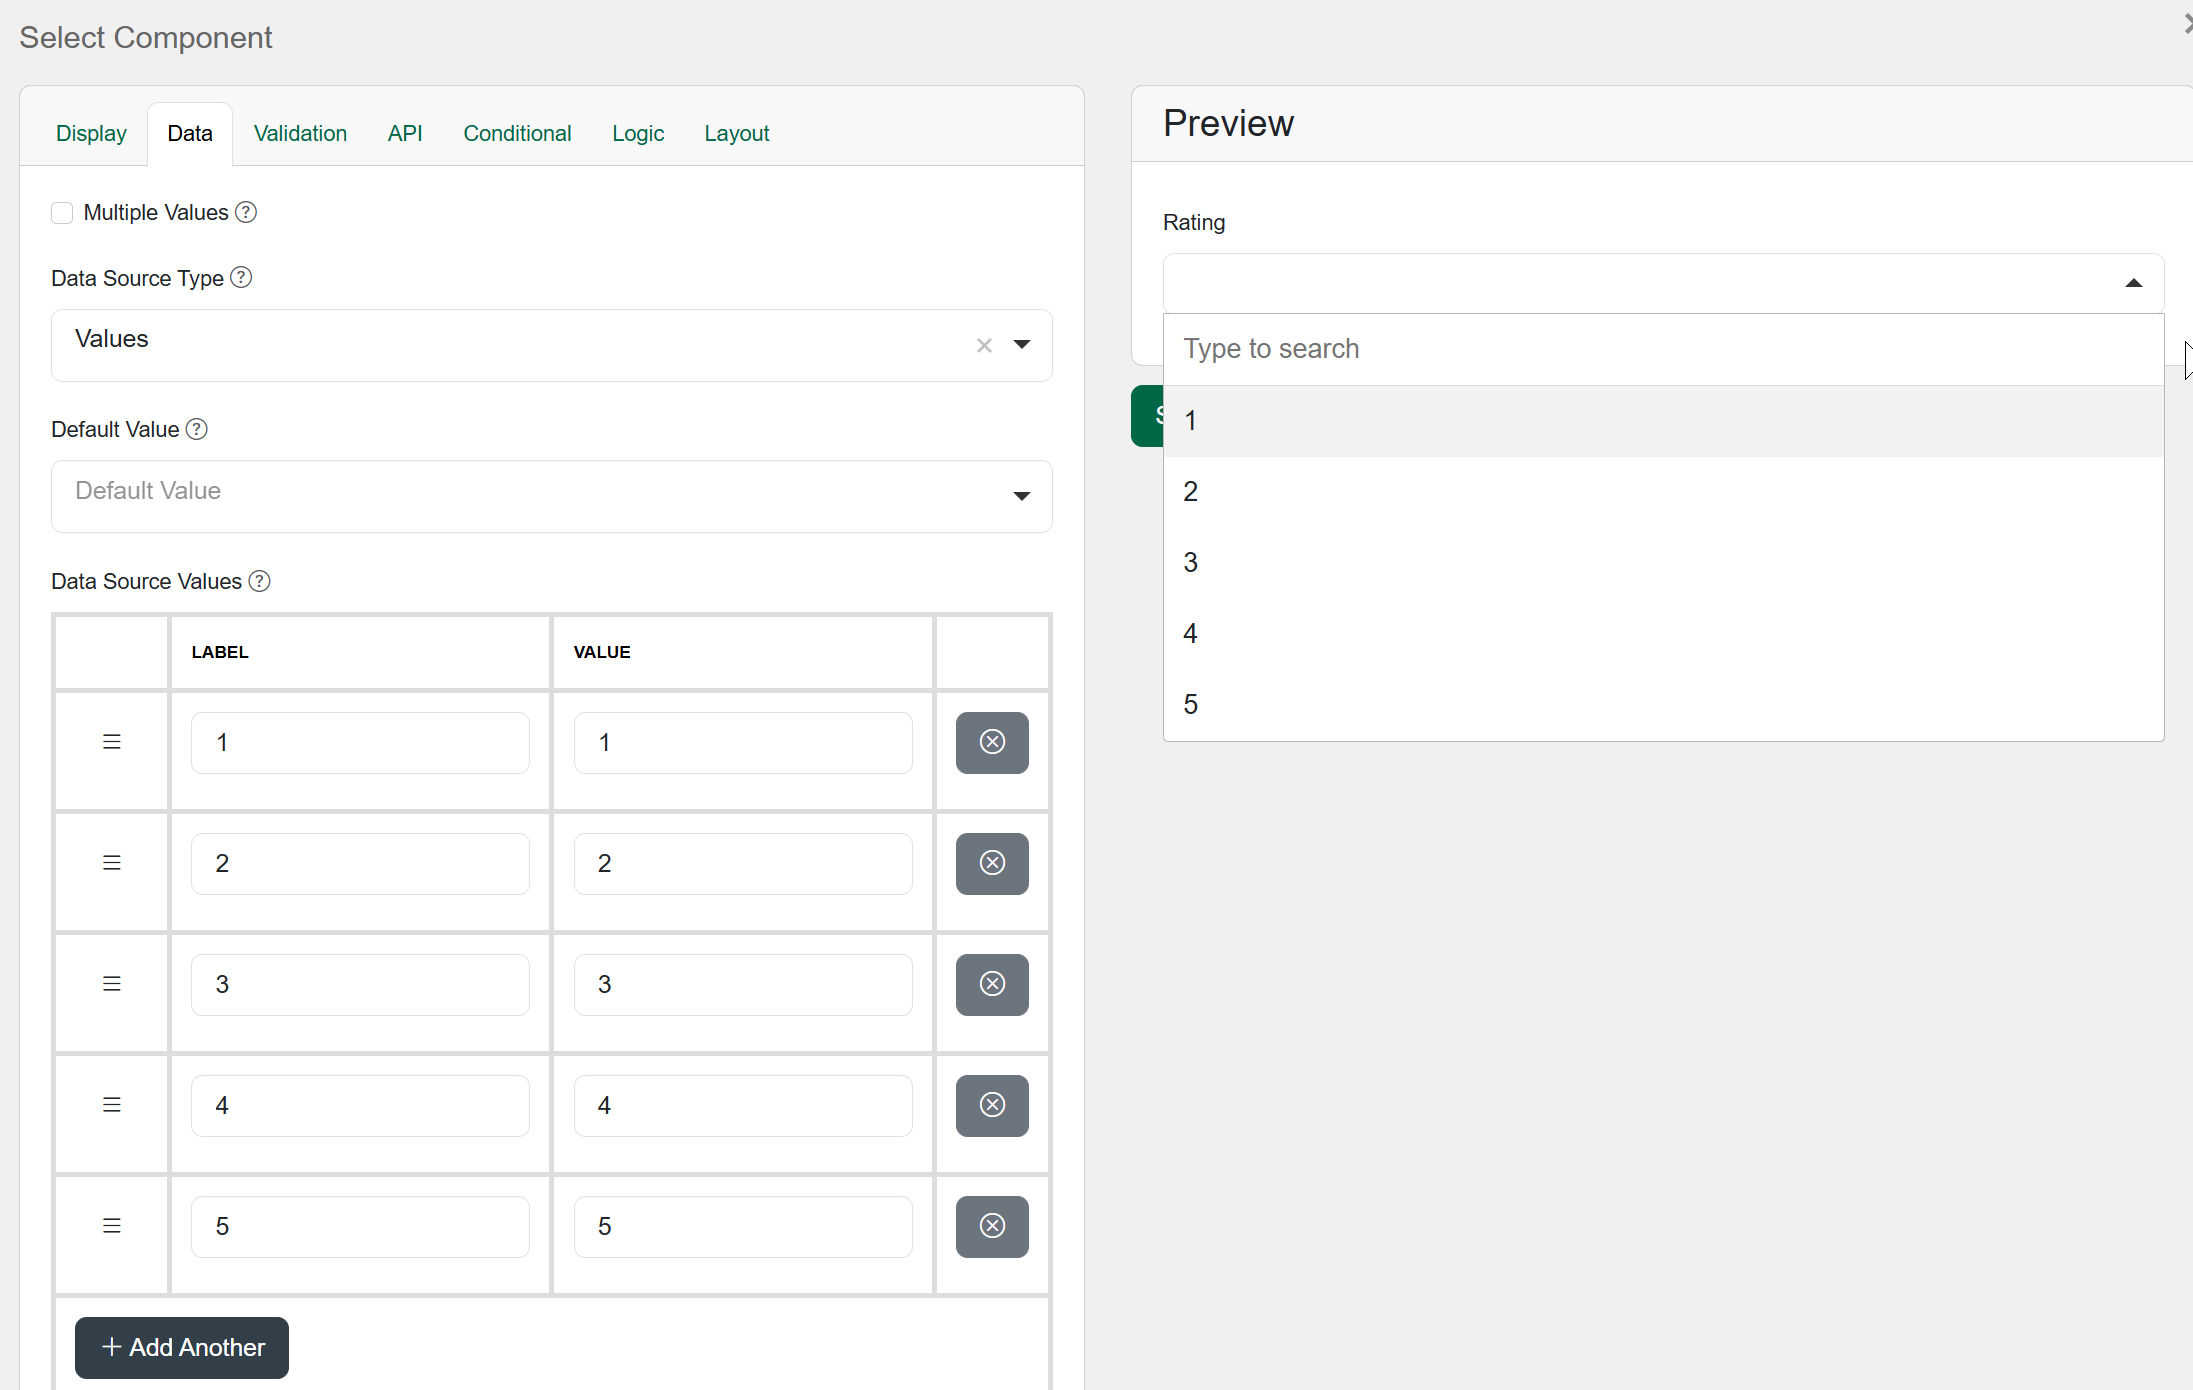
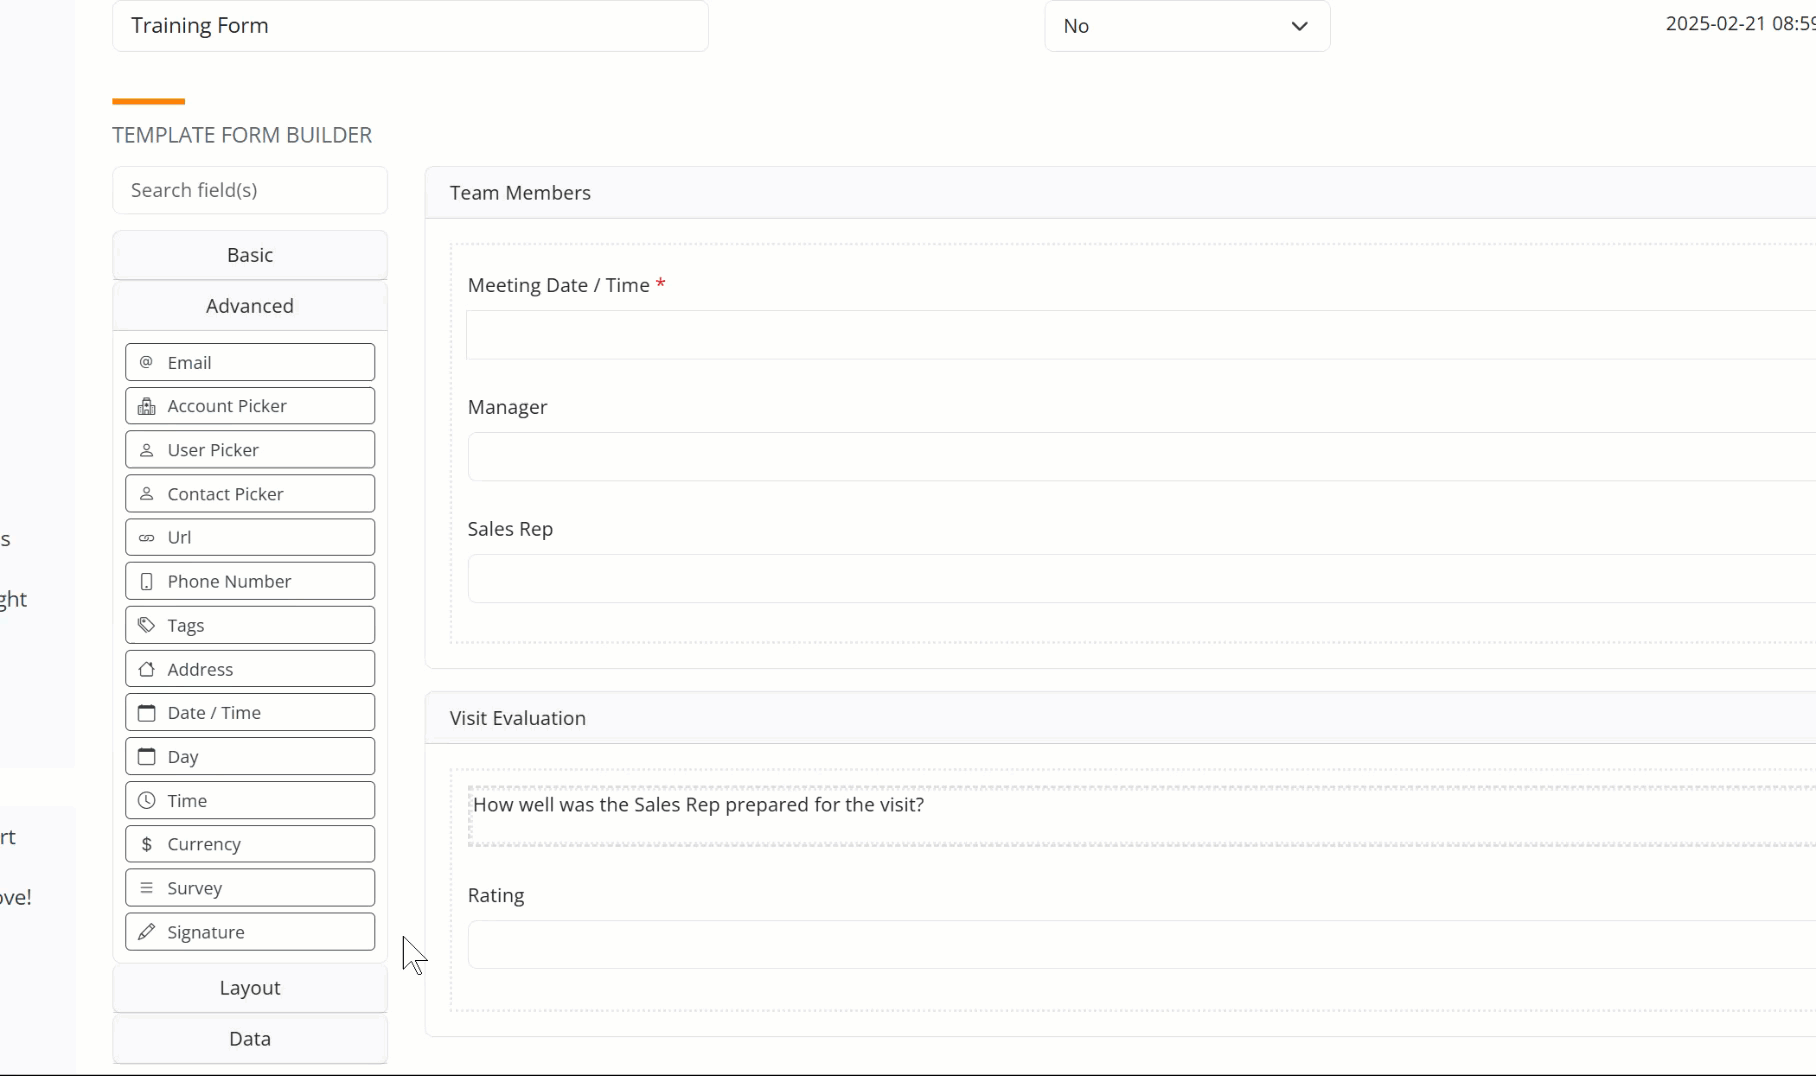
Use Case - I want to be able to provide a quick rating in response to an evaluation question.
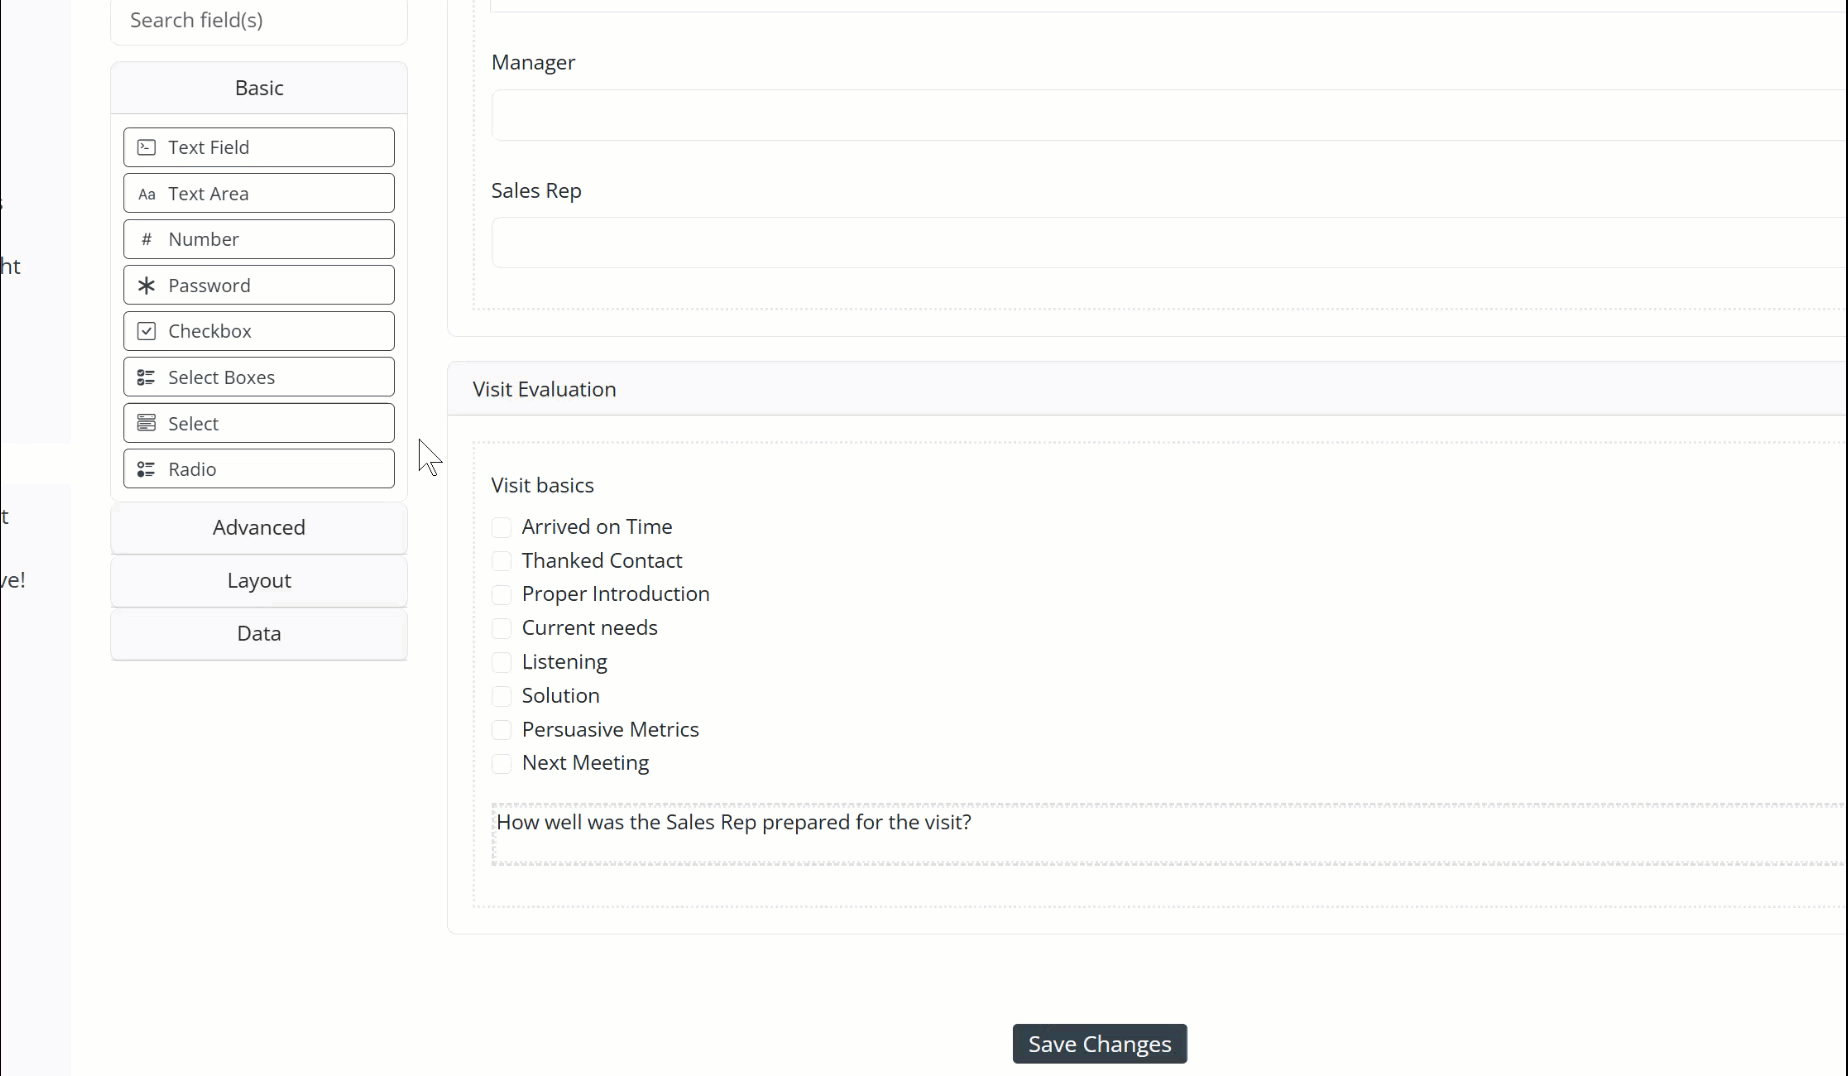
In this example, we have created a "Visit Evaluation" panel and added a "Content" component (In the Layout collection) which is just a box of text. Our question was "How well was the Sales Rep prepared for the visit?" |
 |
|
 |
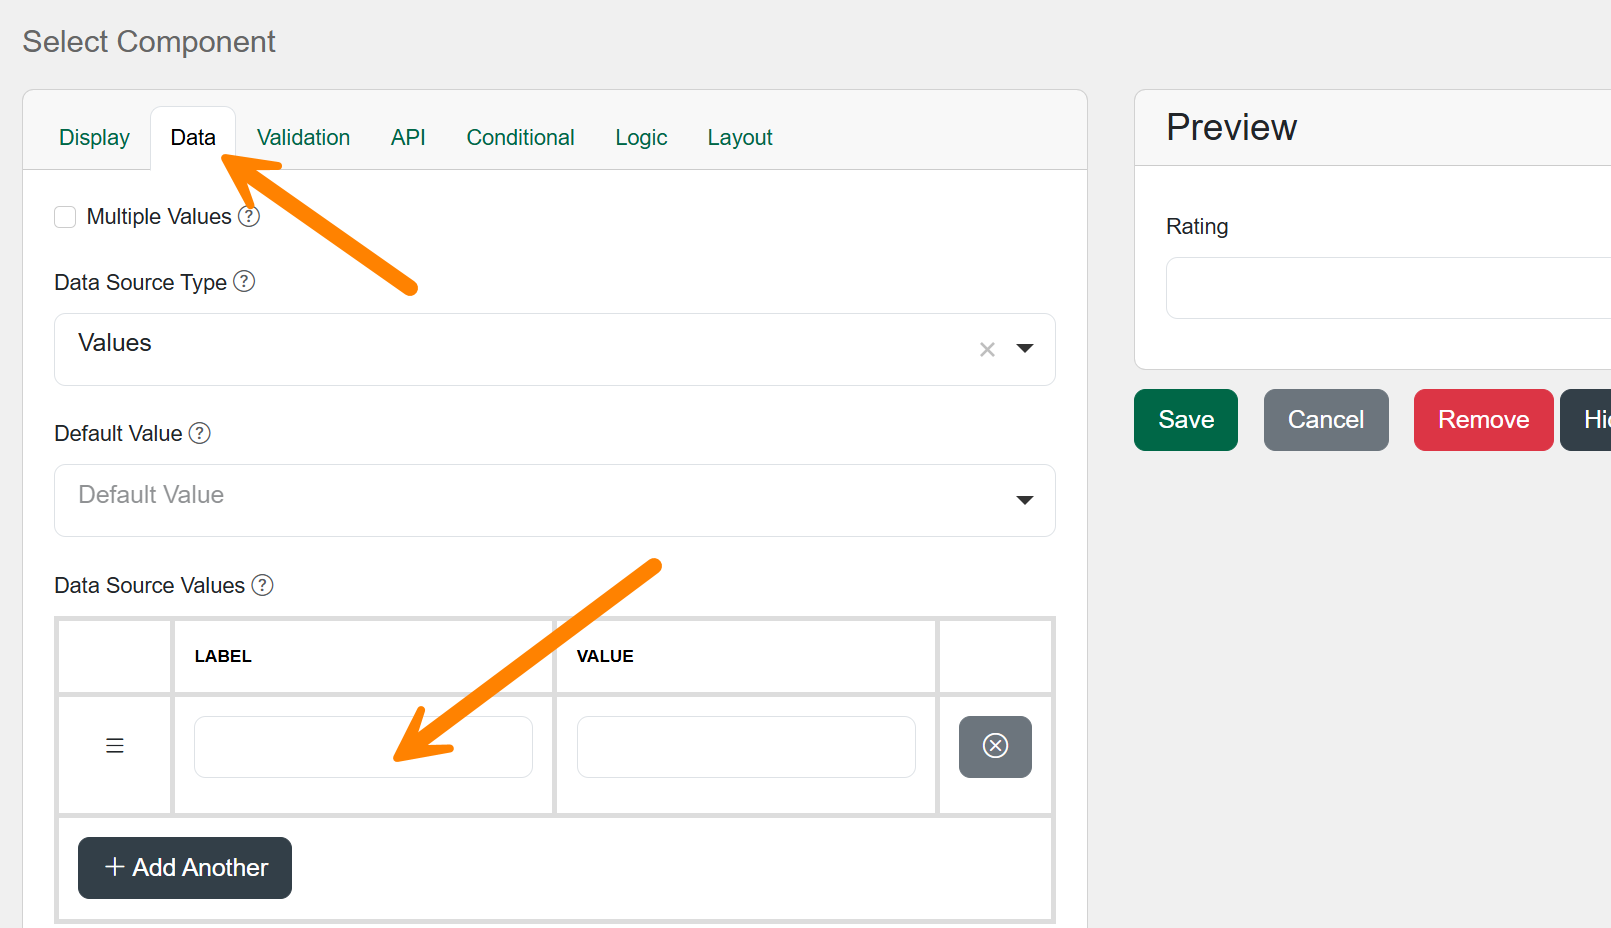
The "Data" tab allows us to create a data set for the component we are adding. In this case, we need to create five options - one to five.
|
 |
The image to the right shows the settings and the final result as shown in the Preview. |
 |
Editing Existing Coaching Templates
![]() If you haven't looked at the Form Basics yet, we suggest you navigate back up and look through that content, then come back down to look at editing.
If you haven't looked at the Form Basics yet, we suggest you navigate back up and look through that content, then come back down to look at editing.
Editing Overview
To edit an existing coaching form, follow these steps:
|
|
|
![]() Click on the "Coaching Templates" link in the menu. This will open the Coaching Templates interface. The image above shows what this interface looks like.
Click on the "Coaching Templates" link in the menu. This will open the Coaching Templates interface. The image above shows what this interface looks like.
![]() Click on the Edit button to the left of the form you want to edit.
Click on the Edit button to the left of the form you want to edit.
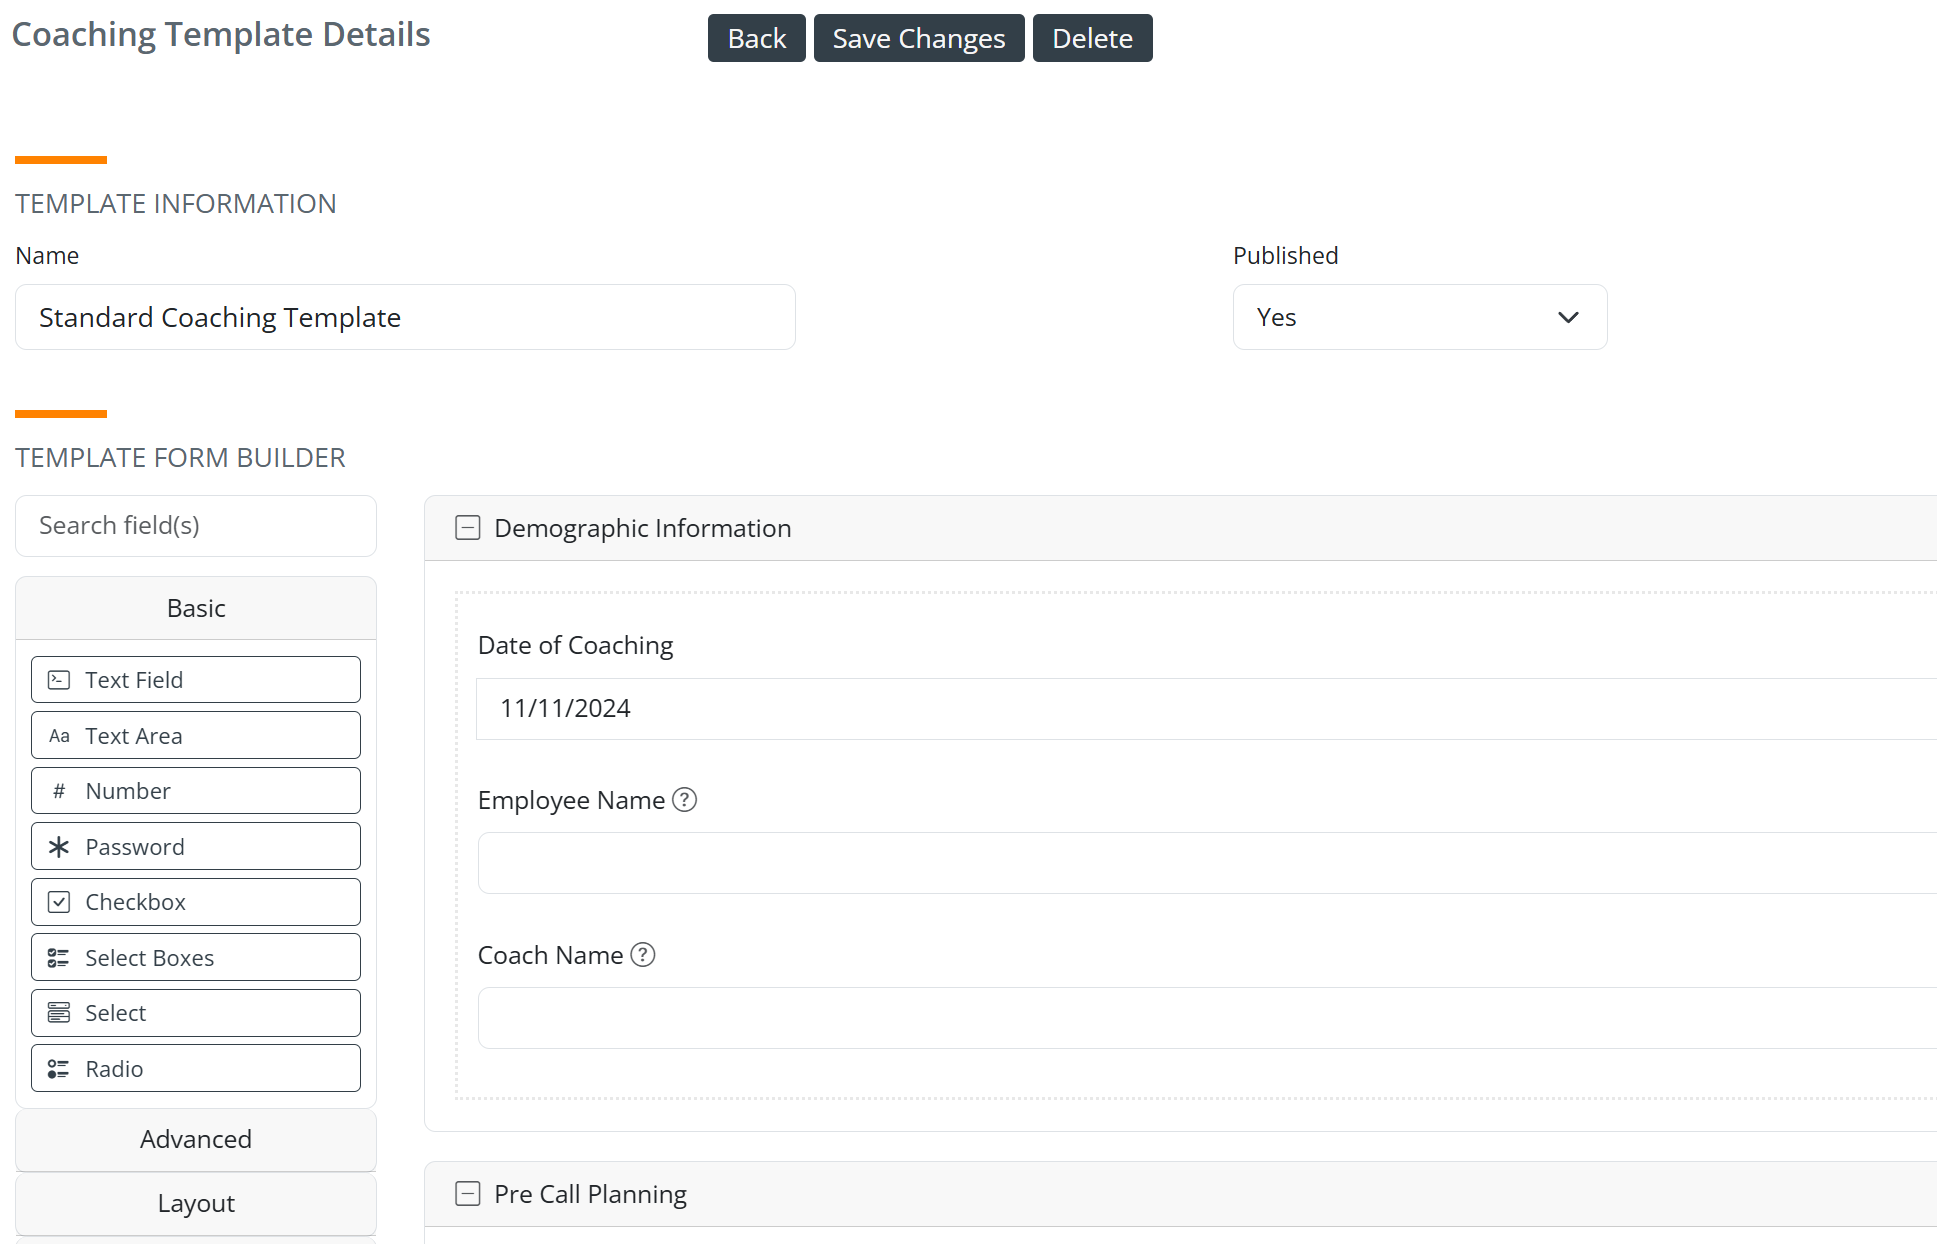
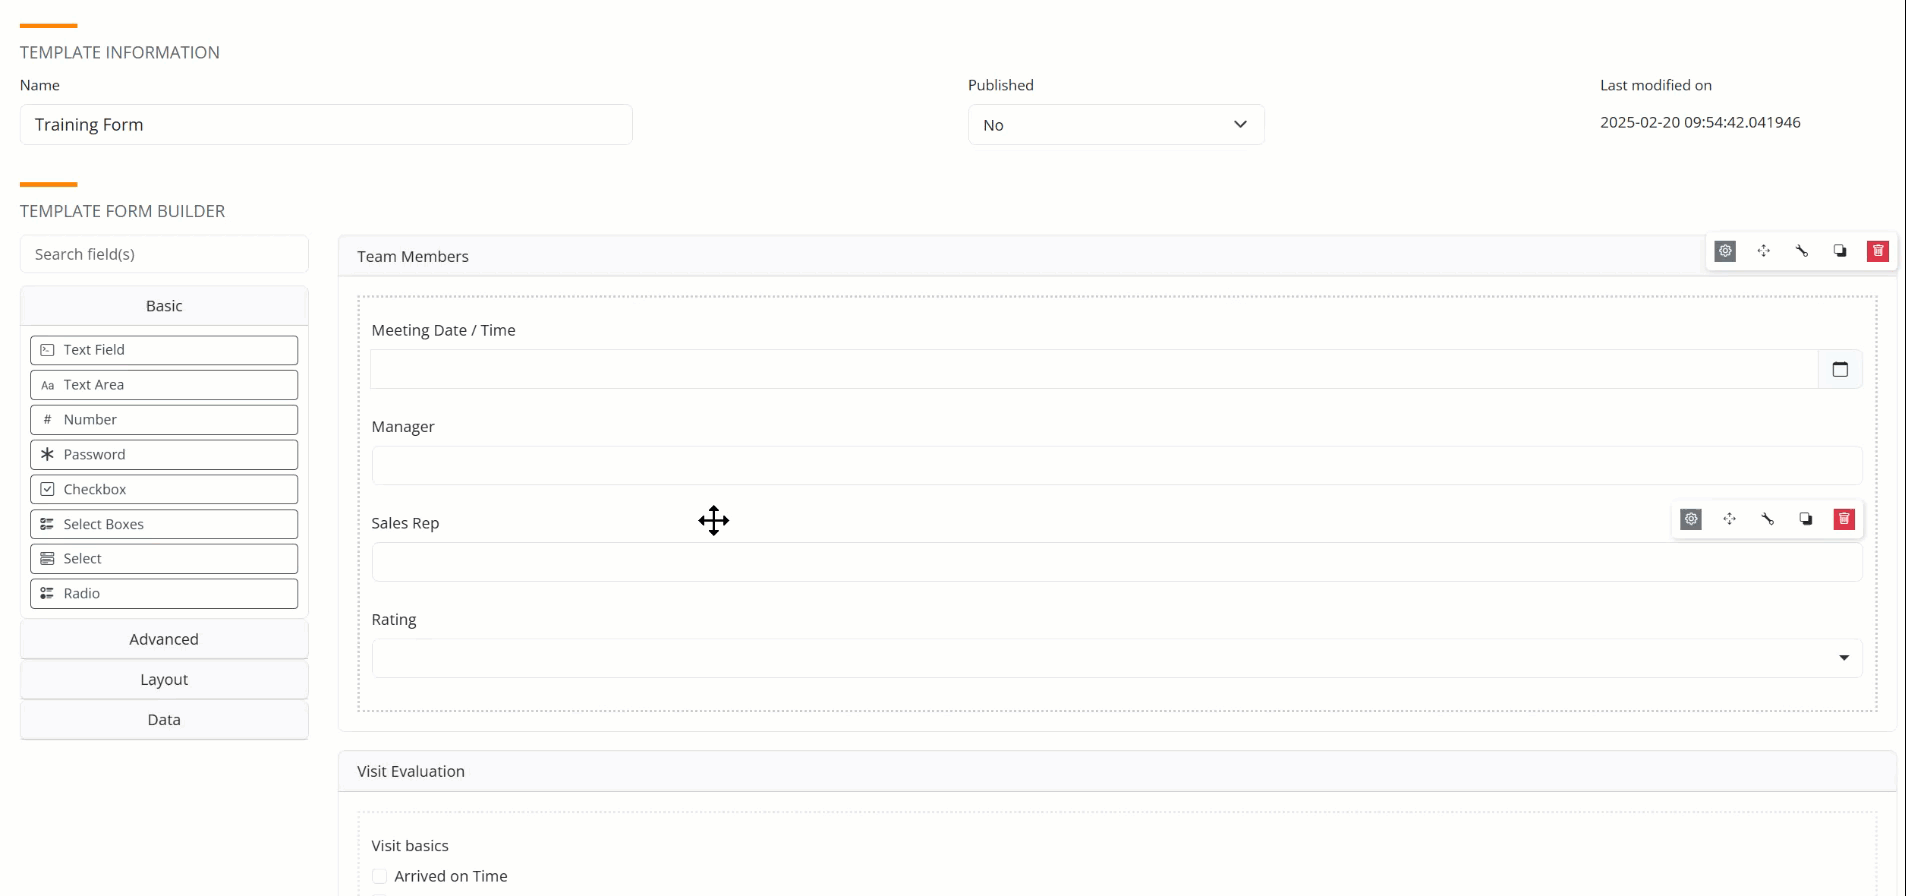
The Form Builder opens. Use the image below to identify the features described below.
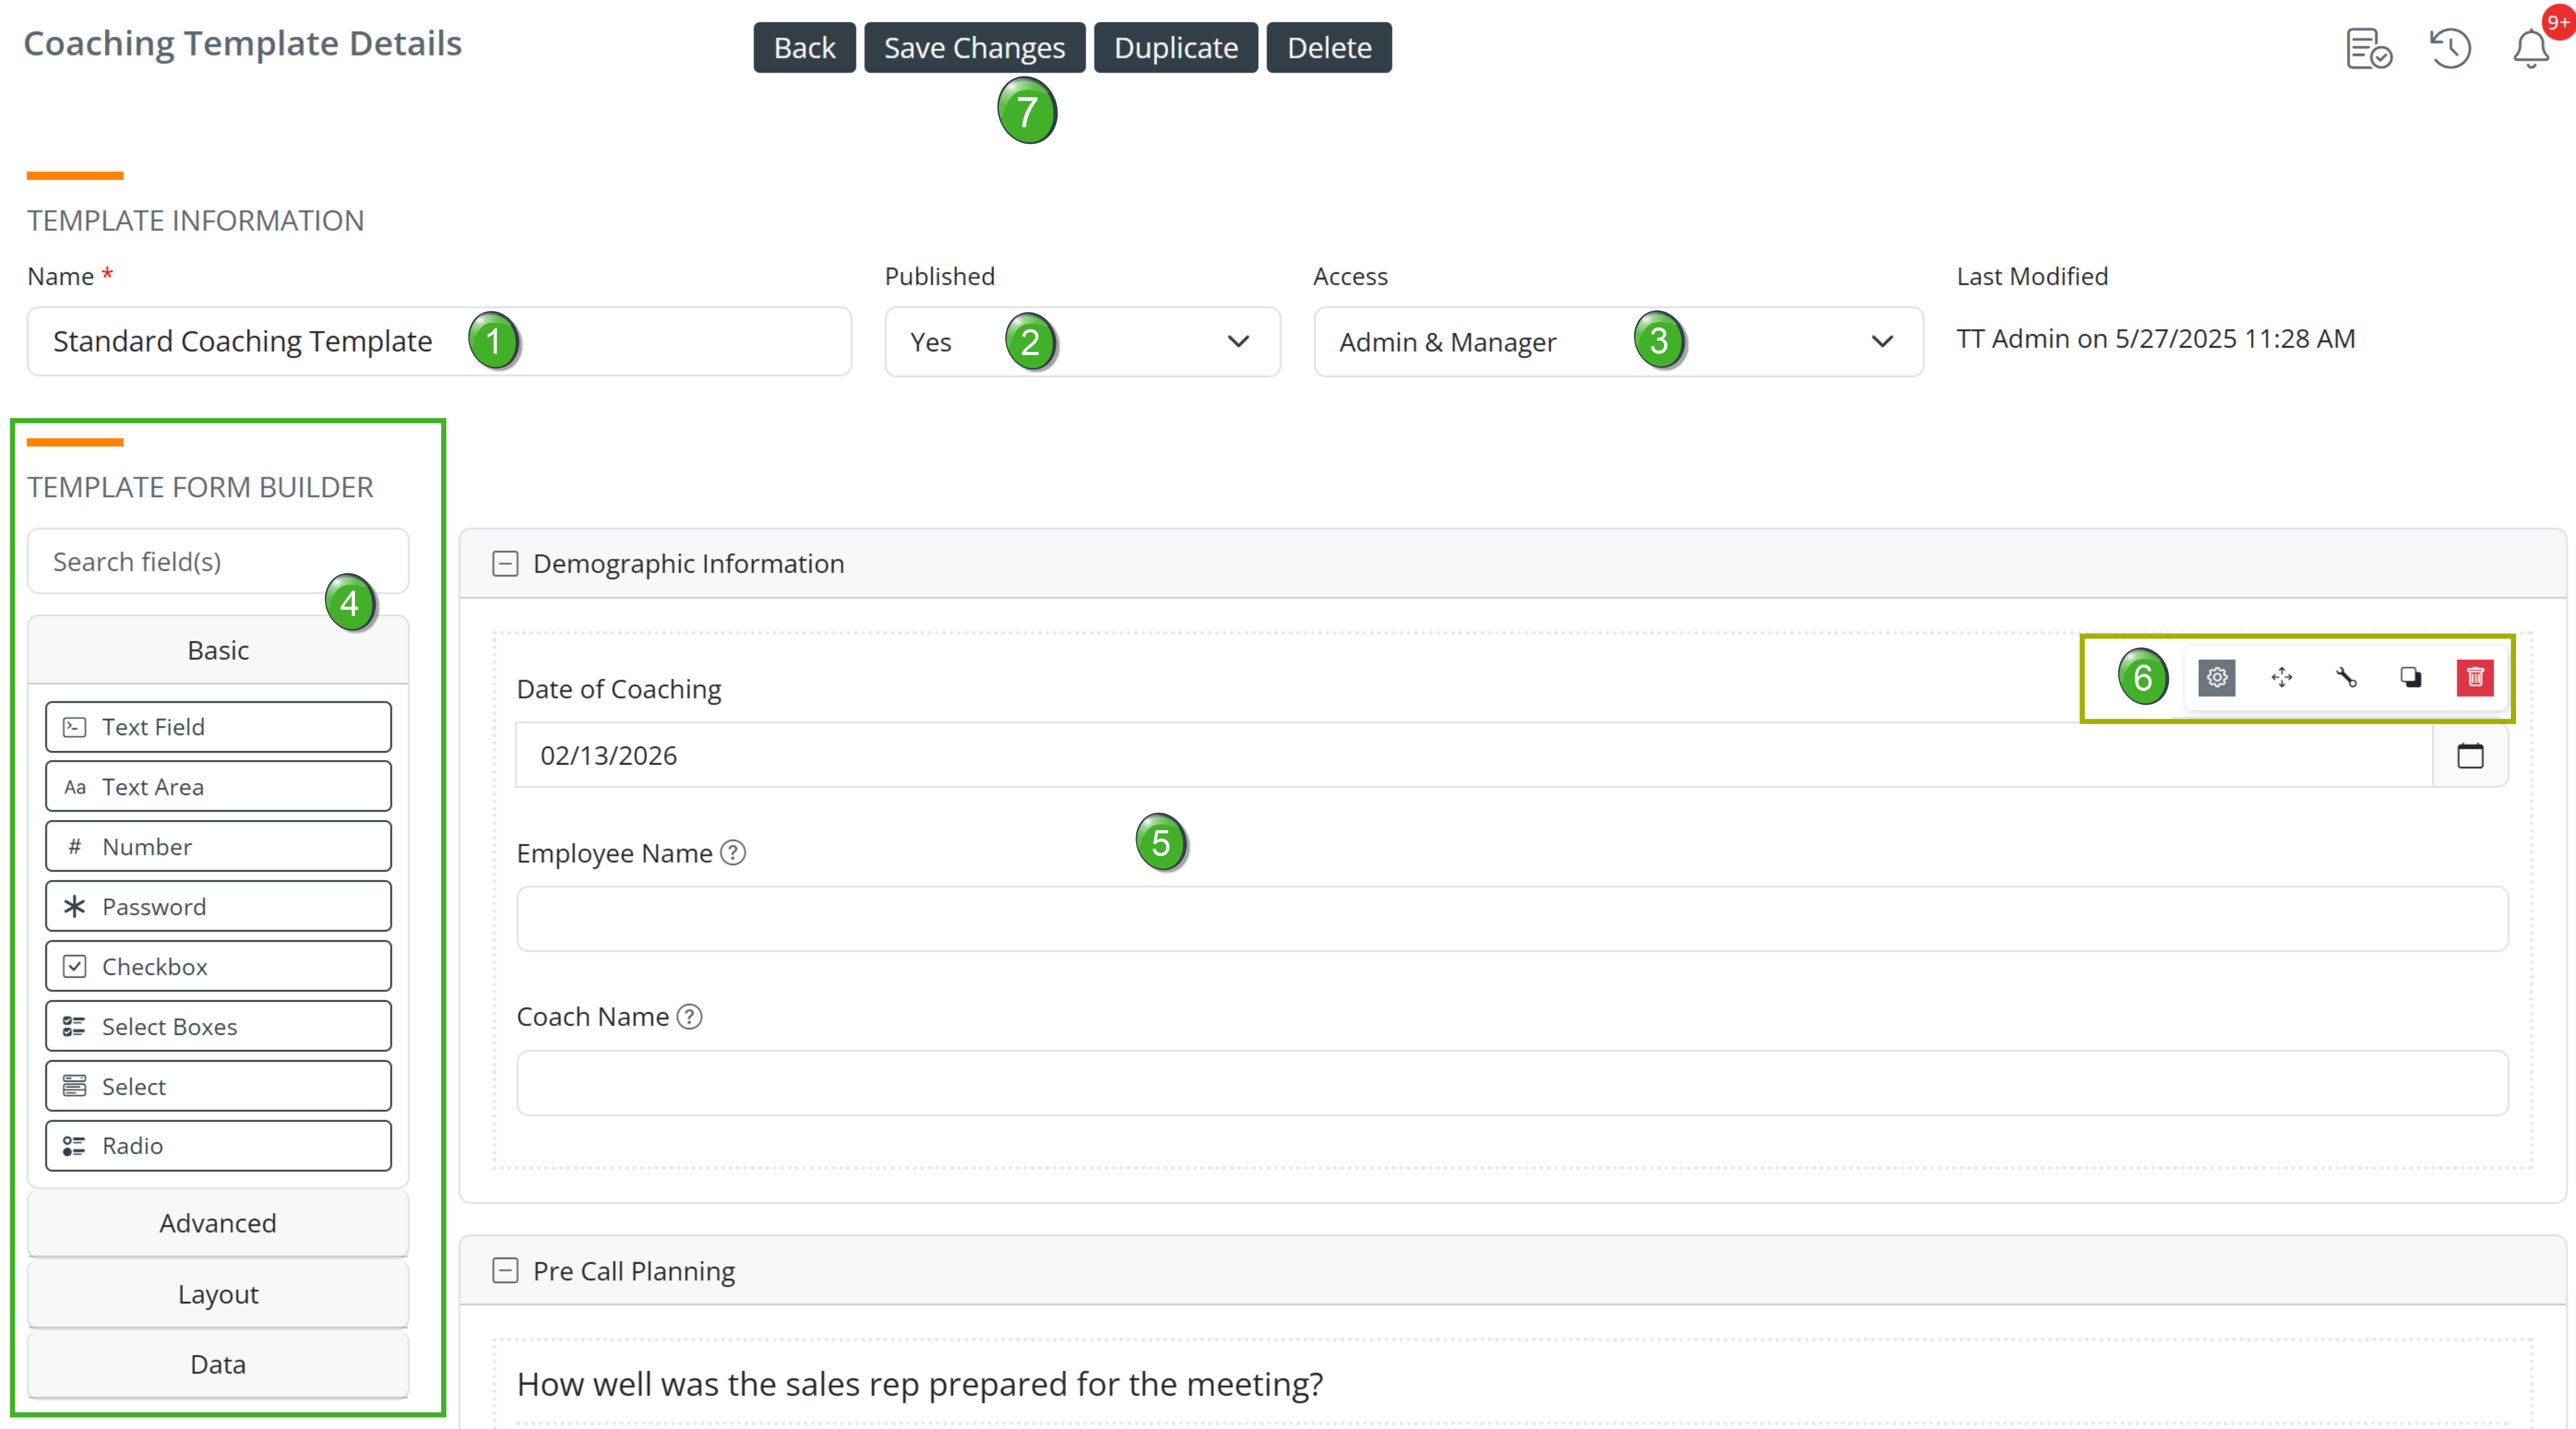
![]() Form Name - This name can be changed. The ideal name will help a manager to select it based on the coaching goals they intend to accomplish. For example, "Standard Coaching Form," or "Professional Growth Evaluation Form." Each of these would be easy to pick out from a list.
Form Name - This name can be changed. The ideal name will help a manager to select it based on the coaching goals they intend to accomplish. For example, "Standard Coaching Form," or "Professional Growth Evaluation Form." Each of these would be easy to pick out from a list.
![]() Published - This field needs to say "yes" for the form to be used. While creating a new form, or editing a form, leaving the form unpublished will keep the form from being used until the form is ready.
Published - This field needs to say "yes" for the form to be used. While creating a new form, or editing a form, leaving the form unpublished will keep the form from being used until the form is ready.
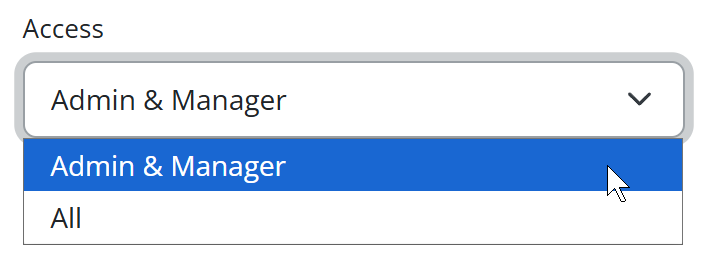
![]() Access - Choose who will be able to duplicate a completed coaching session.
Access - Choose who will be able to duplicate a completed coaching session.
|
See Adding a Component, below. |
|
![]() The Existing Form - Current Components - The different components that make up the current form are in the large section to the right. The Form Builder allows you to move components already in the form, or remove unwanted components.
The Existing Form - Current Components - The different components that make up the current form are in the large section to the right. The Form Builder allows you to move components already in the form, or remove unwanted components.
![]() Component Tools - When you hover over any component already in the form, the following options will open to the top right of the component.
Component Tools - When you hover over any component already in the form, the following options will open to the top right of the component.
From left to right the Tools shown are
- Edit - Opens the detailed settings for the component
- Move - Another way to move the component (see Moving a Component, below)
- Edit JSON - Opens a JSON editor for the selected component. This is another way to edit the details. It is much easier to use the edit tool, unless you are familiar with JSON.
- Copy component - Copies the entire component so you can paste it into another location on your form. If you have created a component for your form that you want to use repeatedly, this will save a lot of time.
- Remove component - removes the component (See Removing a Component, below)
![]() Actions - The buttons at the top of the page.
Actions - The buttons at the top of the page.

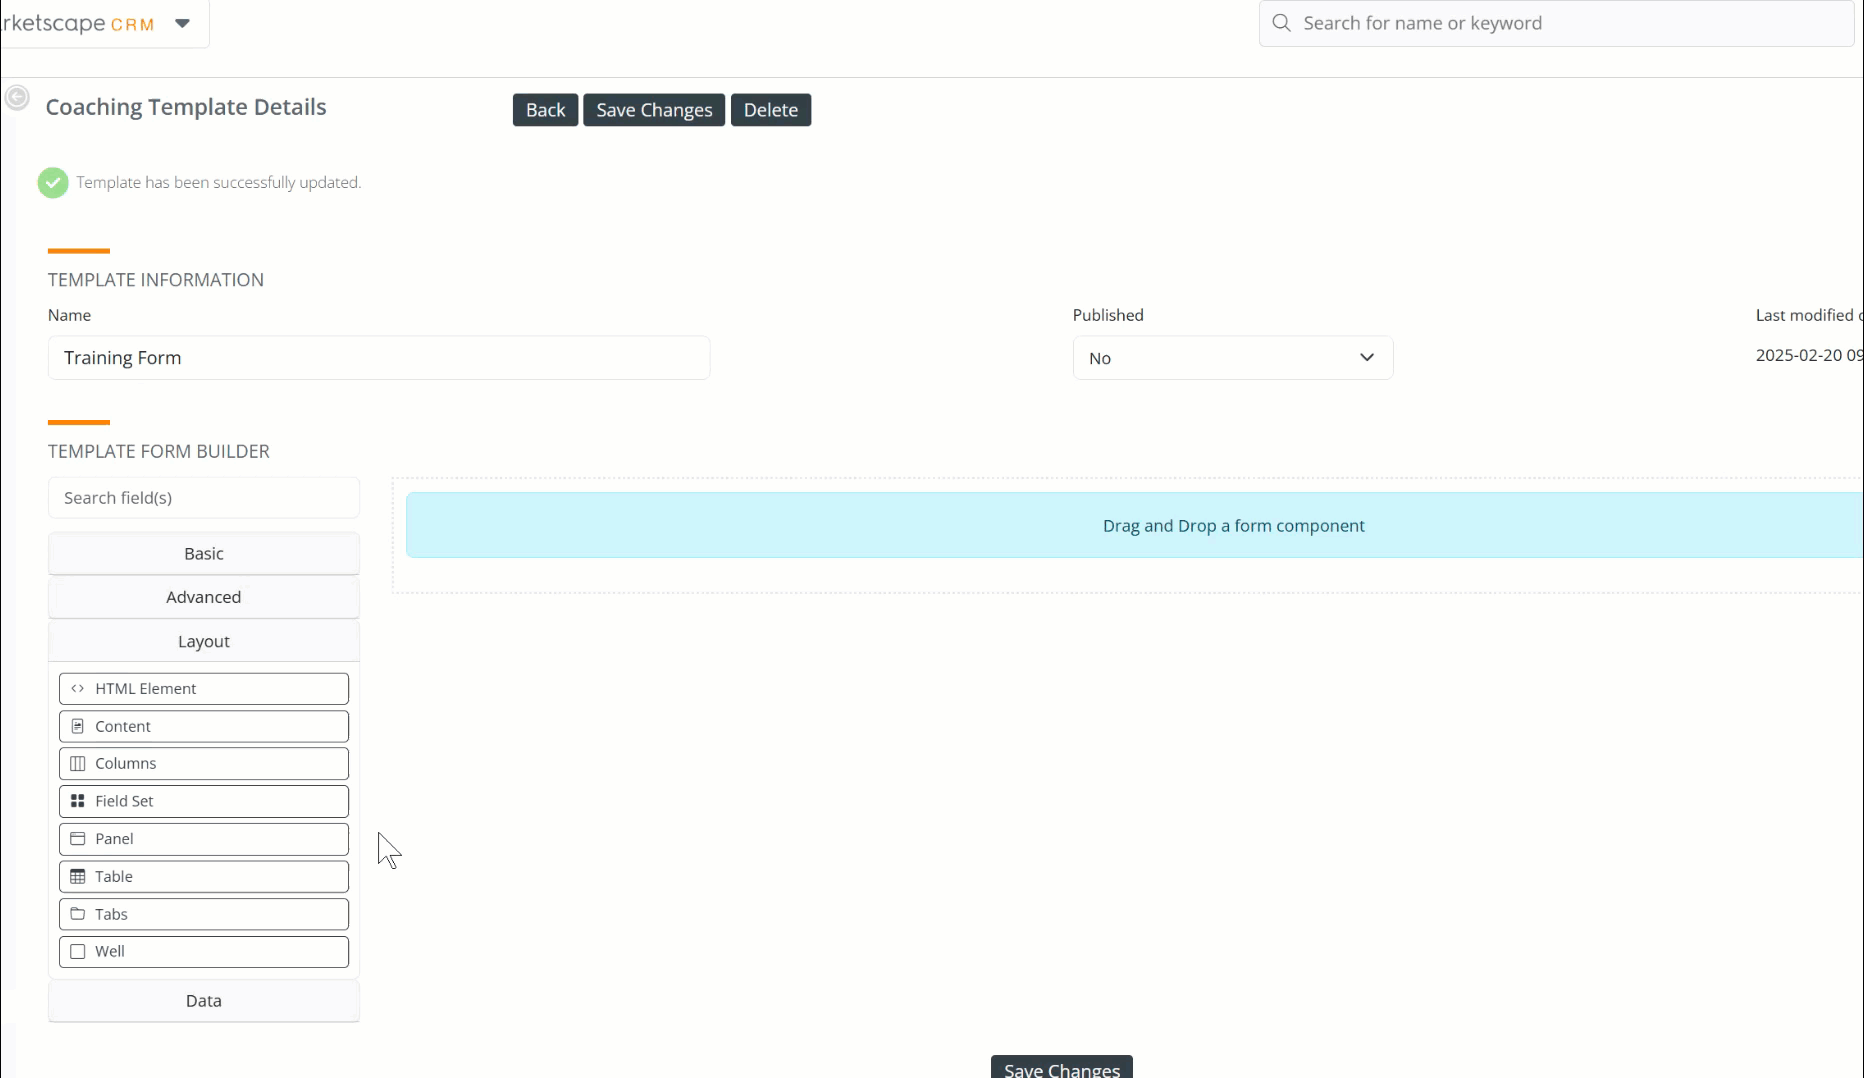
- Back - Navigate back to the previous page. If you have made changes and not saved them, the changes will be
-
 Save! - Save frequently! Trella CRM, for security reasons, logs off after an hour of non-use. Any unsaved changes to your form could be lost.
 - Duplicate - A quick step to make another template with all of the same fields. You will make changes, add a new name, and save
- Delete - Deletes the selected template
![]() Sneaky work around. If you try to save your form and you see the following error:
Sneaky work around. If you try to save your form and you see the following error:
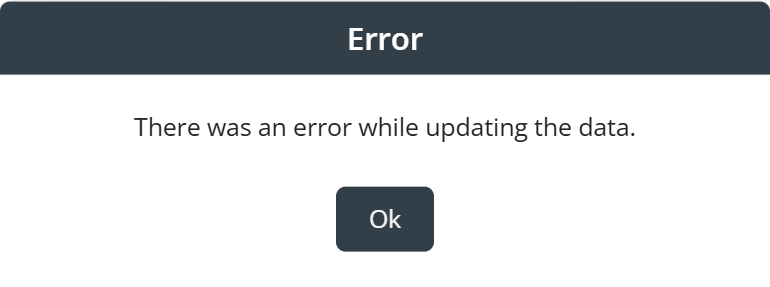
- Open another tab in your browser
- Navigate to app.trellahealth.com and log in.
- This will activate your session in the other tab and allow you to continue!
Adding a Component
Adding a component is a simple drag and drop action.
- Find the component you want to add to the form in one of the four collections of components on the left
- Drag the component to the desired location on the form to the right
- The component details interface will open
- Make any desired changes
- Click the "Save" button
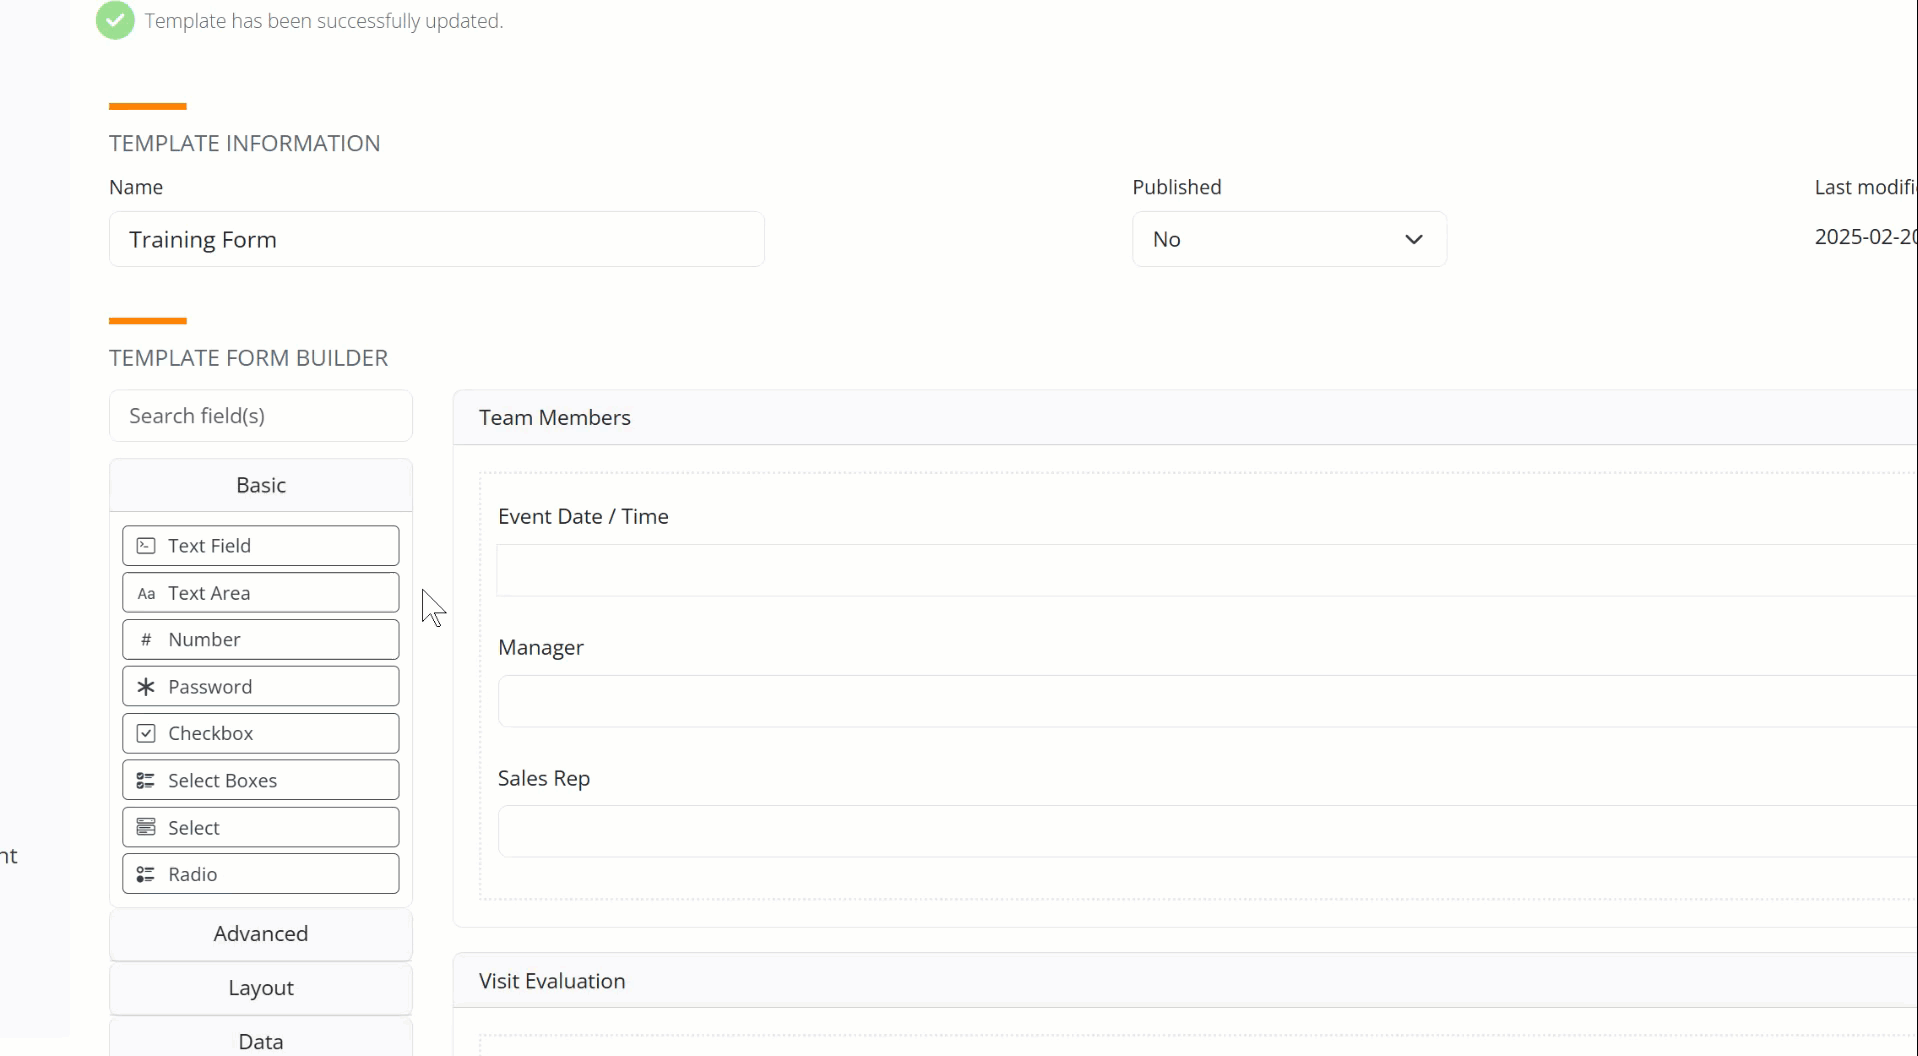
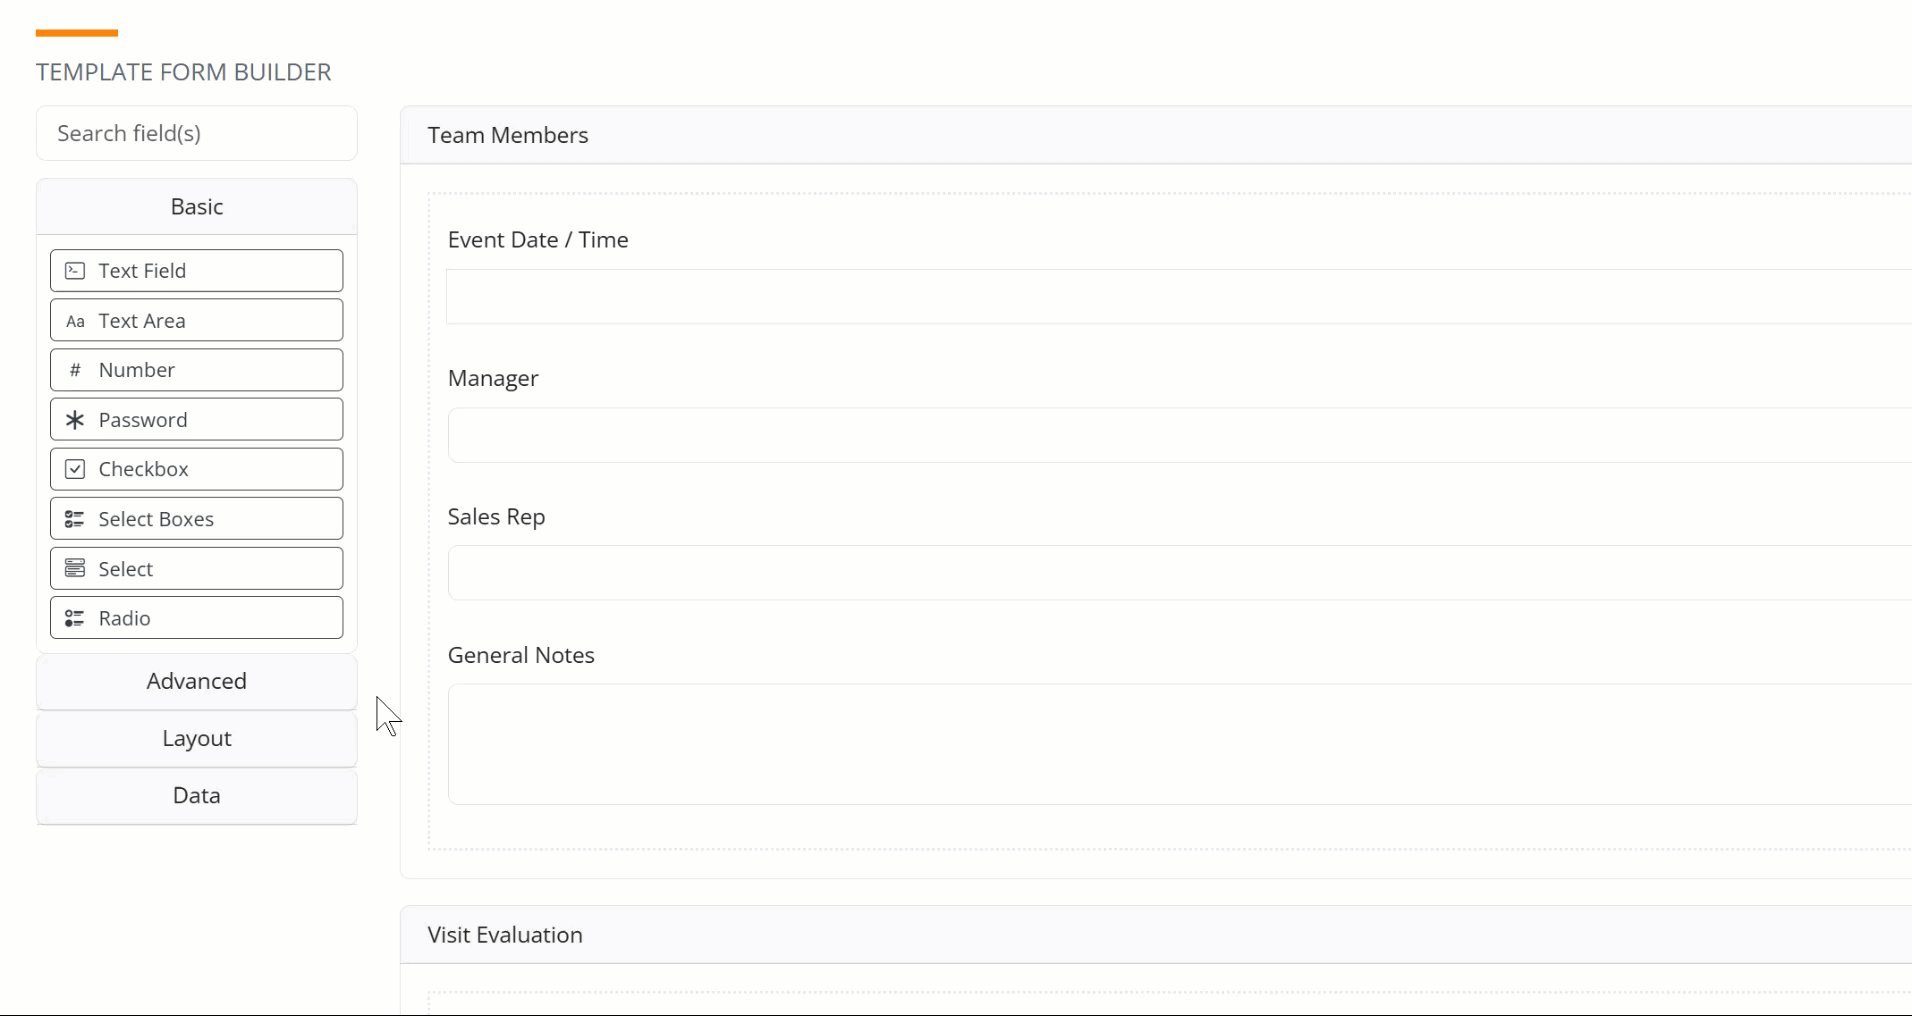
The following animation shows us adding a text area component that we name "General Notes."
Moving a Component
Moving any existing component is a simple drag-and-drop action.
- Click on the component you want to move
- Drag the component to the new location
- Drop the component
- Don't forget to save your form
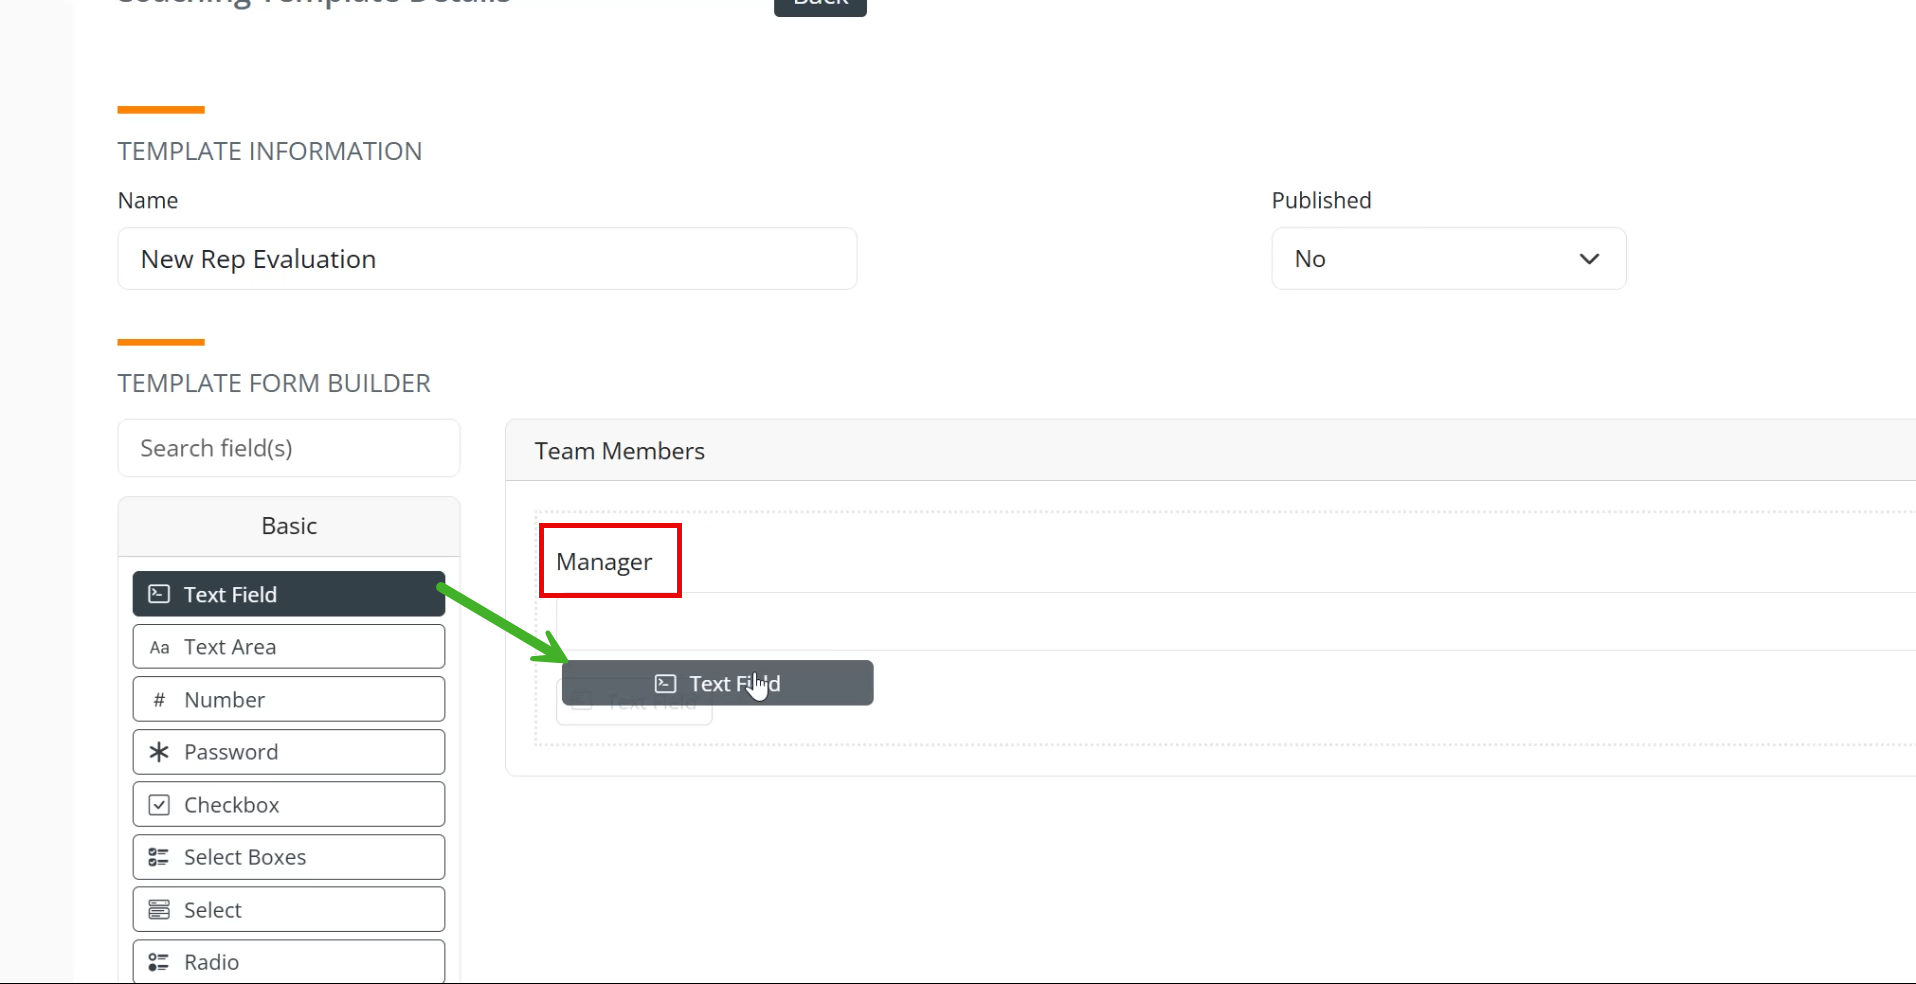
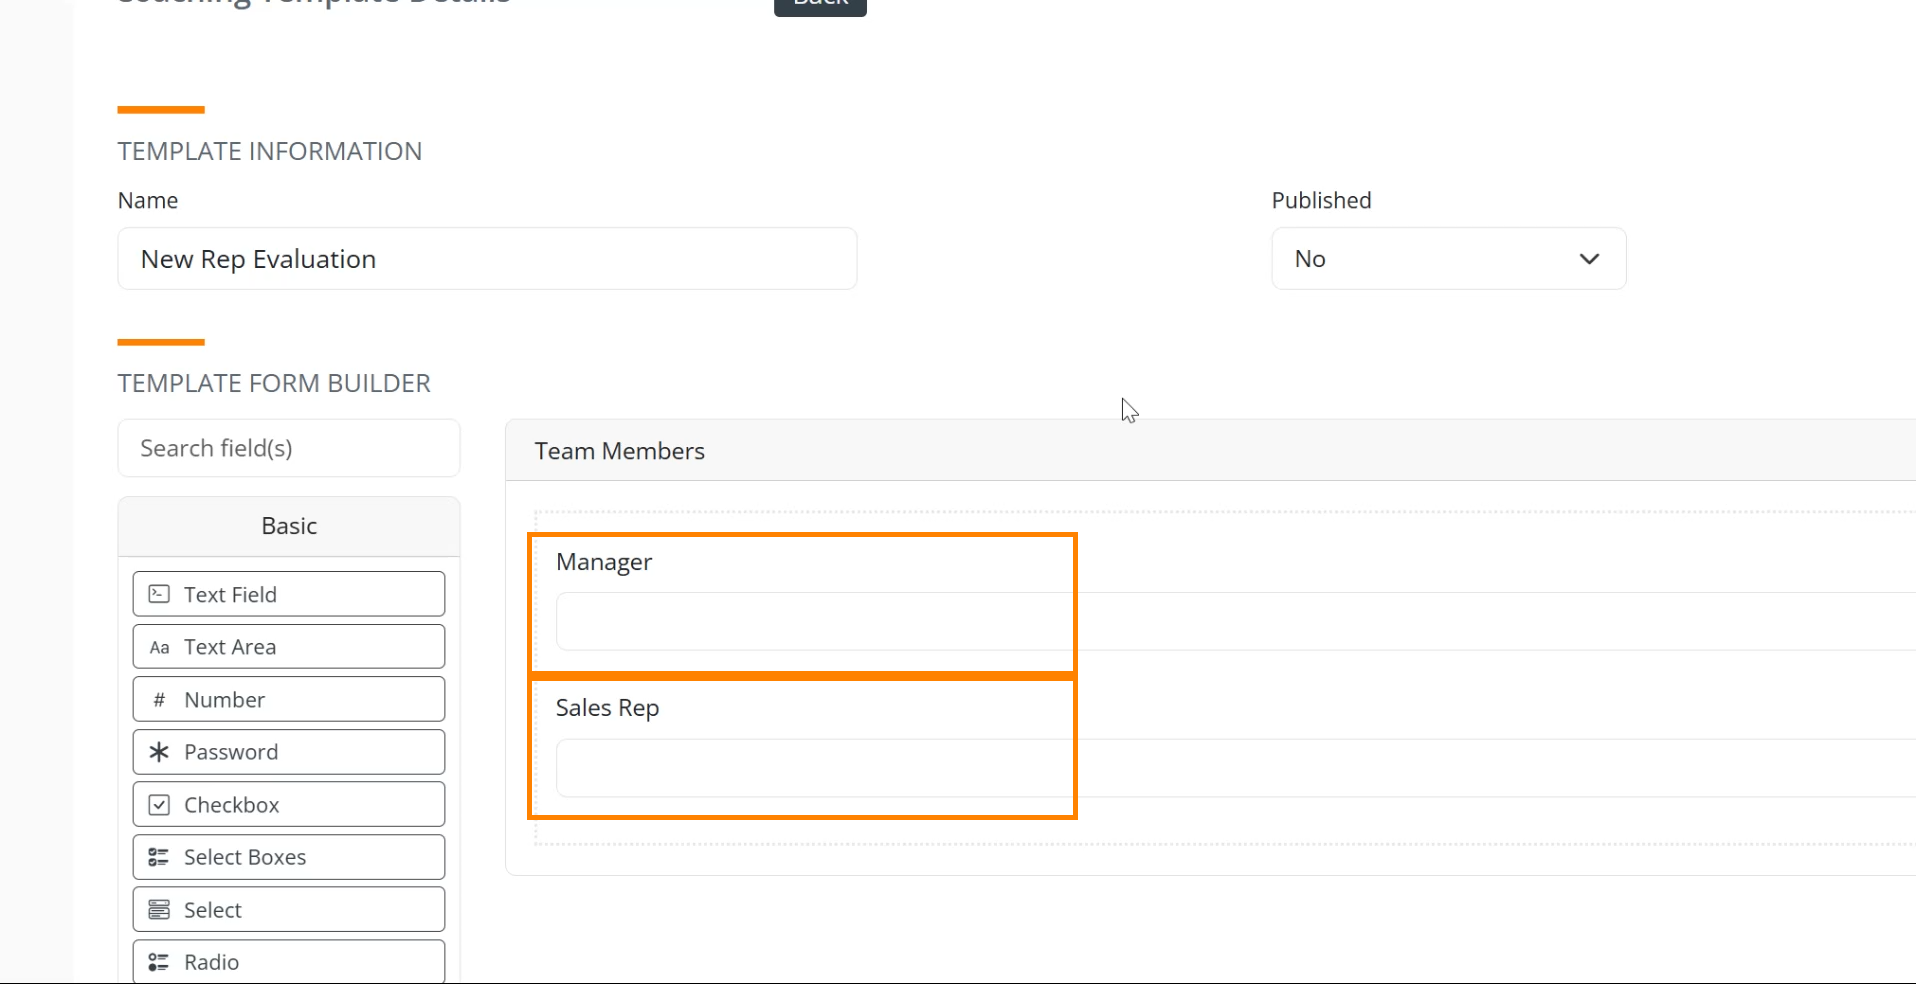
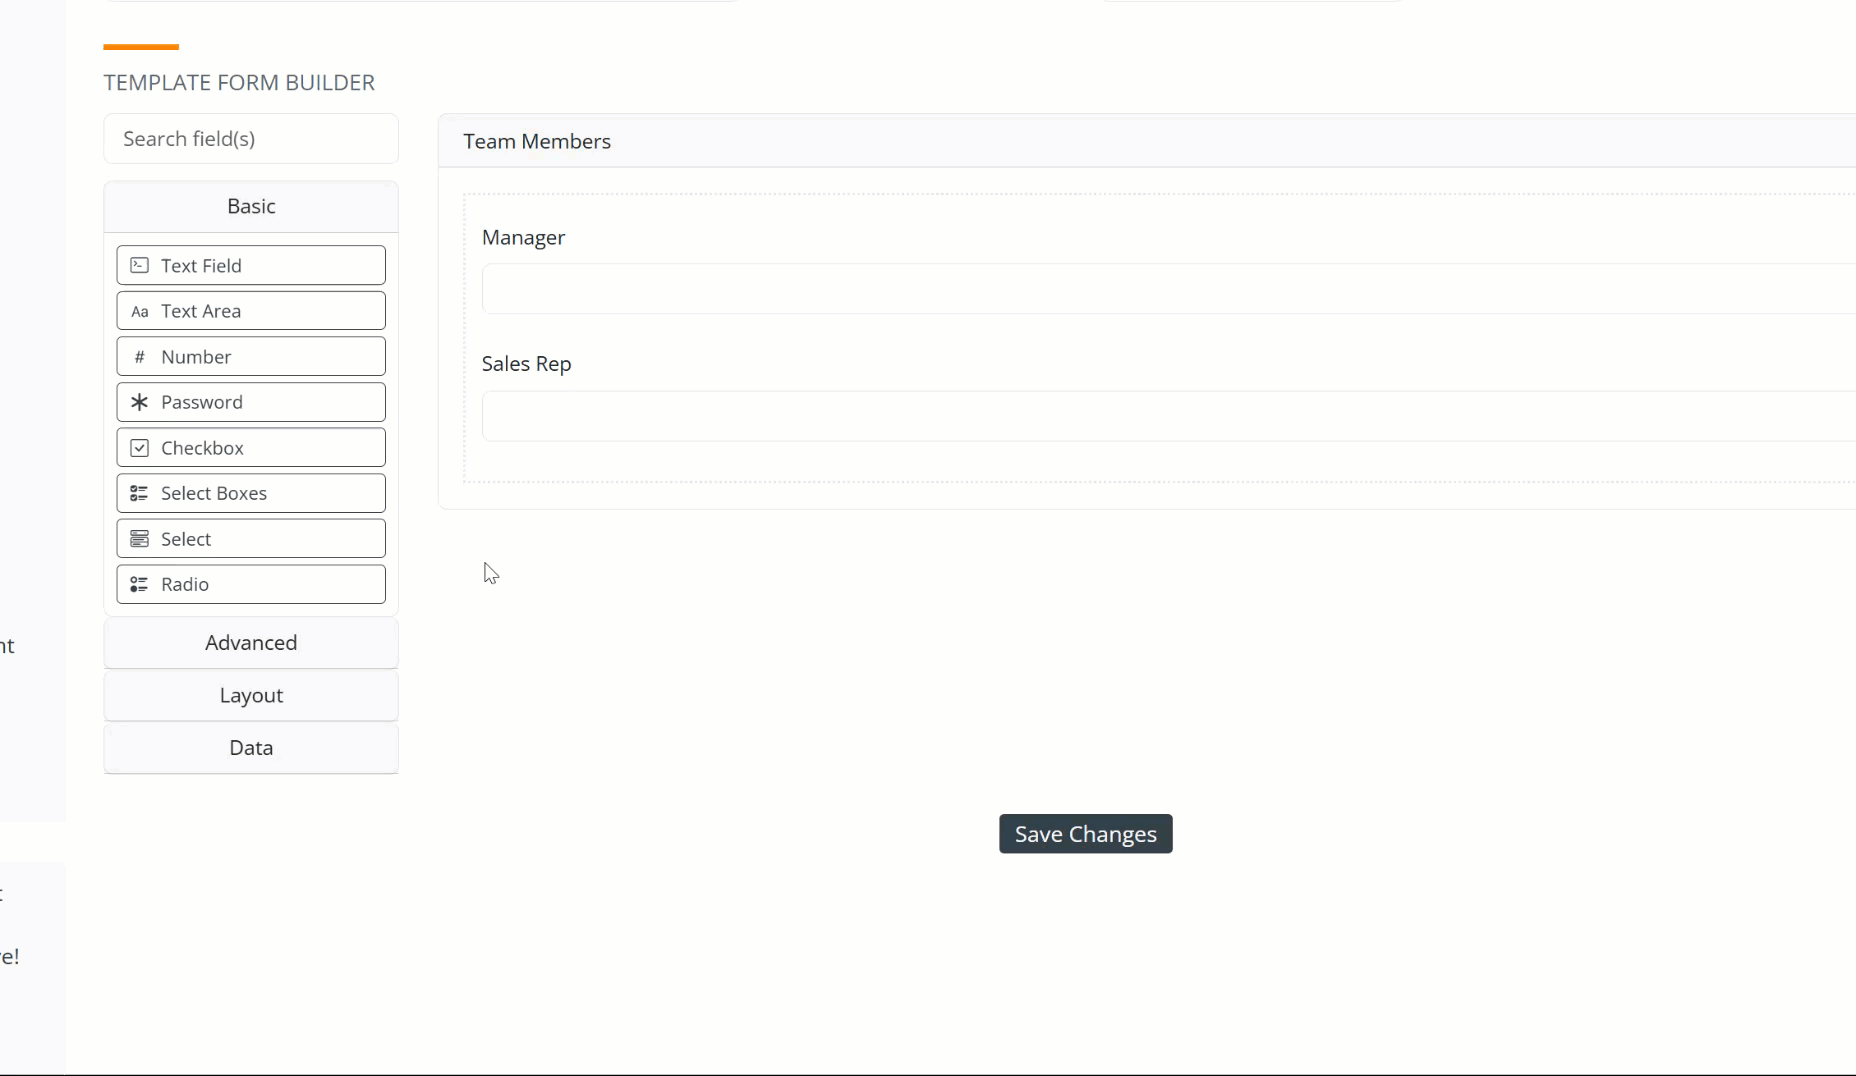
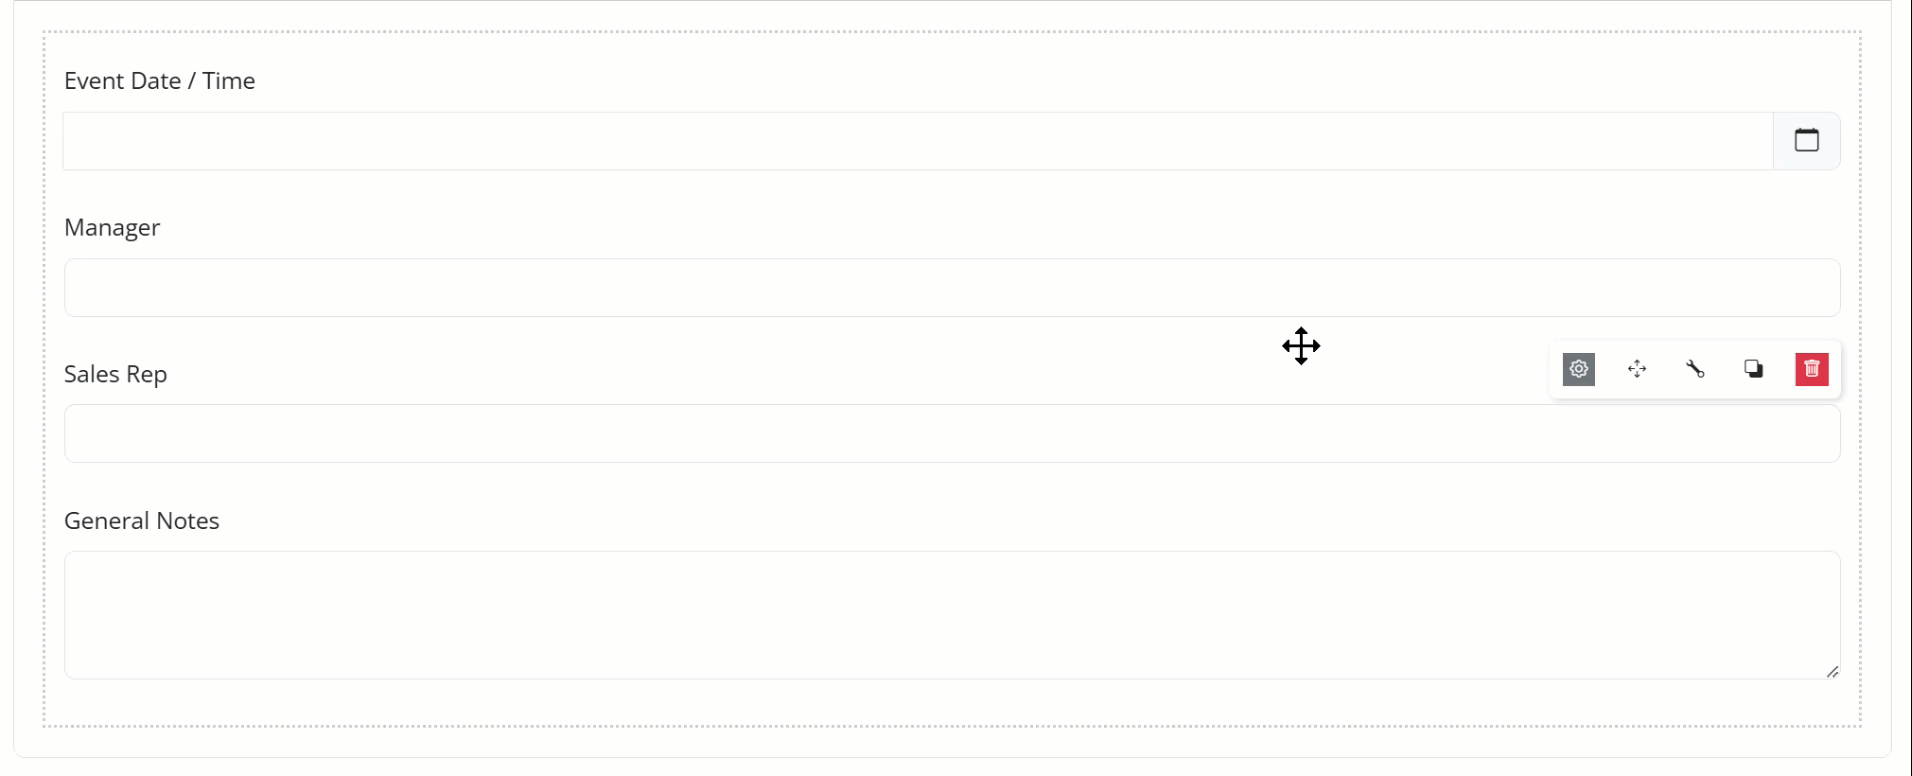
The following animation shows us moving the "Sales Rep" text field above the "Manager" text field.
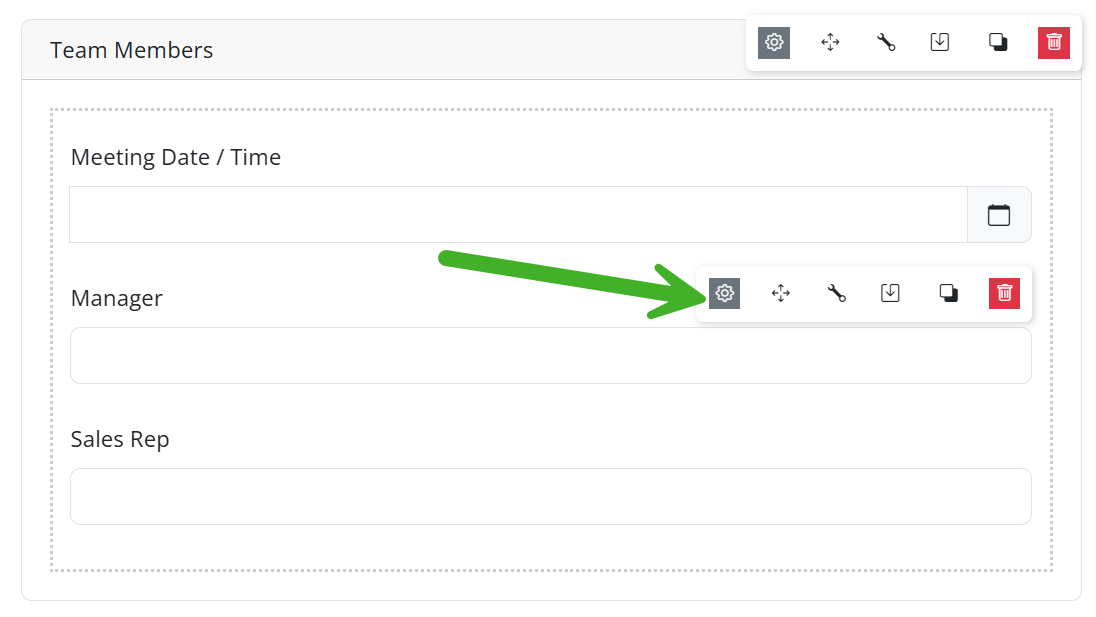
Editing a Component
To edit an existing component, you will need to open the component details
- Hover over the component you want to edit
- The Tool menu will appear at the top right of the component
- Click on the gear icon
 in the tool menu
 - The component detail interface will open
- Make any desired changes
- Click the "Save" button
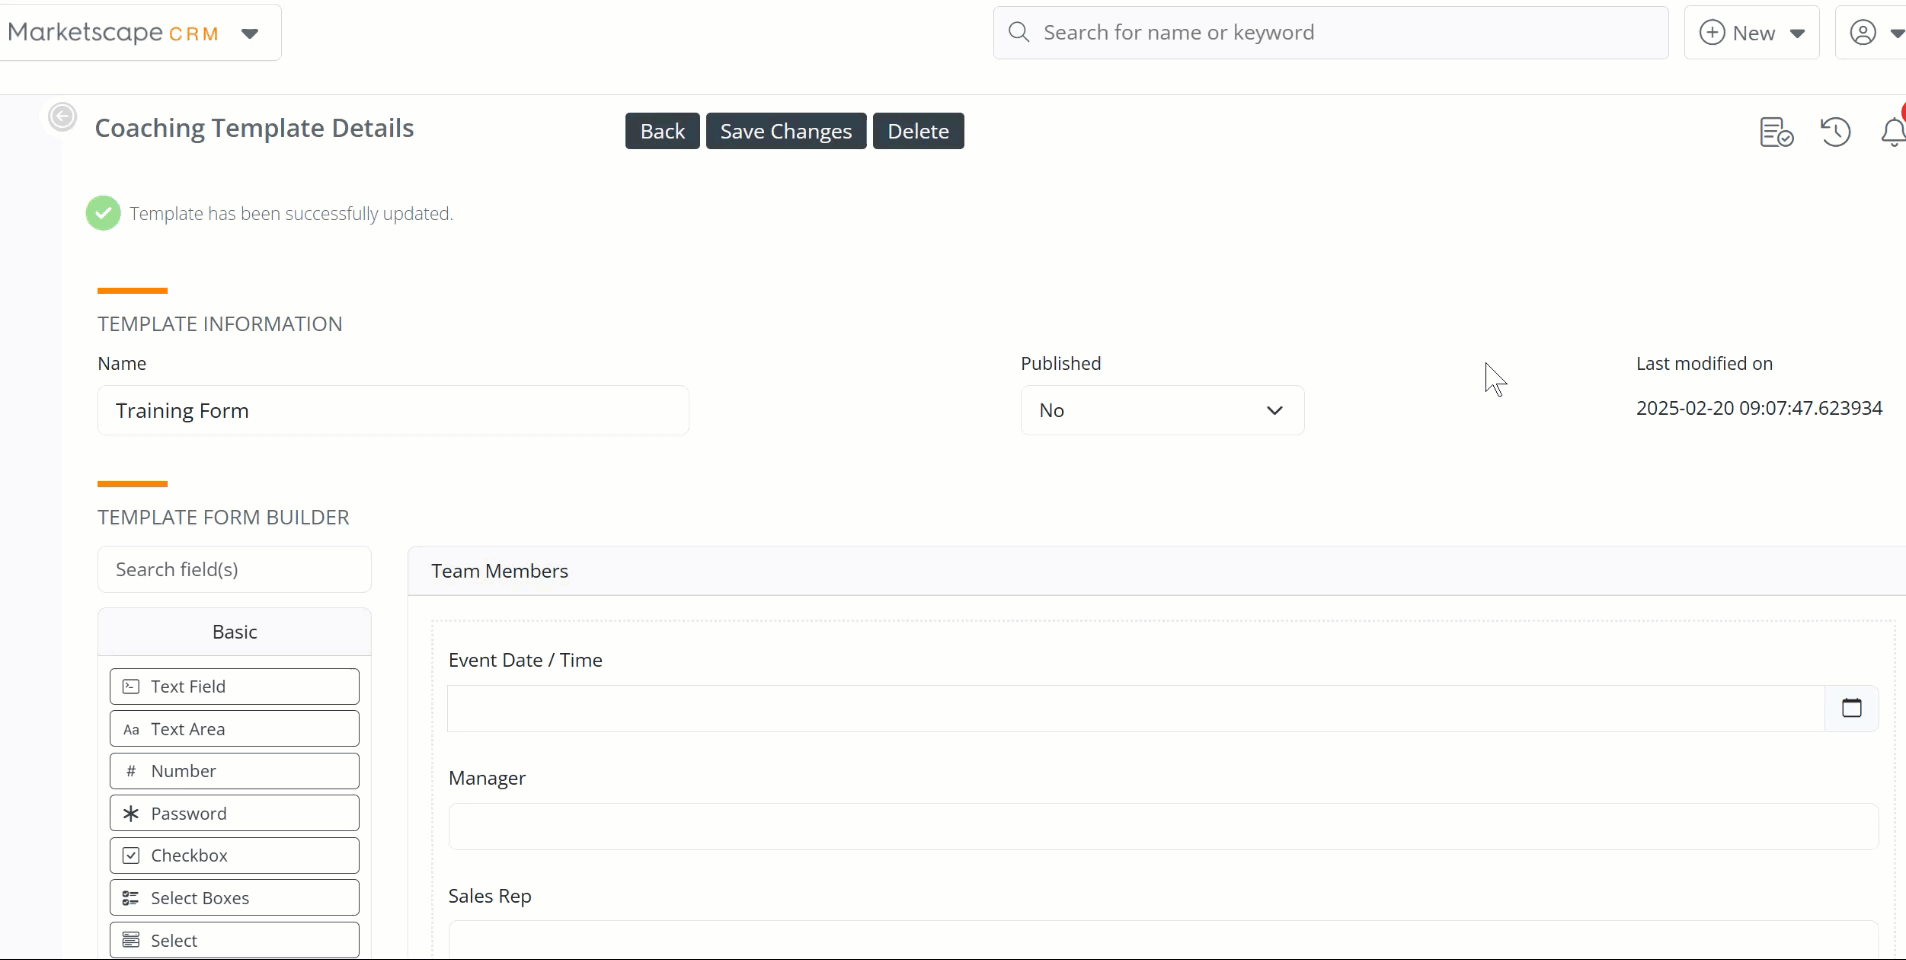
The following animation shows us making a simple edit to the Date/Time component.
Removing a component
To edit an existing component, you will need to open the component details
- Hover over the component you want to edit
- The Tool menu will appear at the top right of the component
- Click on the trash can icon
 in the tool menu
 - The component will be deleted immediately
![]() Be sure - clicking the trash can icon deletes the component without confirming your action.
Be sure - clicking the trash can icon deletes the component without confirming your action.
The following animation shows us deleting the "General Notes" text area component.
Advanced Usage of the Form Builder
If you open the form builder, you will immediately notice that there are dozens of components that are not described in this article. Moreover, the component details include scores of additional settings. Here are some tips.
- For most forms, using the basic components with default settings will be all you need. Those basic components are explained above.
- Experiment - Since you can't break anything, or do anything that can't be undone, feel free to drag, drop, make changes, and see how different components work.
- If all else fails, send an email to our support team at Support@TrellaHealth.com. We can figure out an answer, and who knows, maybe we'll add the explanation here.
Copying a component
If you create a component that you want to use over and over, it is easy to copy and paste that component.
In the example below, the "Rating" component is a dropdown that allows us to evaluate on a scale from 1 to five.
Here are the steps to copy and paste a component
- Hover over the component so that the Tools menu opens -
- Click on the copy icon
 - the component is now copied
 - Move the cursor to hover over a component above where you want to place the copied component. The Tools menu will have another option.
- Click on the paste icon
 . The copied component will be placed on your form.
The following animation shows us copying and pasting the Rating "Select" component
Sections and Headers
To organize your form into separate, identifiable sections, you will use the "Panel" and "Content" components.
- A "Panel" component create a section where you can add any number of other components The Panel requires a Label name. In the example below, we called our panel, "Rep Evaluation."
- A "Content" component is a divider that contains text to identify the components below. In our example our content component says, "How well did the rep prepare for the visit?"
- As we proceeded with the form, we would put a rating component under the question, along with a text area component for evaluation notes.
- Then we would add another content component for the next question, and so on!
Here are the steps for creating a section.
- Click on the "Layout" button to open the Layout collection of components.
- Drag a "Panel" component onto the form
- Type in a Label name
- Click the "Save" button
- Drag a content component onto the panel you just created
- Type your content into the empty field at the top of the component details page
- Click the "Save" button
The following animation shows us adding a "Panel" component and a "Content" component
![]() Although you can see how easy it is to build a form by dragging components onto your form, it is also clear how important it is to do some careful planning before you start building your form.
Although you can see how easy it is to build a form by dragging components onto your form, it is also clear how important it is to do some careful planning before you start building your form.
Restricting Editing
You can specify who is able to enter data into a specific field. This will make a field in the form unavailable to anyone without that permission.
|
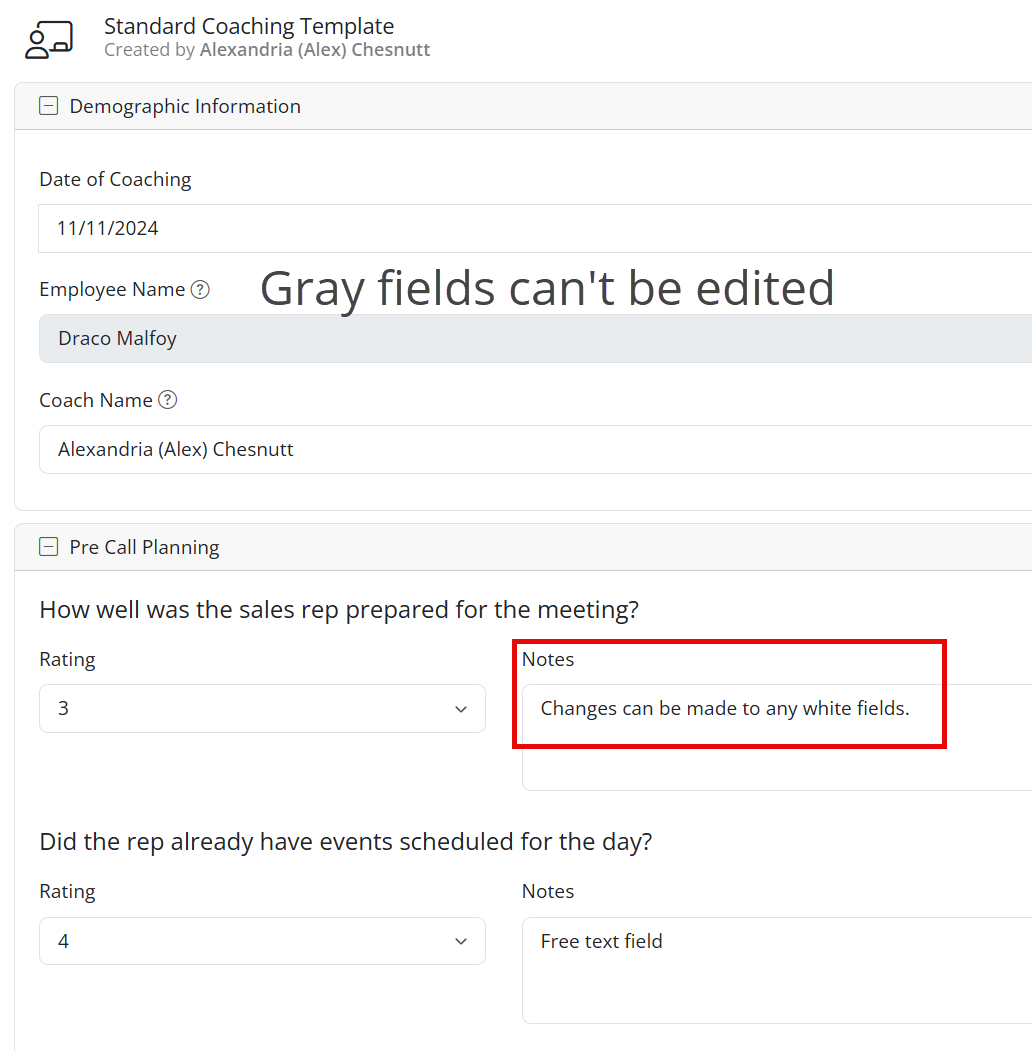
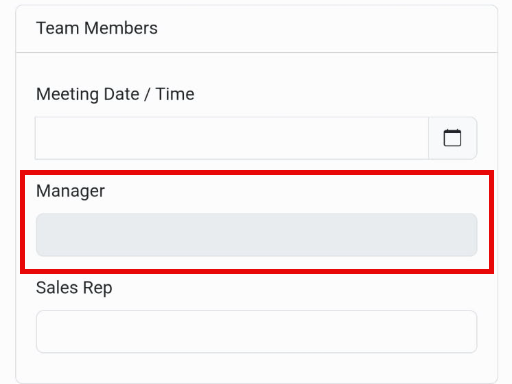
In the image to the right we show a completed form as seen by a sales rep. We have set the text field component so that only the manager can enter their name in that field. Any field that is grayed out can't be edited. |
 |
|
To restrict a field, follow these steps:
|
 |
By setting the checkbox for "Coach," the sales rep is restricted from that component.
|
 |
How to make a component required
To make a component required, follow these steps:
- Hover over the component so that the Tools menu opens -
- Click on the Gear icon to open the component details interface
- Click on the "Validation" tab at the top
![]()
- Under the "Validation" tab, click on the "Required" checkbox
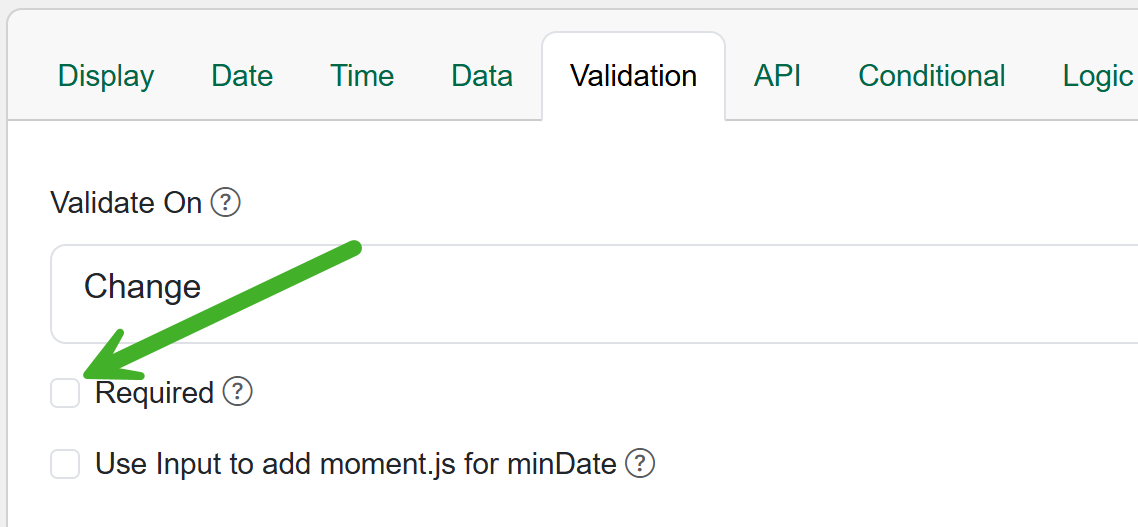
The following animation shows us making the "Date/Time" component a required field.

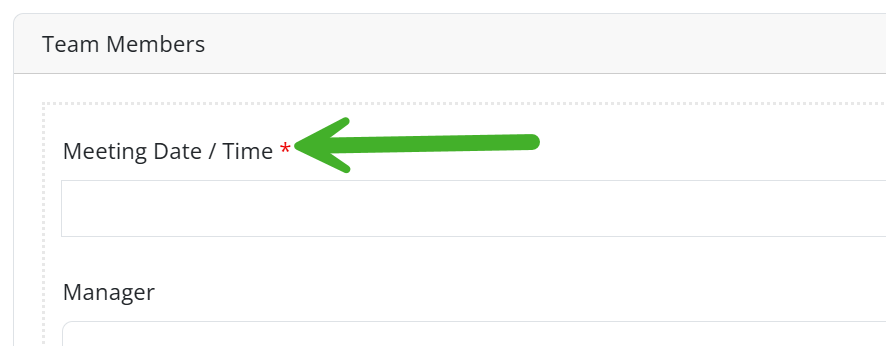
![]() Once you make a component required, the label is marked with an asterisk to identify that it is required.
Once you make a component required, the label is marked with an asterisk to identify that it is required.
Adding Signatures
The signature component is available in the "Advanced" collection.
- Drag the "Signature" component option to the form
- Specify the Label name
- Click the "Save" button
The following animation shows us adding a signature to our form.
Questions and Answers
![]() How can I export the content of a coaching session?
How can I export the content of a coaching session?
You can export a coaching session as a .PDF file from Trella CRM for web.
Refer to the image below for instructions on how to export a coaching session.
|
|
|
This will display a list of all coaching session visible to you
![]() Click on the "View" link to the left of the coaching session you want to export.
Click on the "View" link to the left of the coaching session you want to export.
The coaching session will open showing all of the details.
![]() Click the Export icon
Click the Export icon ![]() at the top right of the page.
at the top right of the page.
The .PDF file will be automatically downloaded.
![]() What will I be able to see and do with coaching?
What will I be able to see and do with coaching?
Like most features in Trella CRM, what you will be able to see and do will depend on your assigned Role and the permissions attached to your account.
Role |
Which Sessions on the Coaching page? |
What Tools can I use? |
| Admin | An account administrator will be able to see all coaching sessions for all sales managers and sales reps |
An account administrator is able to:
|
| Sales Manager | A sales manager will be able to see sessions for all of their sales reps. Another way of looking at it, as sales manager will see any session they have created. |
A sales manager can:
|
| Sales Rep | A sales rep will see their own sessions |
A sales rep will be able to:
|